1. Introduction
Welcome to the Chesstempo User Guide. This document is designed to give instructions on all aspects of the Chesstempo site. Some of the features described in this guide are only available to Premium members of the site. To see more information on which membership levels have access to a particular feature, please see the Membership Description Page.
1.1. The Chesstempo Board
The Chesstempo chess board is central to many features. Below is a summary of features common to all boards used on the site.
1.1.1. Piece Movement
There are two methods of piece movement available, drag and drop and click and click. By default both are available and you can freely alternate between them.
- Drag and Drop
-
Drag and Drop piece movement works by clicking on the piece you want to move, keeping the mouse button down, and moving the piece to its destination, before releasing the mouse button. If you change your mind during piece movement, you can return the piece to its start position and release it there (no touch-move on Chesstempo :-) ). If you are uncertain where the piece started, and want to cancel the move, then drop the piece outside of the board boundaries and the piece will snap back to its original location.
- Click and Click
-
Click and Click piece movement works using two separate clicks to select the piece to move and its destination square. If a piece has been selected, it can be deselected by either clicking again on the piece, or clicking on a different piece of the same colour (which will then select the second piece).
1.1.2. Navigation Buttons
The navigation buttons allow you to move through the available moves on the board. The following navigation buttons are available:
- Jump to Start
-
Jump to the start of the move list, this sets up the board in the position before the first move has been played. For tactic and endgame boards, this also animates the opponent "pre-move", that sets up the position at the start of the problem.
- Back
-
Go back one move. Also available with Left
- Forward
-
Go forward one move. Also available with Right
- Jump to End
-
Go to end of move list, this brings you to the position AFTER the last move was played.
- Play
-
Auto play the current moves , starting with the next move from the current position. Unless the stop button is clicked, play will continue until the end of the move list (or variation) is reached.
- Stop
-
Stop auto playing moves.
1.1.3. Board actions menu
This is the blue circular menu shown under the move list.
The options available are:
- Board settings
-
Launch the board and move list settings panel.
- Play against computer
-
Launch a play against computer window using the current position as the start position.
- Toggle fullscreen
-
Toggle between full-screen and non-fullscreen modes
- Toggle autoplay
-
Auto play moves in the move list, select again to stop any auto-playing currently in progress.
- Rotate board
-
Flip the board orientation (also via r).
- Annotate
-
Bring up the annotation window, which allows you to add comments and graphical annontations, and manipulate any side variations you have entered.
- Show PGN
-
Shows the PGN of the current game, and allows you to download the PGN to your own computer.
- Explore in DB
-
Go to the database page where you can view the current game, and use the opening explorer, and compare to other games played with similar lines. The chess database offers many options for examing your game in the context of other database games, and in controlling how the opening explorer works. Please see the Chess Database for more details
1.1.4. Board Settings
To change board settings click on the blue rotary menu beneath the move list (or on the old site the button in the top left corner of the board). Unlike user settings in the preferences panel, the settings here are stored in your browser rather than on the server, this means you can have different settings on different machines, for example, a larger board size on your desktop machine compared to your mobile device.
- Board Size
-
This option allows you to select the size of the board in pixel units.
NOTE: This option is only available if the board resize handles on the edge of the board have been disabled, as that is the default method for board size selection. The handles are disabled for compatibility reasons on some touch devices.
- Piece Type
-
The style of image used for pieces.
- Board Style
-
The colour or texture used for the board squares.
- Icon Style
-
The style of the icons used for navigation and other board related actions.
- Icon Size
-
The size of the board icons such as navigation and action buttons.
- Coordinates Size
-
The size of the border around the board used to display the board co-ordinates.
- Move List Style
-
The style used to display the moves. Indented style displays main line moves one after another, and indents to a new line for a new variation. Two Column style presents each white and black move on a separate line in a two-column format.
- Highlight Move
-
Moves can be highlighted with either arrows or by colouring the source and destination squares. Both methods can be used, and highlighting can be turned off by disabling both methods of highlighting. The highlighting option applies to both the last move, and to pre-move indication for the board that have pre-move enabled.
- Board Sounds
-
This option determines if sounds will be played on this board. Sounds include piece movement sound, but may include other types of audio notifications, depending on the context the board is being used in.
- Auto Promote
-
Allows you to turn auto-promote on, and choose the piece to auto-promote to (usually the Queen).
- Drag and Drop
-
Turn on drag and drop piece movement.
- Click and Click
-
Turn on/off click and click piece movement (i.e. the movement of the piece by clicking the source and then the destination square).
- Figurine Notation
-
The figurine notation option allows you to choose if you want move list notation to replace piece letters with small piece images for each piece.
- Force PNG Images
-
The board will attempt to use the SVG format for piece images on browsers than provide good SVG support, however some browsers may perform better if PNG piece images are used. This option allows you to force the use of PNG images on a browser that would otherwise choose SVG pieces.
- Move List Font Size
-
The size of the font used in the move list.
- Autoplay speed
-
The delay between moves if the play moves button is clicked.
- Piece Movement Speed
-
The speed of the piece animations.
- Confirm Moves
-
Turns move confirmation on or off. The move confirmation option allow you to confirm each move before it is sent to the server.
1.2. Other Buttons
- Launch Analysis Board
-
Launch analysis board using the current board position as the start position, and the following moves from the current position as the initial analysis move list. If you want all the board moves to be loaded into the analysis board then use the Jump to Start button before clicking the launch analysis board button. See the Analysis Board section of the manual for more details.
- Copy FEN
-
The Copy FEN button allows you to view and copy the FEN description of the current position, which can then be pasted into other applications, or other parts of the Chesstempo site that accept FEN strings as input. The dialog which shows the FEN, will also show a 'copy to comment' button, it is relevant to the context. The 'copy to comment' button allows you to create a static image of the current board position in a comment.
NOTE: FEN strings are a format used in most chess software as a shortcut for describing a particular position in a game. It holds information on the piece configuration, move number, castling status, colour to move, and information required to process en-passant captures and adjudicate the 50 move rule. You don’t need to understand the actual format to make use of the notation, as most chess software will have a way of accepting FEN strings as input, and producing them as output. A common use of FEN strings is to setup a position you have seen on Chesstempo in your own chess engine, in order to do further analysis of the position on your own computer.
1.3. Play Position vs Computer Button
Play Position vs Computer The Play Position vs Computer Button launches the play versus computer feature with the current board position set as the starting position.
2. Chesstempo Books
The Chesstempo book feature allows you to purchase and create books that can be read online, and integrate directly into Chesstempo training tools.
2.1. Buying books
Books can be purchased at the buy chess books page. Books can be purchased by both free and paying users. Some books include training features that would normally require premium membership such as spaced repetition. While training with a purchased book, such features are provided free of charge, and do not require an active membership to make use of. However premium membership does give access to a wider range of features while using a purchased book, such as cloud engine analysis. Creating custom sets beyond the default training sets provided with the book will also require a premium membership, and some advanced stats output may also require premium membership. However, the books are designed to be very usable without premium membership, and premium membership should be seen as a useful, but strictly optional supplement to the book.
2.2. Reading books
Each book purchase comes with a browseable version of the book that can be read in a similar manner to a physical paper version. The book reader includes a convenient analysis board that can be used to view the position at any point in a variation, and allow you to easily browse through the variations without having to use an external board to keep track of the position. Arbitrary moves can be made on the viewing board if side lines not included in the book material need to be investigated. Premium members also have access to cloud engines to request analysis in any position.
See the your books page to see a list of your currently owned books (including those you have created yourself).
The left edge of the reading view shows a selection of icons and buttons that provide actions useful while reading. Some of these actions are specific to the type of content available in each book. Available actions include:
- Toggle right panel
-
Hide (or Show) the right analysis board panel.
- Toggle reading/solving mode
-
Switch between reading and solving mode. In reading mode , some of the interaction buttons attached to positions in the book such as 'Solve', 'Study', 'Show' etc are hidden. For problems the solution moves will be shown and the 'Moves' button which is normally required to show the solution moves is hidden.
- Import repertoire into opening trainer
-
For opening books, the book opening repertoire will be automatically loaded into the opening trainer when you first purchase the book. However if you remove the book repertoire from the trainer, or have deleted parts of the repertoire and want to load the full repertoire again, you can use this action at any time.
- Contents browser
-
Navigate the book by chapter and section.
- Problem browser
-
Navigate the book by chess problems.
- Game browser
-
Navigate the book by chess game.
- Variation browser
-
Navigate the book by opening variations.
- Settings
-
Change book specific settings such as board orientation and appearance. See the settings section of more details.
- Train
-
For a book with chess problems, this enters training mode with the currently selected training set.
- Set
-
For books with problems, this lets you select the current training set.
- Study
-
Enter study mode, which provides a more board focused view of each part of the book, and allows you to solve problems in a mode that is more interactive than the pure training/solving views. See the study mode section of more details.
- Drill
-
Jump to the opening trainer with the repertoire from the current book selected as the current repertoire.
- GTM
-
Launch the Guess the Move (GTM) feature , showing a list of the games from the current book that are available for training with the GTM feature.
The chess content available in the book may also have associated action buttons:
-
Chess games will have a 'Study' button allowing you to jump into study mode with the game selection. If the game is also made available for use in Guess the Move mode, there will be a 'Play' button that launches GTM mode with the current game selected.
-
Opening variations have a per variation 'Drill' button that will launch the opening trainer with the variation selected for revision. Note when launched in this manner 'Review in order' training mode will be selected so that you can traverse the entire variation. If you normally use spaced repetition for training , click on 'train branch' after the position has loaded and that will use your default training method with the variation position selected.
-
Chess problems have three buttons displayed: 'Moves', 'Solve' and 'Study'. 'Moves' will toggle the visibility of the solution moves, 'Solve' will launch the solving board for the selected problem, and 'Study' will launch the more interactive Study mode solving view for the problem. Attempts done in 'Solve' and 'Study' views are not treated as part of your training sets, so do not impact your solving set rating, or the current position in your training set if you are using an ordered solving set.
2.2.1. Settings
Book specific settings are available by clicking on the cog icon on the left side of the book reading or editing view.
-
Book Orientation: This setting allows the user to control the orientation of board images shown in the book reading and editing view, as well as the orientation of the board used to visualise move lists. Comment boards embedded in any move lists will also be oriented in the manner specified. The default value is 'Auto - Player on bottom' which will automatically choose the player shown at the bottom by context, for example repertoire moves will have the repertoire colour at the bottom, problems will have the solver at the moment and guess the move games from game collections will have the player you play as shown at the bottom. White or Black will always show that colour on the bottom, so choosing "White" will provide an experience similar to reading the book in its original form. 'Auto - opponent on bottom' is similar to the default auto option, but will flip the board to have the opponent on the bottom, so for example a problem with the solving side playing the white pieces would have the black pieces on the bottom with this option selected.
-
Show instructional material in solving mode: Some books may have problem based material that is included as instructional, as opposed to exercises. The author intends for this material to provide instructional background to any exercises the book may have. Therefore by default this material has the full move list visible by default. If you’d like to have instructional material hide the move list and provide a 'solve' button, then enable this option. Note that instructional material is included in the default training problem settings (but excluded from the 'exercise only' sets). If you toggle reading mode on, it will also make the instructional move lists visible, and hide the solve button, irrespective of the values for this setting.
-
Try again hint options: For moves that have been marked to show a hint arrow giving away the solution when played (for example moves that the engine evaluates as better than the book solution move) you can change the way the hint is displayed. Instead of the default 'green arrow' automatically showing the solution move, you can also choose to make the arrow optional, requiring a click on a 'show' button to reveal the book solution move, allowing you to keep trying , and only using the hint at your own discretion. The other two options allow you to choose to have the solution move played either automatically or optionally via a button click instead of simply showing the move via an arrow.
-
Click on the 'Board Settings' button to change the look of the boards and move lists used in reading mode.
2.3. Training using book content
There are several ways a book can be used for training:
-
Simply browsing the book in reading mode and looking through the lines and positions.
-
For content structured as problems:
-
Using study mode, and solving in interactive mode where any book comments are incrementally displayed as you progress through a training position. Click on the 'Study' button on a problem to inter study mode with the problem selected. Study mode attempts are unrated.
-
Using solving mode directly from book reading mode via the 'Solve' button. This is similar to study mode, but without interactive commentary and is more like the usual Chesstempo solving experience. Attempts done in this manner are also unrated attempts.
-
Using pre-made custom sets. These include custom sets for solving via spaced repetition, or via looping through the book problems in order, and starting again after reaching the end. These pre-made sets are available to all book purchasers, irrespective of membership level. To train using one of these sets, click the 'Train' button to the left of the book reading page. The book reading page has a set change button which allows you to choose between the available training sets. You can also train using these sets by going directly to the Chesstempo tactics training page, and using the change set button to select a book set there. If you’ve purchased a book with training problems, you’ll see a "Books" folder in the set change selector tree, under which you should find a sub-folder for your book which contains any pre-made problem sets. Problems done from the Train button or by selecting a book problem set on the tactics training page will be rated, and a per-problem set rating will be tracked.
-
For premium members, creation of your own custom sets using the powerful Chesstempo custom problem set criteria such as rating range, or your previous mistake history is also possible. Custom sets can be created to collect content from multiple problem books, and train them together under the one set.
-
-
For opening books
-
Training within the opening training tool. Book repertoires are loaded automatically into the trainer on book purchase.
-
Reading through the repertoire lines in reading mode or study mode. Study mode does not provide an interactive training mode for opening material like it does for problem material. You can use the opening trainer for that type of training.
-
-
For game collection books
-
Game collection books will usually have the games made available for training within the guess the move tool. If GTM is available for a game, you’ll find a 'Play' button at the top of the game in the reading view that will launch the game in the GTM view. GTM games may also appear in books that are not primarily Game collections, for example a tactics book may have some annotated example games which may also have GTM capability enabled. Reference games from opening books may also include game training via GTM.
-
Reading through via book reading mode or study mode. You can browse the moves of a game directly in the reading view by clicking on a move in the game, and using the keyboard arrows or navigation arrows on the right panel analysis board to move through the game. If you’d like a view with a larger board, you can also view the game in study mode using the 'study' button.
-
2.3.1. Problem Training view
While solving a book problem, you are shown an interface similar to the tactics solving interface. Attempt to find the best moves, and play them out on the board. If you are solving in a rated mode, you’ll be given a rating adjustment after each attempt. Book problem ratings will not impact other Chesstempo solving ratings such as Standard and Mixed, instead, the rating is specific to the book problem set you are currently solving under.
By default, the solution in book based problems will show the book’s moves and commentary. If you’d like to see engine analysis that was performed on the problem positions, there is a computer icon below the move list that can be used to toggle the analysis viewing mode which shows the engine analysis for each move in the problem solution, with the top 5 alternative moves in each position. The analysis lines can help understand moves that the book author hasn’t written comments on. If the move you are interested in is not listed, you can launch the analysis board and investigate the line (with cloud engine analysis if your membership level allows).
2.4. Study mode
Study mode allows you to step through the content of the book concentrating on one piece of content at a time. The book is broken up into study modules, and one module is shown at a time. Modules may be pure text from a chapter introduction, or game material such as a full game or chess problem. The top right of the study view shows a study browser button on the left which lets you see a list of the available modules (chapters, sections, games, problems etc), and navigation buttons to move forwards and backwards within the study modules.
Study mode can be entered by either clicking the 'Study' button in the left column in the reading view, or by clicking on the 'Study' button attached to games or problems which will jump into study mode with that item selected as the current learning module. If you use the left column Study button , study mode will be started with the last module you visited loaded (or the start of the book if this is the first time using study mode on this book).
Chess games can be played through within the study view, or if the game is available as a Guess the Move game, you can click the 'play' button to launch the game in GTM mode. After playing through the game, you’ll be shown your moves and move assessment scores alongside the annotations of the game from the book, allowing you to see author commentary for many of the positions from the game.
Chess problem modules show the problem in interactive solving mode. In interactive mode comments from the author may be used as prompts during solving, and you are given a 'solution' button to show the solution move for the current position via board arrows. You can move the pieces to make your move, and if there was a comment to display connected with that position, you’ll have to click the next move button to play the next opponent move. No rating point adjustments are made for solving done in study interactive mode.
2.5. Creating books
Chesstempo provides a book creation and editing interface. There are three main uses for the book editor interface:
-
Coaches can create training material for their students that they can then assign to students, allowing them to read the book and train against the material.
-
Premium members can create their own training material for themselves, for example problem positions they may have previously extracted from their over the board games or games played on other servers can be imported as book problems, and trained against, allowing Chesstempo’s training UI to be used with arbitrary material.
-
Authors or publishers can also use the creation interface to create books for publication. Please email books@chesstempo.com if you’d like to become an official Chesstempo publisher.
To create a book, use the Chess Books → Create book menu action. Choose a title , a summary, description etc, and any appropriate advanced options. You can start a book from scratch, or import material from PGN. See the book editing section of the User Guide for details on how to edit a book after creation. For details on how PGN is treated, and methods of creating book specific PGN games for import, see the creating books from PGN section for further details.
2.5.1. Book Creation Advanced options
-
Opening colour: Set the default colour to be used for opening repertoire moves for the book.
-
Only allow browsing: If selected, the book will be for reading only and will not provide training.
-
Problems start with opponent move first: Used to dictate if book problem content starts with an opponent pre-move similar to Chesstempo problems, or the first move in each problem is the one to be played by the solver. The default setting is to start with the player to move first. This can also be overridden on a case by case basis when importing from PGN, see the documentation for the HasPreMove tag for more details.
-
Treat non-problem games as Guess The Move targets: When enabled, this option will set all games not identified as other material such as problems or reperotire moves to be enabled for Guess the move playing.
2.5.2. Creating books from PGN
If you have book material stored in PGN, such as a collection of problems or games, or an opening repertoire, you can create a book based on this material during the creation process. Our system will attempt to guess the structure from the type of book you have specified, and by analysing the tags in the PGN. We provide some of our own custom tags to allow better control over the imported PGN, and these are discussed in the next section. If we can’t guess the type of material in a PGN game, it will be assumed to be related to the type of book selected during creation. So a PGN game in a tactics book for example, will be assumed to be a tactics problem.
See the PGN Import Specification section of the User Guide for details on constructing PGN files suitable for import as books.
2.6. Editing books
The book editor allows you to create chapters, headings, move list variation and diagrams, basically all the required contents of a chess book.
The insert menu at the top of the book editor view allows you to insert several types of chess and non-chess content:
-
Move list - an inline move list, of the type that shows move within a paragraph.
-
Board diagram - a simple diagram showing only a single board position, with no moves attached.
-
Chess problem group - a section to hold a number of chess problems in a structure which formats all the problems as a group.
-
Chess problem - a move list describing a Chess problem that can be solved within the solving interface. After creation, hover over the game to see a settings icon in the top right of the game that you can use to modify the game settings.
-
Chess game - a full game with game header, used for games in game collections, or model games within tactics or opening training books for example. After creation, hover over the game to see a settings icon in the top right of the game that you can use to modify the game settings.
-
Repertoire moves - a set of moves defining a variation in a repertoire inside an opening book.
-
Image - Insert an image by loading an image from your local drive. Be cautious with image file sizes, as many large images will slow down loading of the book.
-
Chapter - Create a new chapter. The new chapter will be inserted at the end of the chapter holding the edit cursor.
-
Newline - You can usually enter a newline by simply using the return key but some editor elements may require an explicit new line insertion using this option.
-
Horizontal rule
|
|
We currently consider the book editor to be an early test release, and we are still ironing out some remaining issues with the editor (especially for browsers other than Chrome). If you’d like to create books for your students, yourself, or for publishing then editing and importing from PGN currently provides the most stable pathway for importing books into the system. |
2.6.1. Editing move lists
Move lists are the basic building block of chess related material. They can be used as stand-alone objects used to present a sequence of moves or can be embedded inside book content such as chess problems or opening line variation definitions.
You can create a move list via the insert menu , by copy/pasting , or dragging in a file holding PGN into the editor. A move list can be edited by dragging pieces on the board viewer on the right. While a move list is selected, a list of key-bindings that allow editing operations such as deleting and promoting lines can be viewed by using the '?' key (press the '?' key again to hide the keyboard help panel).
Arrows and square colour highlighting can be added by right click and drag to draw an arrow or just right click to highlight a square. Different colours can be selected by using combinations of the Ctrl and Shift key change. Right click without keys draws Green, Ctrl-Right-Click = Yellow, Shift-Right-Click = Red and Ctrl-Shift-Right-Click gives Blue. To save your visual annotations, use the 's' key to save them to the move before moving on to the next move.
Comments and annotation glyphs such as '!', '?' etc can be added using the comment editor under the board viewer.
Note that for some move list types, annotations may have special importance. For example in a chess problem, a move marked with '!' , '!!' or '!?' will be deemed to be an alternative good move, and will be given a 'try again' if it is marked on a variation, and not the main line move.
Some types of move lists will have a settings icon when you hover over the board connected with the move list. If you click on the icon you can edit details for the move list, for example on chess problems you can change details such as whether the chess problem has a pre-move at the start for the opponent move.
2.6.2. Engine analysis
Premium members have access to cloud engine analysis while editing a book, clicking on lines from the analysis will insert them into the currently selected move list.
2.6.3. Publishing and sharing books
The book editor has a 'Publish' menu that provides actions required to get books ready to be shared with students. Actions are:
-
Show in viewer: Launch a reader view of the edited book in a separate window.
-
Edit settings: Edit book settings that can’t be otherwise changed directly within the edited book content.
-
Give book: If you are a coach with students, you can use this menu item to give your book to one of your students, which will allow them to read it, and train on the content contained within the book.
-
Export to PGN: Exports the book to PGN format. Useful if you want to do your editing in a separate application , and then re-import the results. Note that currently some book content may not be fully preserved. All move lists will be preserved, but some formatting, such as font size changes may need to be redone after re-importing PGN exported in this manner.
-
Re-import: Allows you to rebuild the book from external PGN again. If you are doing most of your editing in an external PGN file, then re-import is the best way to update the book, and view your progress. It is better to re-import updates, rather than create a new book each time from your edited PGN.
|
|
Re-importing will completely erase the current book material, and replace it with the material found in the imported PGN. You may be able to recover by using the undo buttons at the top of the editor, but undo and redo functionality are still under active development. If you’d like to import a PGN fragment into an existing book without erasing existing content. Then copy the PGN into your clipboard, and paste the PGN content into the appropriate position in your PGN. |
-
Create Chesstempo problems: For problem based books, this will import all the problems in the book into the Chesstempo problem set. You can edit the book without performing this step, and solving via the reading interface 'Solve' button will be available. However to use custom sets or the train button with the book, you will need to complete this step. If you are importing problems for your own use - or the use of your students - you should be aware that there is a finite number of problems that can be loaded, and once loaded problems can be disabled, but not removed (to make sure all previous attempts still have problems attached when browsing your problem history). So you should try to avoid loading duplicate problems, and make sure you load problems you intend to use to avoid wasting your problem quota.
-
Computer Check: Analyse all problems in problem based books. This will provide a post-analysis quality report, highlighting potential problems, and also provide engine analysis used to display alongside problems in the solving interface. You can check the entire book, or just the currently selected problem. Issues found by the analysis are classified as either errors or warnings. Warnings are items where the engine found a better move than the suggested move in the solution list, but not so much better that the solution move would be considered a blunder. Errors are issued for solution moves where the engine found a much better move than the book’s suggested move. Warnings (and even Errors) may not be critical problems. It is possible they are easier , more human like wins, but win less material, or miss a mate, but should be investigated to make sure you have not missed something in your solution. It is important to run this process before publication or sharing with students, as it will also generate the data used for 'try again' responses for alternative lines, avoiding failing people for moves that may still be winning. Keep in mind that computers are not infallible, and it is possible to find positions the computer may get wrong, for example drawn positions where the engine gives a winning evaluation, but in reality no progress is possible. If you believe you have such positions in your material, it is safe to ignore related warnings or errors.
-
Sync Guess the Move Games: This option handles the loading of book games as GTM games. GTM requires a lengthy analysis to provide the data required for the GTM scoring system. This menu option adds any games marked for GTM usage that are not yet processed to the analysis queue, and will also refresh analysis for games where moves may have changed since they were last processed. Like problem import, GTM import and syncing also has a limited quota, so again, be sure you plan to use the games before loading.
-
Update book stats: This option refreshes the statistics calculated for your book, such as number of problems, number of moves, word counts etc.
2.7. PGN Import Specification
The following section describes the PGN tags and structures that Chesstempo supports when converting an imported PGN file to a book structure. The importer will do its best to deal with any PGN in a sensible manner, but structuring your PGN to match some of the explicitly supported Chesstempo book tags will usually provide a better initial import, and reduce the amount of subsequent editing required.
2.7.1. General conventions
PGN tag names specified below are all case sensitive unless otherwise noted, so for example if a tag specifies
[Author "Author name"]
then [author "Author name"] will not work, as the importer will be expecting [Author not [author
Most PGN tag values that can contain free text will support formatting using standard Markdown formatting rules.
Comments within PGN games also support Markdown formatting.
A good summary of basic Markdown syntax can be found here:
Carriage returns are not legal values in a PGN tag value so if you need carriage returns in a value field, you can substitute a carriage return with '\n'. Note that PGN comments can contain carriage returns, so do not need \n to inject new line information.
For example
[Summary "A tag with two lines, this is the first line.\nAnd this is the second line."]
2.7.2. Editing PGN with custom tags and NAGs
Many popular PGN editors may ignore, truncate or modify content with custom tags, despite being legal PGN. The same is true for Numerical Annotation Glyphs (NAGs) - the method the PGN standard uses for handling per move annotations. You may be able to find a PGN editor that preserves custom Tags and NAGs, but if not, you may be better off using a text editor to edit the PGN directly. Any text editor will do, but some advanced editors provide plugins that help make editing PGN easier, these include Emacs, Vim, Sublime and Atom.
2.7.3. Book details initial game
The first game in a PGN file can be used to provide high level details on the book, such as authors, publish date and book type. An example would be:
[White "ChessTempoBook"]
[Black "BOOK_TITLE"]
[Author "Author Name"]
[Description "Detailed description of book."]
[Summary "Summary description of book."]
[BookType "game_collection"]
[PublicationDate "2012.11.22"]

*
The White tag with value "ChessTempoBook" is compulsory if you want to use a book details game. The Black tag holds the title of the book, Author, Description, Summary and PublicationDate tags should be self explanatory. BookType is the primary type of this book. Supported values for BookType are : - tactics - openings - game_collection - strategy - endgames - mixed - other
BookType values are case sensitive so should be entered in lower case as shown in the list above. If your PGN includes generic PGN games that do not use all of the Chesstempo PGN import specification, the book type will be used to try to guess the type of material being described when no explicit tags mention the game content type. BookType will also be used to categorise the book to help users find books covering particular areas. If your book covers more than one area, you can use the mixed type, but it is probably best to use the type that characterises the majority of the material.
Some book types have extra tags available:
-
[OpeningColor "white|black|both"] : This tag specifies the colour of an opening repertoire book.
-
[AutoProblemGroup "true|false"] : This tag specifies if problems in a problem based book are to be automatically grouped. See the problem grouping section for more details.
As mentioned elsewhere, text fields such as Summary and Description can use Markdown format text to create formatting such as bold, headings, links or images. Multiple lines can be added to text in tags by using \n to mark a new line (literal newlines are not legal in the tag values).
2.7.4. PGN game structures for text representation
While much of a Chess book will be built from material describing moves and variations, and comments on those, a book will also usually require text only content. This section describes tags that can be used to explicitly mark text only content to be used in the book.
The first game element after the book details should be the TitlePage element. It holds any introductory text and images before the first chapter.
[White "TitlePage"]
[Black "Text for book title"]
{ 
Initial book text goes here.
} *
Note that images are encoded in base64 data URI format, and embedded using Markdown image format. Markdown format for images is: .
If you are not sure how to convert images to Data URI format , there are several sites online that provide a conversion service, for example: https://www.base64-image.de/ and https://onlineimagetools.com/convert-image-to-data-uri
The first image in TitlePage content will be used as the cover page for the book, and will be used as the base image to generate smaller thumbnails shown in the book interface. We recommend using webp as the image format, as it will usually provide the best quality vs file size tradeoff.
Alternatively, if you don’t want to mess around with base64 image encoding you can host your images externally , and the chesstempo PGN importer will convert them for you, which means you can use a standard image link such as:

inside a PGN comment.
Chapter
The Chapter is the top level book organisation structure, as well as grouping content into chapters, it also allows you to specify pure text blocks as introductory text.
Any PGN game where the White tag is set to "Chapter" will be treated as a chapter start. The title of the chapter will be stored in the "Black" tag of that game. An empty move list with an opening comment not attached to a move can be used to hold the opening text of a chapter. For example:
[White "Chapter"]
[Black "Introduction"]

{ This is the first paragraph of the introduction:
- A markdown bullet list first item
- Bullet list second item

This is the second paragraph and contains a numbered list:
1. first item
2. second item
3. etc

#### A sub heading in the chapter text using markdown format heading specification.

Another paragraph starts here. } *
If you’d like to break up your book into parts you can use the ChapterPart tag on a game to mark a chapter as a part heading for example:
[White "Chapter"]
[Black "Part 1"]
[ChapterPart "true"]

{ } *
This will create a chapter with heading "Part 1" that is styled to make it clear it is a high level part heading instead of a standard chapter heading.
Paragraph
Paragraphs are used to build the text elements of a book chapter, they can include chess diagrams or inline move lists, and there is further detail on how to achieve that in the later sections, but the primary role of a paragraph is to provide pure text content.
A PGN game holding a paragraph is created using the sole tag:
[White "Paragraph"]
And then an empty move list with a single starting comment holding the paragraph text.
Note that a Paragraph can actually hold multiple paragraphs by separating paragraphs with carriage returns.
For example a single paragraph game:
[White "Paragraph"]

 { In the next game we see a typical game of Karpov: }  *
and a 3 paragraph game, with one sentence paragraphs separated by carriage returns.
[White "Paragraph"]

 {
In this chatper we'll look at games from later in Karpov's career.

Karpov was still able to produce some stunning games during this period.

In these years, he produced many notable wins.

 }  *
Paragraphs can include markdown formatting to include Bullet lists, ordered lists, headings, block quotes and images. When exporting books back to PGN, we sometimes need to create games that hold these types of elements, but these are rarely needed in practice, as a paragraph with the appropriate markdown is sufficient, but for completeness, the following tags can also be used for non-game elements [BulletList "true"], [OrderedList "true"], [Heading "true"], [BlockQuote "true"], [ImageBlock "true"], [Image "true"]. Each of these has the same format as Paragraph games, but with the single game comment on the empty move list containing markdown text for the relevant tag.
Section
The Section tag can be used to break up chapters into smaller chunks. Note that sections are optional as it is possible to break up chapters using paragraphs with markdown headers to create section and sub-section headers if required, and indeed this may be simpler and more convenient. Section tags are included largely to support content that may already be using PGN games for section breakdown.
Any PGN game where the White tag is set to "Section" will be treated as a section start. The title of the section will be stored in the "Black" tag of that game. An empty move list with an opening comment not attached to a move can be used to hold the section text of a chapter. For example:
[White "Section"]
[Black "Conclusion"]

{ This is the first paragraph of the conclusion section:
- A markdown bullet list first item
- Bullet list second item
} *
The section can also be completely empty of moves or comments, with section content included in following paragraph blocks.
Alternatives structures
To facilitate easier import of book content authored in other tools, we also support some common conventions used in PGN exports from other tools.
Empty move list with chapter name in white field.
If a PGN game in an imported file does not match any other specific chesstempo tags, and has an empty move list and a value filled into the White tag, we assume the game is a chapter and any comments in the empty move list are text content for the chapter.
Fallback if no specific tags or conventions can be mapped onto a game
If we can’t guess the content of a PGN game from the tags or common conventions, we will make an assumption based on the type of book being imported, which can be specified in either the "BookType" of the first game where the first game holds the [White "ChessTempoBook"] tag marke, or in the create book panel when first importing the content into a book. That means a tactics book will assume unspecified PGN games will be treated as Chess problems, game collections books will treat unspecified PGN games as games to be imported as Guess the move targets and opening books will assume unknown PGN games are to be treated as Repertoire move holders.
2.7.5. PGN game structures for chess move material
As well as holding text content, PGN games can obviously hold descriptions of chess moves. These include full games, chess problems, and opening repertoire moves. There are a series of tags that further specify details for each type, and some tags that are specific to the particular type of chess content being held. The following sections cover these Tags.
ColorOnBottom
By default board images shown in the book and the orientation of the board viewing book move lists use the user setting for preferred orientation. If the orientation is auto (or auto-flipped) then boards will be oriented based on context, for example in a guess the move capable game orientation will be with the colour you play as at the bottom. For problems, the solving colour will be at the bottom. Board diagrams with no move lists will be shown with the colour to move that was used when setting up the position on the bottom. The ColorOnBottom tag on a game marked with [ChessGame "true"] will allow the author to use the auto-orientation colour in situations where the game is not a guess the move game, for example:
[ColorOnBottom "b"]
Will set black to be the colour shown on the bottom of the board if the user has selected auto orientation mode (or white in auto-flipped mode) for the game the tag appears on.
Note that the colour to play in the GTM game will always override the ColorOnBottom value if both are provided.default auto orientation
StartPly
If you’d like to provide move lists that start from the initial position in the PGN, but are displayed from a position further into the move sequence, you can use the StartPly tag, for example:
[StartPly "14"]
Will skip the first 13 ply and start displaying moves at the 14th half move. This can be useful in opening material where you don’t want to continually display the leadup moves in a repertoire, but do want the full line to be included in any repertoire data. Note that because PGN comments attach to the end of moves by default, if you have a sequence that includes the fragment "4. Nf3 {Post move comment} Bxc2" and the StartPly is set to 9 - so the move list display would start at 4…Bxc2, the {Post move comment} from 4.Nf3 will be treated like a pre-move comment for Bxc2 and displayed in the move list.
ChessProblem
To mark a PGN game as holding a chess problem, use the tag:
[ChessProblem "true"]
You will usually also want the FEN set up tags to specify the start position, so a minimal problem game PGN will look like:
[ChessProblem "true"]
[SetUp "1"]
[FEN "FEN_STRING_FOR_START_POSITION"]

*
Other problem tags
Instructional
If you’d like a problem to be presented as an instructional problem in the book reading view instead of a testing puzzle you can mark it is instructional using the tag
[Instructional "true"]
Instructional problems will still be imported as training positions for training modes.
UsePlayBestAlts
Some positions may have several good moves, but you want to highlight a particular line. The default method of handling this is using the 'try again' system, however this can be frustrating during training if you are presenting problems with many alternative winning lines. The play best alternative is an alternative winning move that will trigger the main line solution move to be played, thus avoiding forcing the user to hunt amongst several good moves to look for the intended main line solution. To signal that an alternative winning move should auto play the main solution move at the current position, you can annotate the first move in a variation line with a $202 NAG. If you’d like all alternative winning moves to be treated as play best alts you need to add the following PGN tag to the problem to turn on this interpretation:
[UsePlayBestAlts "true"]
With problem level play best alts turned on, you can turn off play best on a move by move basis by adding a $218 NAG to the alternative move, which leads it to be treated as a standard 'try again' alternative.
UseOptionalPlayBestAlts
Similar to the previous UsePlayBestAlts, but leaving the choice to the solver on whether they want to play the best move or continue to make further attempts after playing an alternative good move.
You can turn on optional play best alts for all moves that would normally be given a try again by adding the following tag to the problem PGN:
[UseOptionalPlayBestAlts "true"]
You can also apply optional play best alts on a per move basis by adding the $212 NAG to the move, for example: '5.Nxf6 $212' will lead the playing of 5.Nxf6 to give the solver the option to request the system play the best move.
Similarly, if you’ve enabled the UseOptionalPlayBestAlts tag, thus turning all try again moves into optional play best moves for the problem, you can turn off the play best behaviour on a per move basis by using the $213 NAG.
UseShowBestAlts
UseShowBestAlts is similar to the UsePlayBestAlts, but instead of playing the best move after an alternative is played, the best move is shown on the board via an arrow. Some positions may have several good moves, but you want to highlight a particular line. After adding the following PGN tag to the problem
[UseShowBestAlts "true"]
Any move that would normally receive a 'try again' response will also show the best move.
You can also apply show best alts on a move by move basis by attaching the $214 NAG to a move, for example: '5.Nxf6 $214' would lead 5.Nxf6 to show the best move on the board via arrows.
If the UseShowBestAlts option is on, and you would like to disable for a particular move you can use the $215 NAG attached to the move to achieve that, and the move will receive the default ALT treatment.
UseOptionalShowBestAlts
Similar to the previous UseShowBestAlts, but leaving the choice to the solver on whether they want the best move to be shown via arrows after playing an alternative good move.
You can turn on optional show best alts for all moves that would normally be given a try again by adding the following tag to the problem PGN:
[UseOptionalShowBestAlts "true"]
You can also apply optional show best alts on a per move basis by adding the $216 NAG to the move, for example: '5.Nxf6 $216' will lead the playing of 5.Nxf6 to give the solver the option to request the system show the best move.
Similarly, if you’ve enabled the UseOptionalShowBestAlts tag, thus turning all try again moves into optional show best moves for the problem, you can turn off the optional show best behaviour on a per move basis by using the $217 NAG.
UseOpponentAlts
Sometimes it can be important for the problem solver to prove that they can counter not just one, but several opponent moves. If they haven’t considered some key opponent responses, and only have an answer for the main line of the problem, then they may have solved the problem partly by luck (lucky that the problem didn’t play a different opponent move, one they hadn’t considered an answer to before moving).
Authors can choose to mark multiple opponent variations as "opponent alternatives" in a problem, and this will force the user to play the solution shown in each opponent variation before they are deemed to have completed the problem, thus proving they have a response for all important opponent lines.
To mark an opponent variation as a required alternative, add the variation to the main line opponent moves, and annotate the first move in the variation with '!?' ($5 in PGN NAG format). A main line opponent move can have multiple required opponent alternatives, and more than one main line opponent move may have opponent alternative lines. Opponent alternative lines may themselves have sub-variations to indicate further nested alternative opponent lines. In problems with opponent alternative lines, the main line will be played out first, and then the alternative opponent lines will be presented in the reverse order they were encountered during solving (so the most recently traversed move with an opponent alternative line will be shown first).
You’ll also need to add the following PGN tag to the problem to turn on this interpretation:
[UseOpponentAlts "true"]
By default use opponent alts is not enabled, and so '!?' annotations on opponent move variations will not be treated as special without the above PGN tag.
If you’d like to mark opponent alts without having a visible marker (perhaps '!?' is not appropriate for example), then you can avoid using the UseOpponentAlts tag, and use the $203 NAG which doesn’t have an official meaning, and will trigger the same behaviour as using the [UseOpponentAlts "true"] with '!?' and will not show a visible annotation in the solution list.
UseSolutionAlts
It is common for real world positions to have more than one way to win. The default method for dealing with this is the 'try again' system where moves that are not the main line solution, but can still be considered reasonable moves in the position get a 'try again' response, and the player has another chance to find the main line move. We introduced the play best alternative move as one option for dealing with this, where instead of being met with 'try again' after playing an alternative good move, the main line move is autoplayed for you, thus avoiding the annoyance of having to hunt through what might be several more 'good moves' before hitting the one the author wanted to present as the main line.
Another way of dealing with ambiguity in a problem is to simply provide multiple correct solution lines. The user can choose the move they wish to play in an ambiguous position, and if it is listed as an alternative solution line, they can complete the problem by correctly finding the solution moves in the alternative line. To mark a line as an alternative playable solution line, add it as a variation to the 'main' line, and annotate the first move in the variation with a '!' annotation ($1 in PGN NAG format). Alternative lines may themselves have further alternatives variations if required, and are marked with the same method. Note that if a line is marked in this way, and the user plays into it, the line will become the new solution line. The main line will be left, and the played move line will become the main line for the rest of the problem. Unlike with the opponent alt lines, the original main line will not be continued, so you need to consider this when deciding if an alternative solution marker is the best treatment. If you believe the original main line is the most important line to learn, then leaving the alternative solution as a 'try again' may be the best choice.
You’ll also need to add the following PGN tag to the problem to turn on this alternative move interpretation:
[UseSolutionAlts "true"]
By default use solution alts is not enabled, and so '!' annotation on a variation will not be treated as special without the above PGN tag.
If you’d like to mark solution alts without having a visible marker (sometimes '!' is not appropriate), then you can avoid using the UseSolutionAlts tag, and use the $204 NAG which doesn’t have an official meaning, and will trigger the same behaviour as using the [UseSolutionAlts "true"] with '!' , but without showing a visible annotation in the solution list.
It is possible to use all three Alts tags and features on any problem, so to make use of play best alts, opponent alts, and solution line alts, use the three tags:
[UsePlayBestAlts "true"]
[UseOpponentAlts "true"]
[UseSolutionAlts "true"]
HasPreMove
Chesstempo problems usually start with a pre-move showing the opponent move that preceded the first move required in the solution line. However, for book problems the pre-move is optional. You can specify whether a pre-move is part of the solution line using the tag:
[HasPreMove "true"]
or
[HasPreMove "false"]
The existence of pre-moves can also be configured as part of the import settings panel when you are importing the PGN in the create book panel. If all your problems are of one type it is probably easiest to set this in the import settings, but you can still override this on a case by case basis as the HasPreMove tag will override the import settings on any particular problem game found in the imported PGN.
Some existing PGN material may mix pre-move and non-pre move problems, and if no HasPreMove tag has been set there are heuristics we apply to try to guess the pre-move status. For example if the first move is annotated with a '?' or '??', depending on the context we may assume the move is intended as a pre-move and the solution line is the following punishment for the mistake shown in the first move. Similarly if the second move in a move list is marked with a '!' or '!!' annotation, it is a strong indication the first move was an opponent move, and the solution starts at the second move. If you find we are incorrectly guessing the pre-move status, you’ll need to override the choice with an explicit HasPreMove tag.
ProblemTitle
Problem titles can be specified with the tag:
[ProblemTitle "title text"]
If no problem title is provided, we will try to auto-generate one from the White, Black, Event and Date tags.
BookProblemId
BookProblemId is an identifier of a problem specific to the book, for example if you identify problems with "Fork 1", "Pin 2" etc. For example:
[BookProblemId "Fork 1"]
TruncatePly
You may wish the problem solution line shown to the user after solving to be longer than the moves required to be marked correct. If you’d like the point at which the problem is marked correct to be shorter than the full solution line you can mark the game with the tag:
[TruncatePly "PLY_NUMBER"]
For example if you’d like the problem to finish immediately after the first move then use:
[TruncatePly "1"]
Keep in mind that a ply is a half move not a full move so if you’d like the problem to finish after the solver’s second move then you’d use:
[TruncatePly "3"]
Which will include the first solver move, the opponent reply and the second solver move. The full list of moves from the solution will still be visible after the problem is over, the truncate ply only applies to the point at which the problem will finish.
Note that the count does not include any pre-move if included, so the count starts at the solver’s first move.
DownMaterial
Applying the tag:
[DownMaterial "true"]
to a chess problem game gives a hint to the automatic quality analysis that the game is intended to finish down material and the point is to play moves with best fighting chances. This avoids marking such problems as errors in the quality analysis.
UseFirstMoveAlternative
Some existing PGN material describing problems may choose to have a mistake in the original game as the first main line move in a solution move list, and the required solution as a variation line under that move. You can transform such material by hand yourself before import, but we also provide a way of marking a problem game that has that type of solution structure by using the tag:
Special Problem Annotations
In problem PGN, some annotations can trigger special behaviour on import. The PGN standard defines annotations using the NAG format (Numeric Annotation Glyphs) which maps numbers onto common annotation symbols. So for example ! (good move) is represented in PGN by $1.
Some of these usages have been covered in previous sections, and require specific tags to trigger the interpretations, the NAGs below will trigger their stated behaviour on problem moves even without any triggering tags enabled:
-
1,3, 5 : $1, $3 or $5 (i.e '!','!!' or '!?') will mark a move variation as a 'try again' move that does not fail and prompts the user to try again. Note that problems that have been computer analysed by the server may also auto-mark some moves as try again moves. Keep in mind that these tags can also trigger more complicated alternative treatment if any of the UsePlayBestAlts, UseOpponentAlts or UseSolutionAlts tags are present.
Currently most software does not make use of NAG numbers in the ranges 147-219 and 222-237, and we are using some of these for specific book problem interpretation. Namely:
-
200 : When marked on a move, indicates that one of the sub-variations of the move should be lifted to replace the move in the main line. We can use this with the 223 nag to force a particular move into the main line if the heuristics to chose a line do not pick the right move.
-
201 : When problem solution lines are contained in variations coming off a null move, use $201 as an annotation to the first move in a variation to mark which of the variations holds the solution.
-
202 : When marked on the first move in a variation, $202 will mark the move as an 'auto play best move' alternative move. This allows marking such alts without providing a visible '!?' (i.e. $5) annotation. It will also work without having to add the [UsePlayBestAlts "true"] tag to the game holding the problem moves.
-
218 : When marked on the first move in a variation, $218 will mark the move as not to be an 'auto play best move' alternative move when the default UsePlayBestAlts is turned on for the problem.
-
203 : When marked on the first move in a variation, $203 will mark the move as an alternative opponent line the solver must solve after the main line is completed before being marked correct. This allows marking such alts without providing a visible '!?' (i.e. $5) annotation. It will also work without having to add the [UseOpponentAlts "true"] tag to the game holding the problem moves.
-
204 : When marked on the first move in a variation, $204 will mark the move as an alternative correct solution line the solver may choose to play into, and receive full points by playing all listed moves in the variation. This allows marking such alts without providing a visible '!' (i.e. $1) annotation. It will also work without having to add the [UseSolutionAlts "true"] tag to the game holding the problem moves.
-
205 : When marked on the first move in a variation, the move will be treated as a 'try again' move without having to commit to marking the move with '!', '!!' or '!?'. If one of '!', '!'' or '!?' are appropriate in the situation, then they should be preferred over using $205, due to providing a visible annotation, which $205 does not.
-
206 : When marked on the first move in a variation, the move will be treated as a 'try again'. The difference between using $206 instead of $205 for this purpose is that a move marked with $205 (or the other try again annotations) will attempt to display the full variation immediately following the move as the try again message instead, while $206 marked try again moves will only display the comment from the try again move, not the full variation. Note for the variation specific try again messages of either the $205 or $206 variety to be used, a comment must exist on the first move of the variation, even if the whole variation is to be displayed. Without a comment on the try again move itself, the generic 'good move, try again' text is shown.
-
207 : When marked on a move in a problem that holds a comment, in study mode, the normal interactions triggered by the existence of comments will be ignored. This allows problems comments that are available in reading mode, or shown in the final solution, but not used during interactive study mode. For example if a try again move is marked with $207 then it will only show the generic try again message, not the variation or comment specific message. Similarly if a main line move has a comment that would cause a pause in the interaction, and require a 'next' button click to continue, marking it with $207 will auto-play the opponent move without requiring the 'next' button. This can be useful in situations where a comment may give away subsequent solution moves and so isn’t wanted to be shown in interactive solving mode.
-
208 : When marked on the first move in a variation, the user will be shown the variation in study mode before moving on to the next move in the solution. This allows displaying side lines to the user during study mode without requiring the user to explicitly play into them. NOT YET IMPLEMENTED.
-
212 : Mark a move that gives an optional 'play best' action after being played, to be used for situations where there are a large number of winning moves, such as some endgame positions to reduce annoyance.
-
213 : If optional play best moves is turned on at the problem level, then applying the 213 nag to a move will turn off the behaviour, defaulting to the standard 'good move, try again' behaviour.
-
214 : Mark an alternative move to show the best move via arrows after being played, to be used for situations where there are a large number of winning moves, such as some endgame positions to reduce annoyance. If this is applied to a solution move then any variation moves played that are deemed to be alternatives will also trigger arrows showing the best move instead of standard 'try again' responses.
-
215 : If show best move behaviour is turned on at the problem level, then applying the 215 nag to a move will turn off the behaviour, defaulting to the standard 'good move, try again' behaviour. If this is applied to a solution move, then all alts will revert to standard try again alts instead of show best alts.
-
216 : Mark a move that gives an optional 'show best move with arrows' action after being played, to be used for situations where there are a large number of winning moves, such as some endgame positions to reduce annoyance.
-
217 : If optional show best moves is turned on at the problem level, then applying the 217 nag to a move will turn off the behaviour, defaulting to the standard 'good move, try again' behaviour.
-
219 : Mark a move as the last move in a solution line, useful when truncate ply tag can’t be used because it only applies to main lines, and we need to truncate solution lines in variations, such as alternative opponent lines. Note that the full move list will still be shown in the solution, but the line will be deemed correct as soon as the move marked with the 219 nag is played.
-
222 : Mark a move as not holding alt opponent move, used if auto-opponent move alts are enabled and a particular opponent line should not be marked as an opponent alt line.
-
223 : Mark a move as preferred variation when promoting into main line due to main problem move annotated as bad, note that we can also use this to force a problem move to become main line even when main line move NOT annotated as bad.
-
224 : Mark a move as a failure even if the engine analyis would give a try again. This can be useful for moves that the engine might give a moderately high eval to , but miss the point, and you want to override the evaluation based try again behaviour and force the move to be treated as a failure.
ProblemGroupStart and ProblemGroupEnd
Problem groups are containers for a set of problems. They are useful in creating groupings which allow a more book-like rendering of a set of problems in the book reading view. To start a problem group use a game that looks like:
[White "ProblemGroupStart"]

*
Then add several ChessProblem games, before closing the group with a trailing:
[White "ProblemGroupEnd"]

*
If you would like your imported PGN to use automatic grouping of problems instead of having to mark each section with the group start and end, then you can set the following tag in the book details initial game in your book PGN:
[AutoProblemGroup "true"]
Using auto-grouping will join any set of continuous problems that don’t have other book material separating them into a group. Note that auto problem grouping is on by default, so if you don’t use the tag to turn it off, and don’t need explicit control over groups, then you can simply rely on the system grouping your problems automatically. If you do need control over the groups , such as when you have a large number of continuous problems you want to split into multiple groups without using chapters or other separators, then set:
[AutoProblemGroup "false"]
In the initial book details game to indicate you want to control the grouping yourself.
|
|
Some aspects of problem group specific rendering is turned off in edit mode for performance reasons, so you’ll need to view your book in reading mode to see exactly how problem group formatting will appear in the final version of the book. |
RepertoireMoves
Placing the tag [RepertoireMoves "true"], into a PGN game will mark that game as holding moves that are part of an opening repertoire. By default the repertoire colour will be assumed to be the open specified in the opening book details PGN if one is provided, otherwise you can specify the colour on a per PGN game basis with the tag:
[OpeningColor "white|black|both"]
To allow convenient navigation the sequence of moves leading up to the variation covered by the game should be placed in the tag:
[VariationStartMoves "1.e4 c5 etc etc"]
The value of VariationStartMoves tag must be a legal sequence of PGN moves (without newline characters). While repertoire moves imported without this tag will work, the user experience with your book will be improved by providing the start moves. If the game moves start from a non-initial position, then the VariationStartMoves will need to start from the same start position that the RepertoireMoves starts from.
If no VariationStartMoves tag is provided, the system will attempt to automatically determine the variation moves for each RepertoireMoves PGN game. You may wish to start with this , and only provide an explicit VariationStartMoves where the automatic detection fails.
The name of the variation this game covers can be stored in the tag:
[VariationTitle "Repertoire title text here"]
If no variation title is provided, and a VariationStartMoves tag is provided, then the start moves will be used as the variation title. If both the VariationTitle and VariationStartMoves tags are not provided , but a White tag is available on the game, then a combination of the White and Black player names will be combined to form the title, with any automatically determined variation start moves appended to that title.
The variation naming methods will be used to generate shortcuts (bookmarks to jump to the variation position in the opening tree) when importing the repertoire data into the opening trainer tool. If you’d like to organise variation shortcuts into sub-folders, such as grouping under chapters or top-level variations, then you can do so by using the tag on the RepertoireMoves PGN games:
[VariationFolder "Folder name"]
Replacing "Folder name" with the folder you’d like the current RepertoireMoves variation to be stored under.
As each RepertoireMoves PGN game will be treated as a variation for the purposes of organisation, it is usually best to try to split up your opening book material into multiple games such that each variation is covered in a separate game. It is fine to use a single game for several sub-variations, but keep in mind that shortcuts will only be generated on a per PGN game basis.
Moves in RepertoireMoves games can be marked with PGN NAGs to force desired behaviour. The following NAGs are supported: - 209 : Force a variation to be enabled. By default moves in the repertoire colour that are the start of a variation line at the current position will be imported as disabled lines. This allows authors to explain why some choices don’t work, and have that analysis included in the repertoire tree without it being treated as a training target. If you’d like to include a variation move in the repertoire colour to be imported enabled, and therefore available for training, add the 209 NAG to the move. For example 8…Nf3 (8…Bxc5 $209 etc etc) will ensure the 8…Bxc5 line is imported enabled for training. - 210 : Force a variation to be disabled. Sometimes you may have a move in the repertoire colour that is included in a main line, rather than a variation that you would prefer to import as disabled, because the move you’d prefer to be the training target in the position is included elsewhere as a main line (or force enabled using the $209 NAG). So 8…Nf3 $210 would make sure that move Nf3 and any following moves in that line are imported disabled, so not available for training. If you force disable a move, any sub-variations of that move will also be disabled. - 211 : In a group of variations at the same level, force this variation to be first. Useful when you may want to present side-lines first in reading view, but have the last variation in a group shown as the first of the group in the training UI.
Note that the reader of the book can always decide to enable or disable such lines themselves after purchasing the book. This allows the author to include repertoire lines that are disabled by default, but offer viable alternatives for the reader that they may wish to enable for training at their discretion.
Comments on moves in RepertoireMove games will be imported as comments into the opening trainer when the book repertoire is loaded into the opening trainer. You can specify that comments are not imported using the otIgnore flag, and you can also get control over how comments attach to moves with the precom, pre-comment move attachment flag. Note that comments that only have formatting commands or non-text fields such as board markers () or clock PGN extensions ([%clk etc) will be ignored. If you want a comment with a '' board marker to be imported for display in the opening trainer, then you’ll need to include some standard text in the comment along with the marker.
|
|
You can use RepertoireMoves games with non-initial position in an opening book, however you will need at least one RepertoireMoves game that joins up the missing moves that lead to the initial position, otherwise the repertoire will not be usable once imported into the opening trainer. For example if all the variations in your book are in the Ruy Lopez, then you can start most of the repertoire moves games from the position after the moves 1.e4 e5 2.Nf3 Nc6 3.Bb5 have been played, but you need at least one repertoire moves game that includes those leadup moves. |
ChessGame
Placing the tag [ChessGame "true"], into a PGN game will mark that game as representing a full or partial chess game.
Games marked in this manner may also be optionally marked as Guess the Move games with the GTM tag, i.e:
[GTM "true"]
GTM games will be available to be loaded for playing in the GTM feature, and any annotations provided in the game will be made available in the GTM game review mode after the play through has been completed (as well as viewable in book reading and study modes). If the game is marked with the GTMPlayAsColor tag the GTM play through will happen from the point of view of the player with those colour pieces in the game. So for example [GTMPlayAsColor "w"] will play through as white, and [GTMPlayAsColor "b"] will play through as black. If the game is marked as a GTM game but no GTMPlayAsColor is added, then if there was a winner in the game, you will play as that player. If the game was a draw, and no player colour was specified, then it will default to white.
Note that in PGN imports specified as holding a game collection book, PGN games that don’t have any explicit tags to indicate their type will be treated as if they have [ChessGame "true"] AND [GTM "true"] marked on them.
If a game marked with ChessGame "true" is found, you can also explicitly mark the title shown for the game using the tag:
[GameTitle "title text"]
If an explicit title is not found, a generic title built from the player name and event information will be created for you on import. To avoid any title being output for the game create an empty game title with:
[GameTitle ""]
A shorter title can also be specified that may be used in some parts of the UI requiring a shorter title, such as the list of Guess the moves from a book. The short title can be specified with:
MoveListType
The MoveListType PGN tag provides a way of specifying some generic game types that are not specific to a particular structure such as a full game or chess problem.
[MoveListType "inline"]
On a PGN game will allow the move list to be used in the middle of textual content for example if you want a sentence that reads "In this position 45…Nf3 46.Rxf3 Bf2+ is winning for black". A PGN game which specifies the FEN position and move sequences marked with a [MoveListType "inline"] tag can be used in this manner.
However to make this work the original text needs to mark where the latter game will be added, this is done with a MOVE_LIST_OUT%(MOVE_LIST_NUMBER) reference in the original text, so for example you might have the following two PGN games in your PGN file:
[White "Paragraph"]

 { In this position MOVE_LIST_OUT%(1) is winning for black. }  *

[MoveListType "inline"]
[Result "*"]
[MoveListNum "1"]
[SetUp "1"]
[FEN "SOME_FEN_POSITION_TO_SETUP_POSITION"]

45...Nf3 46.Rxf3 Bf2 *
When the book is rendered for reading or editing, the MOVE_LIST_OUT%(1) will try to find the move list game with MoveListNum set to 1, and replace the placeholder with the inline move list defined in the game with the matching MoveListNum (in this case inserting the moves 45…Nf3 46.Rxf3 Bf2. The advantage of using the inline move list in this context instead of just listing the moves in the paragraph text is that the reader will get a clickable and navigable board.
[MoveListType "diagram"]
Using "diagram" as the MoveListType allows you to embed a diagram from a PGN game. For example:
[MoveListType "diagram"]
[SetUp "1"]
[FEN "rnbqkbnr/pppppppp/8/8/7R/8/PPPPPPPP/RNBQKB2 w - - 0 1"]

*
Will generate a diagram in the text using the position shown in the FEN string.
Like inline movelists, you can also embed a diagram into what is otherwise pure text using the MoveListNum so:
[White "Paragraph"]

 { You can see the resulting position in this diagram: MOVE_LIST_OUT%(2) }  *

[MoveListType "diagram"]
[MoveListNum "2"]
[SetUp "1"]
[FEN "rnbqkbnr/pppppppp/8/8/7R/8/PPPPPPPP/RNBQKB2 w - - 0 1"]

*
This will embed the matching diagram with [MoveListNum "2"] into the paragraph, replacing the text MOVE_LIST_OUT%(2) with the diagram.
Note that if you need problems or games (i.e. PGN games marked with [ChessProblem "true"] or [ChessGame "true"]) embedded inside text content, you can also add a [MoveListNum "NUMBER"] tag to the problem or game PGN, and use the same MOVE_LIST_OUT%(NUMBER) placeholder method of placement.
It is important that the numbers are kept unique in a PGN. If you are exporting from a book to PGN, the export will handle this for you, but when preparing external PGN for an initial import as a Chesstempo book, you’ll need to manage the numbers yourself.
2.7.6. PGN Comment and Annotation extensions
As mentioned previously, PGN game comment text can embed formatting by using Markdown formatting style. This allows elements such as lists, paragraphs, bolding and italics markers.
We also offer some extensions that can be used to provide a more book-like appearance to your imported material, or to provide hints to the problem import code for problem based game material.
Comment Format Hints
Variation labels
If you have a set of variations that you’d like to be output using labels such as:
A. 45...Nf6 etc
B. 45...Bxa2 etc 50.Ng4
   B1. 50...Qxg4 etc etc
   B2. 50...Rxg4 etc etc
C. 45...Qf7+ etc etc
Then you can use the [%fmt lower-alpha-list] and [%fmt upper-alpha-list] in a comment immediately following the move that should have the variation label placed before it. For example the presentation above could be handled by using the following PGN variation and comment structure:
( 45...Nf6 { [%fmt upper-alpha-list] } )
( 45...Bxa2 { [%fmt upper-alpha-list] } etc etc etc
    (50...Qxg4 { [%fmt upper-alpha-list] } etc etc etc)
    (50...Rxg4 { [%fmt upper-alpha-list] } etc etc etc)
 )
( 45...Qf7+ { [%fmt upper-alpha-list] } etc etc etc) )
The output code will attempt to automatically generate the correct sub-variation labelling. The lower-alpha-list version will produce the same output but with lower case letters instead of upper.
Inline variations
Sometimes default formatting will force a comment to appear on a new line, such as comments on top level main line moves. In some situations it is possible to repress this behaviour using the [%fmt inline] comment form. So for example if you want to comment on time used in a game, but do not want the comment to appear on a new line you can use the following structure:
8.Bxa2 { [%fmt inline](17m) } 8...Qxd5
This will make sure the output in reading mode for that game reads:
8.Bxa2
  (17m)
8...Qxd5
rather than
8.Bxa2 (17m) 8...Qxd5
Comment attachment to front of move
In situations where the move list and comments are structured in this manner:
8.Bxa2 {The next move loses immediately } 8...Rxa2
You may want to specify that the comment attaches as pre-comment for 8…Rxa2 rather than the default comment attachment of attaching as a post-comment to 8.Bxa2. To achieve this you can use a [%fmt precom] string in the comment, for example:
8.Bxa2 {[%fmt precom] The next move loses immediately } 8...Rxa2
This can be important in parts of the system where a comment is shown for the current move, and you want the comment in the source PGN before the move (8…Rxa2 in our example) to be displayed when showing the move instead of being displayed when 8.Bxa2 is shown. Currently the opening trainer is the only part of the system which makes use of the [%fmt precom]. The opening trainer will also treat comments with [%fmt inline] as if they had the [%fmt precom] marker, as [%fmt inline] is commonly used to create a layout where the comment can refer directly to the following move.
Ignore comments in the opening trainer
You may want to create book material that has comment text in repertoire moves that you only want visible in book reading mode, and would prefer to not make visible in the opening trainer. This can be achieved by adding the string [%fmt otIgnore] to the comment. For example:
1.e4 {[%fmt otIgnore] In this chapter we cover several lines starting with 1...c6}
This will use the comment text in book reading mode, but the text will not be displayed as a comment in the opening trainer.
Comments on new line
Variation comments are usually rendered inline rather than on a new line. If you would like to force a comment to a new line you can use the [%fmt forceBreak] comment command in a comment. So for example:
8.Nf3 ( { [%fmt forceBreak] This variation comment will appear on a new line } 8.Bxa2 8...Qxd5 )
This will make sure the output in reading mode for that game read:
8.Nf3
This variation comment will appear on a new line 8.Bxa2 8...Qxd5
rather than
8.Nf3 This variation comment will appear on a new line 8.Bxa2 8...Qxd5
If you’d like to force a comment onto a new line but also force an extra line break to provide better separation between the new comment and any previous comments, then you can replace forceBreak with forceDoubleBreak.
In some situations you may want to force a variation onto a new line without having a leading comment. Empty comments are usually ignored, but to avoid that, and have the force break apply on empty comments you can use a HTML zero-width space character. For example:
8.Nf3 ( { [%fmt forceDoubleBreak] ​ } 8.Bxa2 8...Qxd5 )
will render as:
8.Nf3

8.Bxa2 8...Qxd5
Reserved NAG usage
NAGs (numerical annotated glyphs) are used in PGN to mark annotations, for example $3 in a PGN game equates to '!!'.
In some chess problem material, it may be necessary to to explicitly mark a variation that holds the solution line if the solution moves include detailed annotations for lots of side variations and the solution line is one of several such variations. Usually it is better to present solution lines as the main line which makes it easier to extract the solution, but if that is not possible the reserved NAG of $201 can be used to indicate to the problem importer that a move is the start of an accepted solution variation.
In cases where a sub-variation should be promoted into the main line for presentation to the user during solving, but we want to leave it as a sub-variation in reading mode, we can use the $200 nag to attach the variation head move. This will have a similar impact to using the UseFirstMoveAlternative tag previously mentioned.
3. Tactics Training
Chesstempo tactics training allows you to test and train your tactical ability. Tactical positions from real games are shown , and you are expected to find the best moves leading to an advantageous tactical outcome. Where possible, the moves will match those played in the source game, however if the opponent played sub-optimal moves or resigned, then the best computer moves will be played instead.
Rated training modes provide you with a tactics rating which can be used to track progress, as well target problems at your current ability level.
3.1. Blitz/Standard/Mixed
Chesstempo tactics training is aimed at improving two important aspects of tactical ability, pattern recognition, and calculation skills. Blitz and Standard tactic solving modes target both these areas. Mixed mode allows you to merge both these skills, with a solve time rating adjusment more closely reflecting time available in longer over the board games, and includes positions where the best move may leave the position even, but is the only move which avoids entering a lost or losing position.
3.1.1. Blitz Mode
'Blitz' mode is a training mode that emphasizes speed, and is useful for seeing a large number of positions, which assists in learning tactical patterns, a very important part of improving tactical strength.
In Blitz mode, your rating adjustment is partly determined by how quickly you are able to solve problems.
3.1.2. Standard Mode
'Standard' mode is a tactics training mode that allows you to take as much time as you like on each problem. Standard mode is suitable for calculation practice, and gives you a chance to see harder problems, that require more thought and deeper calculation than you will see in blitz mode.
In Standard mode, your rating adjustment is based only on whether you get the problem correct. Time taken is shown on the screen, and recorded in your results, however it is ignored for rating adjustment purposes.
3.1.3. Mixed Mode
The mixed rating type uses a hybrid standard/blitz rating adjustment, and includes both winning and non-winning (sometimes called "defensive") problems. Problem attempts are rated the same as standard mode if they are solved under 5 minutes, i.e. time will not be used as part of the rating adjustment, and only correct/incorrect matters. If the time exceeds that level, the problem is rated in a similar way to the blitz rating method, i.e. you start to get less reward for a correct solution if you take longer than the average solution time across all users.
The main differences between blitz and mixed mode after the 5 minute threshold has been reached is that there is no bonus for fast solving, there is no "time after first move" penalty, and the minimum average time you are measured against will be at least the no time-adjustment threshold of 5 minutes. This means for problems at your current rating you should be able to take at least 10 minutes before you start to lose rating points on a correct solution.
3.2. Alternatives
Some tactical positions have moves, which are good, but are not deemed to be the 'best'. When this occurs, you will receive a 'try again' message, and you’ll be given another chance to find the 'best' move.
The reason the problem set includes positions with these alternative winning moves is because it is important to provide training in as many real game situations as possible. Real games often have positions where you need to choose between multiple good moves, and so it is important that training includes such positions. Positions where two moves are given the same computer evaluation will not be used, so one should always be better than all others (at least from a computer evaluation perspective).
3.3. Rating System
The Chesstempo rating system for tactics and endgames is based on the Glicko Rating System. Problems and Users are both given ratings and the user and problem rating are updated in a manner similar to the updates made after two players have played a game against each other. Generally, if you get a problem correct, the problem rating goes down , and your own rating goes up, and the opposite will occur if you get a problem wrong.
|
|
The default difficulty level for tactics problems targets problems that are on average 100 points below your current rating. This means that on average you will lose more rating points for problems you get wrong than you will gain for problems you get right. In return you’ll get a success rate over 50%. If you’d like to get the same amount of points for correct and incorrect attempts (on average), you can change your problem difficulty in your preferences to 'hard' which targets problems at your current rating and will get you a roughly 50% success rate over time. |
3.3.1. Standard Rating
The rating adjustment for standard mode tactics is the same as that outlined above , correct problems will give you a full 1-0 result, with you gaining points, and the problem losing points. Problems you get wrong will give a 0-1 result, with you losing rating points, and the problem gaining rating points.
Time is not part of the standard rating adjustment.
3.3.2. Blitz Rating
Unlike standard ratings, blitz ratings do use the time taken as part of the rating adjustment. This means if you take too long to solve a problem, you may lose rating points, even if you get the problem correct. Usually chess results come in three varieties, 1-0, 0-1 or 0.5-0.5, however the blitz rating system extends this to have values other than 0,1 and 0.5 as results, so for example a 0.25-0.75 result is possible, and when this result was fed into the Glicko rating system it would produce a rating adjustment that was worse than a draw, but better than a complete loss. The blitz rating system adjusts results in this way to account for time taken during the problem.
When you solve a blitz problem, you are competing against the average solve time of all users who got that problem correct. If you solve the problem faster than 1 standard deviation from the average solve time, then you get a solving bonus and instead of a 1-0 result, you are given the equivalent of a 1.25-0 result. If you solve slower than this, but faster than the average time, then you receive a full 1-0 result. If however you solve the problem less than the average time, then you receive a result proportionate to how much slower you took compared to the average. So for example if you took 20 seconds, and the average was 10 seconds you will receive a 0.5-0.5 result. As your solve time increases, your result will approach zero, for example if you take 40 seconds and the average was 10 seconds, then you will receive a 0.25-0.75 result.
Incorrect problems in blitz mode get a standard 0-1 result, where you lose rating points, and the problem gains them in the same manner as a normal loss. Note that blitz problems can gain points when you get a problem correct, as they receive 1 minus whatever value you receive as a result (with a minimum of 0), so as shown above if you receive a 0.25 result, your opponent will receive 0.75.
|
|
To discourage guessing, and incremental solving, blitz problems also take account of time taken after the first move and ads an extra penalty for time taken after the first move. Essentially time taken after the first move is counted twice when accounting for total time taken. So a solve time of 10 seconds where 5 of those seconds were on the moves after the first, the total time used to calculate your rating adjustment would be 15 seconds (10 seconds + 5 seconds). |
3.3.3. Duplicate Problem Rating Adjustment
To help reduce the impact on the rating system of users seeing problems multiple times, a reduction in the reward for successful attempts on problems that have been seen before has been implemented.
Duplicate reward reduction only applies to the top 1-3% of users in each rating type. This prevents the top 10 lists from being a list of users with the best memory for past problems, rather than the people with the strongest problem solving skills, but still allows lower rating users who are not getting large memory benefits from past attempts to get full reward for problems.
The current reductions are:
-
1st Repeat - 70% of full credit
-
2nd Repeat - 55% of full credit
-
3rd Repeat - 45% of full credit
-
4th Repeat - 35% of full credit
-
5th Repeat - 25% of full credit
-
6th and subsequent Repeats - 15% of full credit
There are also time decay adjustments made if the user has not seen the problem for a long time. So problems not seen for least 6 months receive a minimum of 45% of full credit, irrespective of how many times they were solved in the past. Similarly, problems not seen for a year are given 75% of full credit, no matter how many times they had been seen previously.
3.4. Screen Controls
- Next
-
This jumps to the next problem. It is only required if you don’t have automatic continue to next problem options set. The button is disabled until after the problem is over, so if you want to skip the problem, you will need to use the "Give Up" button first. You can also go to the next problem by pressing the space bar.
- Give Up
-
The Give Up button allows you to finish the current problem without playing any further moves. You will be marked as failing the problem, and your rating will be adjusted accordingly.
- Replay
-
This replays the current problem. The button is hidden until after the problem is over.
3.5. Tactics session panel
The tactic session panels shows stats for the current solving session. The session starts when the page loads or after the End session button is used. The current session time, a graph of the last 20 problem attempts (green dots = correct, red = incorrect), and some summary stats for the current session are shown.
- Change Set
-
The Change Set button brings up the problem set selection dialog, allowing you to select a new problem set for the next problem.
There are three groups of problem types, rated, unrated , personal and from my games. Rated includes the officially rated sets such as Standard and Blitz sets. Unrated includes any of the default custom sets such as Mate in 1, Fork etc. Personal is where any custom sets you create are placed. From my games sets are sets targeting tactics extracted from your games.
- End session
-
The End session button allows you to reset the session stats.
- Difficulty selector
-
Click on the difficulty drop down to switch between easy, medium and hard difficulty modes. This option allows you to select the difficult of problems you receive when solving rated problems. This option shifts the average rating of the problems you are given. 'Hard' mode serves up problems targeted at your current rating level, so on average, problems rating will match your own rating. The default 'medium' difficulty gives problems that are on average 100 rating points below your current rating, and 'easy' gives problems that are on average 200 rating points below your current rating. You should expect different success rates at each level of difficulty, and these different success rates ensures that on average, there is no total rating advantage to any of these modes.
4. Endgame Training
The Chesstempo endgame training allows you to play through endgame positions, trying to progress towards to mate. Often you do not have to play all the way to mate, as converting to a more easily won endgame (by capture or promotion) is usually enough, although if a quick mate is available after conversion, then you may be asked to play it.
Promotion or capture may not always cause the problem to finish if it was deemed that the opponent still had threats that needed to be dealt with, for example when the opponent had very advanced pawns , the problem may not end until you have neutralised the promotion threat. All endgame problems start from positions that appeared in real games.
4.1. Benchmark Mode
Benchmark mode allows you to play any move that keeps the win, even if it would take longer to mate. You play moves until the position is deemed completed (usually by either mating or typically for problems with more pieces on the board, after taking a piece or promoting, converting to a more easily won endgame). Playing a move which loses or draws will fail the problem.
In Benchmark mode , your rating adjustment for successful solutions will be based on how many moves you take compared to the average number of moves spent by all previous solvers who have solved the problem correctly.
|
|
Benchmark mode is the only mode in which 7 piece endgames can be solved, as the depth to mate metric required to score correct solutions in Practice and Theory mode is not available for 7 piece endgames. |
4.2. Theory Mode
Theory mode forces you to play the fastest line to mate, if you play a move that is not one of the moves that leads most quickly to mate (and there may be more than one), then you will be asked to try again. This will continue until you find one of the fastest mating moves, or you play a move which loses or draws, at which point the problem will end and you will be marked incorrect. This process will continue until you have either failed, or reached the end of the problem. The main purpose of theory mode is to be shown the optimal mating line, and as such is useful for endgames where you may not know how to mate at all.
4.3. Practice Mode
Endgame practice mode is similar to Benchmark mode , in that it does not force you to follow the optimal line. You can play any move you like, including moves which dramatically increase the number of moves required to mate. The difference between practice mode and benchmark mode is that like Theory mode, Practice mode compares the number of moves you took to the optimal number of moves to mate to calculate your rating adjustment.
4.4. Rating System
The rating system for endgames is similar to that used in the tactic problems, the Glicko rating system is used to rate both endgame problems and players. For failed attempts rating adjustments are done based on a straightforward 0-1 result. Your rating adjustment for successful rating attempts depends on how many moves you played before completing the problem.
For benchmark mode if you take the same number of moves or less than the average number of moves on correct attempts for all users, you will receive full rating points. As the number of moves increases beyond the average, you’ll start to get reduced rating points. If you end up taking exactly twice the number of moves compared to average, the result will be treated like a draw, so against a problem rated at your current rating level, you will receive a zero points rating adjustment. If you use more than twice as many moves compared to average, you will start to lose rating points against a problem rated at your own rating level.
Note that in benchmark mode, some problems may have common paths that prune quickly when converting to another endgame such as taking a pawn instead of opting to mate in the current position. In this situation, the average move length played by all users may be shorter than than the fastest mate in the current position. This could lead to unfair situations where a mate in 6 is played with no extra moves, but marked down due to being considerably longer than the more common move sequence that leads to a quick prune (but a longer mate). To avoid this unfairness, Benchmark scoring on correct solution will also check depth to mate where available as a fall back score adjustment method. This means if you would score highly based on how quickly you mated, but the average move length would punish you, your score adjustment will be the highest of the depth to mate vs the user average move length scoring methods.
Benchmark’s rating method allows you to play lines that may not be the fastest method to mate , but still exhibit good endgame technique without worrying about being punished too much, due to using other solvers move lengths as the benchmark for scoring rather than number of moves to mate.
For practice mode, successful rating adjustments are based on how much longer your number of moves was compared to the fastest number of moves. If you play the optimal move at each point then you will receive a full 1-0 result. However
Theory mode rating adjustments for successful attempts are similar to practice mode, except that instead of total moves played impacting the outcome, it is the extra moves that would have been used if the longer moves had been allowed. For positions where you attempt to play more than one sub-optimal move, the move with the longest length to mate is used for rating purposes.
|
|
In theory and practice modes, the endgame training tool currently uses the shortest distance to mate as the measurement of best moves. This means that to make perfect play, all your moves must lead to the quickest mate. This can sometimes lead to situations where the most obvious move (for example promoting or taking an opponent’s piece) may not always be the quickest way to mate. In these situations the server will treat takes or promotions as equivalent to the shortest mating move, as long as capture or promotion doesn’t extend the length of the shortest mate by more than 2 moves. |
|
|
No matter how sub-optimal your solution, or how many times you use the "Play Best" button, you will never lose more points that you would if the problem is marked wrong. |
|
|
The result notification for correct endgames has two extra lines. The first line shows the number of moves, and then in brackets the number of extra moves. The second line shows you the score you received, 50% means you received a result equivalent to a draw, i.e. 0.5-0.5, 25% means you received closer to a loss (or 0.25-0.75), and 100% means you received maximum points (i.e. the equivalent of a 1-0 result). After the percentage score, the actual number of moves you were punished for is also shown. Where you played sub-optimal , but allowed moves such as slightly longer moves that promoted or took a piece, this value may be smaller than the total number of sub-optimal moves shown on the number of moves line. |
4.5. Endgame Played Move List
The list of played moves in endgame problems serves several purposes. It allows you to see the path you have followed while the problem is active, but it also provides extra details on the moves you played after the problem is finished. You can also play through different lines after the problem is over, and see the variations added to the move list.
The annotations on the move list after the problem is over show moves that were not the best move in the position. For example M10(M8) shows you played a move that was mate in 10 where the best move was mate in 8. L10(M2) shows that you played a move that leads you to lose (i.e. be mated) in 10 moves, where the best move would have had you mate your opponent in 2 moves. D(M3) indicates a move that draws when you could have mated in 3.
4.6. Endgame Legal Move List
The legal move list appears after you have finished solving an endgame (or when viewing the problem in problem viewing mode). For each position it shows a list of all the legal moves and the number of moves to mate (or to be mated) when a win or loss is the optimal outcome, or 'draw' when best play would lead to a draw.
|
|
7 piece endgames do not show the number of moves to mate, only if the move is winning, losing or a draw. |
We also provide a distance to zero (DTZ) number for each move, which is the number of moves (in ply) before the 50 move counter would reset (so before a pawn move or capture occurs).
Note that the scoring is 50 move rule aware, so there are three types of draws, the normal draw, a cursed win draw (i.e. a position that allows mate, but not before the 50 move rule), and a blessed loss (a position that would lead to the player getting mated, but not before the 50 move rule would finish the game as a draw).
You can click on any of the moves in the legal move list to play that move on the board.
Not that clicking on a move in the endgame legal move list or moving forward in the played move list will play only one side’s move. However if you play the move by interacting with the pieces, the opponent move will be played in reply, allow you to play out lines against the position.
4.7. Endgame Blitz Mode
Some endgames can be quite easy to play to mate, but very difficult to play the fastest mating sequence, these problems can be particularly annoying in modes that score you based on the optimal mate length as it can be easy to lose rating points on these type of problem. The "Blitz" button is designed to avoid some of this frustration.
The "Blitz" button allows you to take the option of solving endgame problems under the clock. The "Blitz" button is intended for use on endgames which you feel may be easy to mate , but not easy to play perfectly. After clicking the "Blitz" button, the clock changes to a count down timer and you have until the clock reaches zero to solve the problem.
Similar to Benchmark and Practice modes (irrespective of whether you were in Theory or Practice or Benchmark mode to start with), you are able to make any move you like (as long as it is still winning). You will not be punished for moves that take longer than the shortest path to mate, and in benchmark mode you will not be compared to the average number of moves to solve.
If you solve the problem within the time limit, you will get full points for getting the problem correct. There are no rewards for fast times, you will be marked the same if you have 1 second left on the clock or 50 seconds. If you run out of time, play a losing or drawing move then you will marked incorrect. You can only choose to blitz a problem before your first move. The number of seconds you have to solve the problem is defined by the function MAXIMUM(60,DTM*3.0+10) where DTM = Depth to mate. The time used before you press the blitz button is also included in the time allowed, so the longer you take to press the blitz button, the less time you will have to solve the problem once the clock starts counting down.
When using the blitz button you are required to mate the opponent, the usual endgame pruning is disabled. However, to avoid frustration from having to play out endgames against a lone king when blitzing after having already converted from a harder endgame, there are specific conditions under which a blitzed endgame will prune when you reach a position where your opponent has a lone king. If you reach such a position that would normally be pruned in a non-blitzed endgame, and have not used so much time already that you would likely not have time to mate, and have never reached within 2 moves of checkmating up to this point, then the problem will finish without you having to mate the opponent king. Sufficient time to mate is defined by the formula MAXIMUM(10 seconds,DTM*1 seconds). Or in other words if you have at least 10 seconds or 1 second per move to mate left when you reach a lone king position for your opponent, then you will be deemed to have enough time left to mate, and the early pruning check will be made.
|
|
Blitz mode is not available for 7 piece endgames, as the depth to mate metric required to determine solve time is not available for those endgames. |
4.8. Play Best
The "Play Best" button plays the best move for you in the current position. However there will be a large penalty for using the button, so be careful how often you use it. Each time you use "Play Best" there will be a certain number of moves added to your move count (used in calculating your rating if you succeed). The penalty for using "Play Best" will be a minimum of 10 moves. In Practice and Theory mode, if you have made any previous attempts then the penalty will be the longest attempt you had made already for the current position plus an extra 5 move penalty (or 10 moves if this number is still less than 10). Benchmark mode will add a flat 10 moves on to the number of moves taken each time the play best button is used. The purpose of "Play Best" is to provide an alternative to completely giving up, and thus to allow you a chance to learn more about a position which you may otherwise feel completely lost in.
5. Chess Database
The Chesstempo database allows users to research openings and endgames, and study the games of the great Grandmasters. Powerful search and filtering features are provided to control which games are included in your opening research, or to help you find and study games of interest.
5.1. Opening Explorer
The Opening Explorer provides a way of studying the popularity and performance of different opening moves. The opening explorer allows you to play through opening lines, with statistics provided on all the moves, indicating how they have performed when played by others.
The figure below shows an example of the opening explorer in action:
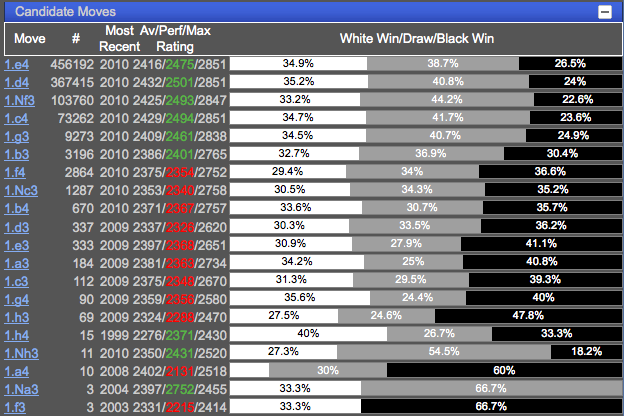
You can interact with the opening explorer by making moves on the board, or by clicking one of the candidate moves. If you are playing through the moves in an actual game, the explorer will also be active, and will show the stats for the current position in the game.
5.1.1. Candidate Move Stats
The number next to each candidate move provides an indication of the popularity of each move. By default, this number shows the number of times the position after the move was reached in the database. Because this count is based on the resulting position, and not the actual move, this means that the count is aware of transpositions, and will also include the number of times the resulting position was reached via other moves. If you wish to see the count for only the moves that were played in the current position, and ignore transpositions into the subsequent position, then you can change the explorer stats settings from Resulting Position to Actual Moves . This is discussed in more detail in the Explorer Stats Options section of the user guide.
The other columns in the opening explorer show the date the move was last played (or the resulting position reached, depending on the Explorer Stats
setting), the average and maximum rating of the player playing the move, as well as the performance rating of the move.
The performance rating uses the USCF tournament performance rating calculation, and provides a rating for a move based on the rating of the opponents of the player who played the move, and the number of times the game ended up won or lost after the move.
If the performance rating is higher than the average rating of players who played the move, the performance rating is displayed in green, and if it is below the average rating, it will be displayed in red.
The colours can be used to see moves that lead to positions where the players of the move perform above or below their average rating.
|
|
White has a natural advantage in the opening, so white moves are more likely to receive green colouring than black moves. This factor should be considered when interpreting performance rating based colouring. |
5.1.2. White Win/Draw/Black Win Percentages
These values show the respective outcomes for games where each move was played (or each resulting position arrived at). The bars allow the relative outcomes to be seen at a glance.
|
|
The order of white/draw/black is the same irrespective of whose turn to move it was, i.e. white’s win percentage is always shown first, even if it is black to play. |
5.1.3. Filtering/Searching and the Opening Explorer
By default, Game Database subsets (2200+, SuperGM+ etc) and game searches (both advanced and quick search) impact the games used to generate the statistics for the Opening Explorer. So for example if you specify the database subset as SuperGM+ then the Opening Explorer will only include games where both players were rated 2700+. You may also want to look at recent theory in a line, and specify a date search criteria to include only games played recently. It is also possible to specify a player’s name to view the opening repertoire of that player. To make this useful, you probably want to look at one colour at a time (otherwise the opening stats will include moves played by the player’s opponents). For example, specifying Piece Colour as white will only have games where the specified player played with the white pieces, so all white move stats will be from the player’s point of view, and all black move stats will be from the opponent’s point of view. It is also possible to specify an opponent name to view the types of openings played between particular opponents, a Piece Colour setting should also be used here so that each colour’s moves are attributed to only one of the players, rather than showing a mix of choices across different games.
|
|
Currently, material search criteria will be ignored in Opening Explorer filtering. |
5.1.4. Explorer Stats Options
By default, opening explorer statistics for each move are based on analyzing the position that is reached after the relevant move is made. This allows stats to account for transpositions into the resulting position from other lines. There may be times at which this is not the desired behaviour, and you would prefer to see the stats based only on the instances in which the relevant move was played in the current position. To do this you can choose the option from the Explorer Stats option selector. To return to the default behaviour choose .
5.1.5. Related Openings
Related openings shows a list of the openings that contain the current position. This display is transposition aware, so it will show openings that contain the current position, even if the move sequence in the move list is different from the opening’s actual move sequence. As the number of openings can be very large for some positions, it is suggested you only have this panel open when needed, as downloading the information can slow down other operations.
|
|
The initial board position will not show any related openings, if you wish to see a list of all openings, the Openings List page is the best place to see them. |
5.2. Game Search
Game search serves two purposes, it allows you to find games meeting a particular criteria, but it also allows you to control which games are processed when displaying the opening explorer stats.
5.2.1. Results List
The search results are displayed under the search filter. You can sort most of the columns by clicking on the column headings, the sort order can be reversed but clicking on the column header a second time. There are three icons shown in the first column:
- Download PGN
-
The first icon on the left allows you to download the the PGN of the game.
- Open Game in New Window
-
The middle button allows you to open the game in a new pop-up window.
- Open Game in Current Window
-
The last button on the right allows you to load the game into the existing page.

When opening a game in the current window, the search results will remain, but any previous game and lines will be replaced with the new game, and there is currently no way of returning back to them, so if you have lines in the move list you still want to refer to, open in new window button is the best option.
If you click on any of the other links in the results list, they will take you to the relevant player or opening shown in the link.
5.2.2. Quick Search
Quick Search allows you to rapidly enter simple search criteria, without having to use the more complicated advanced search panel. Search criteria supported in quick search includes:
- Year
-
Any 4 digits e.g.
2007 - Year Range
-
Two years separated by a hyphen, e.g.
2007-2009. All games played within the years will be matched. - ECO
-
Any ECO code, e.g. B52
- ECO Range
-
Two ECO codes separated by a hyphen, e.g.
B52-B56. This will search for all games with openings within the ECO range. - Minimum Rating
-
A 4 digit number with a + at the end, e.g.
2500+, would match games where one of the player’s rating is 2500 or higher. - Event
-
Any string preceded by the word
event:will matches games in events containing the following word. For exampleevent:Corus. If you want to match more than one word then you will need to put the words in quotes, for example:event:"World Championship" - Site
-
Any string preceded by the word
site:will match all games played at sites that match the following word, for example:site:London. Again, if you want to match more than one word them quotes are required, for example:site:"New York". - Opening Name
-
Any string preceded by the word
opening:will match all games that used the specified opening, for example:opening:Sicilian. Again, if you want to match more than one word them quotes are required, for example:opening:"Sicilian Dragon". - Player Name
-
The name of a player, playing either white or black in a game. There is no special syntax for player names, you can simply type them directly, e.g.
Kasparov. - Player name versus Opponent name
-
The names of a pair of players playing each other. 'vs.', 'v' and 'vs' will also work as replacements for 'versus'. Versus can also be left out, as long as the result is not a player name for example
Kasparov Karpovis equivalent toKasparov versus Karpov. Order of names is not important here, so Kasparov versus Karpov will return games where both Karpov and Kasparov had the white pieces.
5.2.3. Advanced Search
Advanced search allows more explicit control over search criteria than is provided under Quick Search, and also allows access to some search features not made available via Quick Search. When the database page is first loaded, the advanced search is hidden, to show the advanced search fields, click on the Advanced Search link.
Game Details Search
Game Details Search allows you to specify criteria that are related to the game as a whole, currently the following criteria are supported:
- Player
-
Player
- Player Name
-
The name of the player. The more specific the name, the more specific the results, for example if you type 'Kasparov' will receive results from not only Garry Kasparov, but also Sergei Kasparov and Tatiana Kasparov. The name format is fairly flexible, so the following should all return the same results:
-
Garry Kasparov
-
G Kasparov
-
Kasparov, Garry
-
Kasparov, G
-
Some player names are given aliases, so for example 'Gary Kasparov' will be equivalent to 'Garry Kasparov'. Several names can be added using semi-colons as separators for example: Kasparov;Carlsen, will return games played by one of Kasparov and Carlsen (but not necessarily against each other).
- Player Rating
-
The rating range of the players to match. If no player names are specified, this will match all players with this rating range.
- Piece Colour
-
The colour of the pieces played by the player. There doesn’t need to be a player name entered for this to apply, for example if a rating range is entered and 'white' is chosen as the piece colour, then it will apply the rating range to games where the white player had the rating range specified, instead of either player. Similarly, if a colour is selected here and an opponent player name is entered, then the opponent name will only be matched against games where the opponent played with the opposite colour to the one specified.
- Result
-
Specifies the outcome of the game from the first player’s perspective. So for example if you enter Kasparov as the player name, and Karpov as the opponent player name and select 'Win' as the result, then you will search for all games where Kasparov beat Karpov. If you also select the piece colour , for example 'black' then you will return all games Kasparov beat Karpov where Kasparov played the black pieces. To search for any games where Kasparov won as black , you can select Kasparov as the player name, piece colour as 'black' and result as 'win', leaving the opponent name fields blank. Another example of a result based search is to look for games where Kasparov lost to players under 2500. This would require choosing Kasparov as the player name, choosing 'Loss' as the result and entering 0 and 2500 for the min/max rating for the opponent rating. Result’s do not have to have player names entered, for example using setting result to 'Win' and piece colour 'Black' would return all games in the database where black won.
- Opponent Name
-
The name of the opponent. It is important to remember that player versus opponent name is not the same as white versus black player name. The player and opponent names are colour neutral unless the 'piece colour' option has been selected, so entering Kasparov as the player name and Karpov as the opponent name will return all games between Kasparov and Karpov, irrespective of which colour pieces each player had.
- Opponent Rating
-
Rating range of the opponent. Like player rating range, this does not require an opponent name to have been entered, leaving opponent name blank and entering in values for the opponent rating will match all games with opponents within the rating range.
- Year
-
Year - Range of years in which matching games must have been played.
- # Moves
-
The total number of moves in the matching games. This value is in terms of half moves (also known as ply), so 1.e4 e5 2.Nf3 would be 3 moves.
- Event
-
The name of the event that the matching games were played in. Multiple event names may be entered by separating them with the semi-colon character.
- Site
-
The name of the event that the matching games were played in, again a semi-colon can be used to separate multiple site names.
- Opening Name
-
The name of the opening in each game to be matched, multiple openings can be entered by using a semi-colon to separate the names.
- ECO Code(s)
-
The ECO codes of matching games, multiple ECO codes can be separated with a semi-colon, or eco ranges can be entered , for example
E90-E92.
Material Search
Material search allows you to search for particular material configurations on the board. This is especially useful for finding endgame positions to study, but can also be used for other purposes, such as using material value differences to find games involving sacrifices.
|
|
Material search results will have game link buttons that will go to the first position in the game which matched the material criteria. Only the first matching position in each game will be returned in the results, even if there was a matching position later in the game with the colour of the matched pieces reversed. |
Material Counts
Material counts allow you to specify a position with a certain number of pieces of each type on the board. You can specify an exact number of pieces or a range of number of pieces. An exact count is specified by setting the minimum and maximum to the same value. Pieces types that don’t have a count, or count range specified are treated as 'wildcards', that is any number of that piece type are allowed. Piece counts can be adjusted in several ways:
- Text Entry
-
Directly entering the minimum or maximum values into the text box next to the piece.
- Up/Down Arrows
-
Clicking the up or down arrows next to each minimum or maximum box will increase or decrease the count.
- Clicking on Piece Icon
-
Clicking the piece icon either resets the min/max to 1, or if the min and max are already the same value it will increment them both. For example if a count range of 2-3 had been entered, then clicking on the piece icon will reset the count to exactly 1, subsequent clicks would increment both the min and max so the next click would create an exact count of 2, and the next 3 etc. If the count was already at an exact number (i.e. min/max the same value) then clicking will continue to increment both the min and max.
- Zero Button
-
Clicking on the Zero Button sets the count to zero, such that only positions with none of that type of piece will be matched.
- Cancel
-
Clicking on the Cancel Button will reset the count to the default. The default is the wildcard setting, which will match any number of the piece.
In addition to each piece type there is also a 'Minor' piece type and a 'Value' type. 'Minor' pieces is a type which covers counts for both bishops and knights, so a count range of 1 to 2 here means you could have 1 bishop, 1 knight, 2 bishops , 2 knights, or just a bishop and a knight. The 'Value' count lets you search based on a count of material value, using the traditional values of:
-
Pawn - 1
-
Knight - 3
-
Bishop - 3
-
Rook - 5
-
Queen - 9
Kings are not counted in the 'Value' count, and therefore have effective value of zero for Value counts.
|
|
When using 'Minor' piece search criteria you need to make sure you are not creating separate Bishop and Knight criteria that would clash with the 'Minor' piece specifications, otherwise you may not receive the results you expect, for example asking for 0 Knights and Bishops, but also asking for 2 Minor pieces will lead to incorrect results. |
Material Difference
Material Difference ranges allow you to specify the material in relative difference to the opponent, rather than in absolute terms. So for example a material difference range of -2 for the pawns, means that the player is down 2 pawns compared to the opponent. This is often more flexible than using exact counts, as it covers all such situations rather than just one particular case, i.e. rather than just specifying a player pawn count of 6 and an opponent pawn count of 8, a pawn difference search of -2 includes all of player 0 pawns and opponent 2 pawns, player 1 pawn and opponent 3 pawns etc.
Material difference searches allow you to search for particular material inbalances on the board, for example by specifying an exact material difference in minor pieces of -1, and rooks +1 you can find positions where one side has won the exchange. You could also add a pawn difference range to this search of -2 to -1 to find won exchanges where the opponent was given 1 to 2 pawns in compensation.
Material differences can also be combined with exact material counts, so for example an exchange winning difference search could be combined with an exact count of zero for queens for both player and opponent , to find positions where the exchange was one and both queens are off the board.
Stability Length
Stability length specifies the number of ply (half moves) that the position must be stable for in order to match the search. The default value is two, which means the material situation must match the criteria and remain stable for at least the move on which the material balance occurred and after the subsequent opponent move.
|
|
Stability length applies to the entire position, not just the material specified in the search. This means that if for example, you specify an exact match of 1 queen for each player, and a stability length of 4, this will not match a position with 2 queens on the board for 4 moves, if during those moves any other pieces are taken. It will only match positions where there was 2 queens on the board, and the total material on the board remains the same for 4 moves. |
Bishop Square Colour
The Bishop Square Colour option allows you to specify whether the bishops left on the board are on the same or different square colours.
|
|
Bishop square selections should be consistent with the material specified. For example, asking for 2 bishops on each side, and specifying same colour bishops doesn’t make sense. The square colour options are only relevant to situations where there is only one bishop on each side. |
Endgame Selector
It can sometimes be time consuming to set up a material search for a particular endgame type you are interested in. To make common endgame searches easier to perform, a quick endgame selector is provided at the top of the material search tab. The endgames are categorized using the same chapter and section divisions used in Reuben Fine’s Basic Chess Endings.
|
|
The endgame selector creates the relevant material search fields to match the endgame description. Even if a specific endgame you want to find is not in the endgame selector, choosing the closest available endgame in the selector and then tweaking the material search criteria may be much faster than creating a search from the initial default search criteria. |
Interaction with Game Details Player and Opponent criteria
All material search criteria are combined with the criteria from the game details tab, so for games to match the search, they must match both game details and material search criteria. The game details player and opponent criteria are especially relevant, as they dictate which colour pieces the player and opponent material is counting. By default the colour of the pieces is ignored during material matches so, for example a player material difference match of 'Minor -2 to -1' will match any position where either black or white was 1 or 2 minor pieces down. However, if you selected 'Piece Colour' white and did the same search you would only get positions where white was down 1 or 2 minor pieces.
Combining the game details 'Result' criteria allows for some interesting searches. For example specifying Result: 'Win' and a player 'Value' difference range of -38 to -5 and a longer stability length of say 4, you can see all the games where a player was down at least 5 points of material, for at least 4 moves, and still ended up winning the game. Particularly for high rated players' games, these positions are often going to be tactical sacrifices of a rook or queen.
5.3. Games for Position
The Games for Position list shows all the games that contain the current position on the board. If any search criteria was entered, then the games for the position will also be filtered by that criteria (excepting material search criteria which is not included in the games for position filter).
The Games for Position list, is particularly useful in conjunction with the opening explorer, and can be used to study example master games that followed the current opening line.
Like the game search results table, most columns can be sorted by clicking on the relevant column header. See the Results List section of the user guide for more information on the columns returned in the Games for Position results.
5.4. Players List
The Player List page allows you to search for a particular player. It can also be used to identify the top players, as well as the top players by country, gender, rating range, or a particular period in history.
5.4.1. Player Search
- Player Names(s)
-
The player names you want to search for. You can enter multiple names by separating them with semi colons, for example:
Kasparov;KarpovPlayer name auto-complete will be triggered after at least 3 letters have been entered. Auto-complete displays the player names that match the letters types. You can click on the player name to choose the relevant player , or continue to type letters to further refine the choices.
- FIDE Id(s)
-
The FIDE ids of the player players you wish to search for, multiple IDs should be separated by the ';' character, for example:
4100018;600024 - Rating
-
The minimum and maximum rating for the players you want to match. This matches the player’s most recent rating.
- Minimum Games Played
-
The minimum number of games a player must have played in order to match the search.
- Year Last Played
-
The minimum and maximum year range that the player last played a game. This can be used to look at top players in a particular time period. If you want to see the top players currently active, then you can restrict this range to the current year.
- Gender
-
The gender of the players that will be matched by the search. This criteria can be used to show the top male or female users.
- Federation Code(s)
-
The chess federation of the country the matched players are currently playing under. These are three letter codes such as RUS,USA,POL etc. Multiple federation codes can be entered by separating them with semi-colons, for example:
RUS;USA
5.4.2. Player Table
The player table includes the following columns:
- Name
-
The name of the player, in "lastName, firstName" format.
- Last Played
-
The date of the most recent game played by the player in the database.
- Country
-
The chess federation the player most recently played for.
- Max Rating
-
The maximum rating achieved by the player.
- Rating
-
The most recent rating the player has achieved.
- Games
-
The total number of games by the player that are stored in the database.
5.5. Openings List
The Openings List allows you to browse the openings stored in the database, searching and sorting the openings by a number of different criteria.
5.5.1. Openings Search
- Piece Colour
-
The colour of the last player to move in an opening line, in other words, the piece colour of the player, that chose this particular line.
- Minimum Games Played
-
The minimum number of games that must have been played in the opening for it to appear in the search results.
- Opening Name(s)
-
The name of the opening(s) to search for. Multiple opening names can be entered by separating them with a semi-colon. You don’t need to enter for the full name of the opening for it to match, for example entering
Dragonwill match the standard Sicilian dragon, as well as the accelerated dragon. - ECO Code(s)
-
The ECO code of the openings you wish to see. Multiple ECO codes can be entered by separating them with semi-colons. ECO ranges can also be entered in the format
B50-B56. Multiple ranges can also be entered such asB50-B56;B60-B70.
5.5.2. Openings Table
- Opening
-
The name of the opening.
- Colour
-
The colour of the pieces played by the last player to move in the opening line.
- Num Games
-
The total number of games that used this opening.
- ECO
-
The ECO classification for this opening.
- Last Played
-
The date this opening was most recently played.
- Perf Rating
-
The performance rating for this opening. This is the performance rating of all the games this rating was played in.
- Avg Player
-
The average rating of players who choose to play this opening.
- Player Win %
-
The total % of games in which the player who choose this opening won.
- Draw %
-
The total % of games in which this opening was played that led to a draw.
- Opponent Win %
-
The total % of games in which the player who choose this opening lost (i.e. their opponent won).
- Moves
-
The moves which define this opening.
Because opening tagging is transposition aware, it is possible for a game to be tagged with an opening, without using the exact move sequence listed.
5.6. Player Details Page
The player details page shows information relevant to a particular player. Each player who has played a game stored in the database has a player details page. There are several ways of reaching a player page, by clicking a player link on the player page, by clicking on a player link in a game search results or games for position list, or by going directly to the web address which links to the player page via a bookmark, or link posted on another web page.
5.6.1. Comments
The comments tab allows you to read and add comments relevant to a particular player.
5.6.2. Rating Graph
The player rating graph shows how the player’s rating has changed over time.
5.6.3. Opening Stats
The player opening stats shows the most frequently played openings for the player with the white and black pieces. The 'Played' column of each table shows the total number of times the player played an opening and how the player performed , for example:
13 (+3 -4 =6)
shows the player had played the opening 13 times, for 3 wins, 4 losses and 6 draws. You can click on any of the opening names to see the opening details page for that opening. Openings will open in the current page unless you ask your browser to open them in a new tab or window.
5.6.4. Repertoire Selector
When viewing a player details page, a repertoire selector is provided just above the opening explorer. This lets you choose which games of the player the explorer will show stats for. By default, both white and black games are shown, however for the white moves, this will also show stats that include games where the player whose details are being shown had played the black pieces. To view only the stats for games in which the player played one of the pieces, you can use the repertoire selector to choose either black or white pieces only. If white is chosen, then all the stats for the white moves will reflect only the games where the player played the white pieces, and the black move stats will reflect only the player’s opponent moves.
5.7. Opening Details Page
The opening details page shows information relevant to a particular opening. When the opening details page loads, the move list is initialized with the moves in the main line of the opening. The board is shown in the state that exists after the last move in the opening is played, and a game search is automatically performed to show all the games that reached that position.
5.7.1. Comments
The comments tab allows you to read and add comments relevant to a particular opening.
5.7.2. Opening Popularity Graph
The opening popularity graph shows the relative popularity of an opening across the time period that it has been played. In order to factor out the increasing number of games recorded in the modern period, the graph is based upon number of games per thousand in which the particular opening was played in each year. This allows a more meaningful comparison of popularity over time.
5.8. Game Details
The game details shown next to each board on the game database page shows details relevant to either a particular game, or a sequence of moves entered by the user.
5.8.1. Game Data
When the game details are for a game, instead of user entered moves, the details for that game are displayed above the move list. This data includes the names and ratings of the players who played the game, the date the game was played, the event and location the game was played in, the result, the opening, and the ECO code the game was tagged with. The opening used to tag the game is based on the latest position in the game that matched a move reached in a recognized opening. Because the opening tagging is position based, rather than move based, the opening tag is transposition aware, and relies on the positions eventually reached, rather than the moves made to reach them.
5.8.2. Move List
The move list shows the current list of moves. For a game, this starts out as the full list of moves from the game. If the user is making their own moves, the move list will show those moves. Whether the moves are for a game stored in the database or not, new moves or variations can be added at any point by playing a different move to the next move to be played in the move list. Any move can be clicked on in the move list in order to jump to that position on the board.
5.8.3. Current Opening
Just below the move list is the opening relevant to the current position shown on the board. This is different to the opening a game was tagged with, as it shows the opening the move list would be tagged with if the game finished at the currently selected position. As you move through a move list, the opening will become more specific as the moves continue.
5.8.4. Game Actions
The buttons beneath the move list allow several actions to be taken:
- Report Problem
-
Due to the large variety of public sources that games have been collected from, inconsistencies are inevitable. Exact duplicates are removed from the database, however there may be near duplicate versions of a game that are incorrect and require removal or correction. The Report Problem button allows you to report problems with a particular game, and the resulting reports will be used to improve the quality of the database. If you are unsure on whether a game score is accurate, you may want to post a link to it in the forum , so others can discuss it.
- Download PGN
-
The Download PGN buttons allows you to download the PGN of the game you are viewing. The Download PGN button can also be used to download moves,variations or comments you have entered yourself.
- Delete Variation to End
-
Variations created in the move list can be deleted using the delete variation to end button. When clicked, the currently selected variation is deleted to the end of the line, any sub variations on the deleted moves will also be removed.
- Promote Variation
-
The Promote Variation button takes the sub-variation holding the currently selected move and swaps it with the parent variation, with the old parent variation becoming a sub-variation.
- Add Comment to Move
-
After selecting a move in the move list, the add comment button allows you to add a comment to the move. You can select if the comment should appear before or after the move. Once a comment is added, you can edit the comment by clicking on the comment text.
- Previous and Next Game
-
The next and previous game buttons allow you to move though the results of a game search.
- Reset Board
-
The reset button returns the board and move list to the initial position.

The reset button clears all existing moves and variations, and these cannot be restored. - Jump to Novelty
-
The jump to novelty button moves to the last position in a game that is shared with other games. This means the next move to be played was a novelty, never seen before in any game in the database. The novelty button can be used in combination with the Games for Position tab, which after the Jump to Novelty button is pressed will show the games in the database that were closest to the current game.
NOTE: The jump to novelty button will jump to the last novelty in the game, it is possible that earlier novelties may exist in situations where transpositions led the game back into a more popular line later in the game.
|
|
Currently search filters or database subset choices are not applied to the novelty processing, so the games used for novelty matching use all games in the database. |
+
5.8.5. Permanent Link
Because games can be loaded directly into the page without causing a page reload, the link at the top of the browser window, may not reflect a link to the current game. To provide a convenient way of saving or book marking links to a game and position, a permanent link is provided beneath the game board. For games this will link to the game and the current position. For moves entered without a game, it will link to a page that will show the current board position, but without the move list.
5.8.6. Material Graph
The material graph shows how the material balance in a game changes over time. This can be used to see key points in the game, both where material has been swapped, or a persistent material advantage has been gained. The graph can be clicked on to move to the relevant point in the move list.
5.8.7. Game Comments
Game comments allow you to add comments that are specific to a particular game.
5.9. Database Subset Selector
The Database selector allows you to conveniently select a subset of games to be used. Database subsets are based on the minimum rating of both players involved in each game. The default subset is 2200+, and subsets up to SuperGM+ (2700+) can be selected. To see the full database select the "All Games" option.
The database subset will effect the game search, the games for position list and the results shown in the opening explorer. The database subset will be ignored if you enter a rating based search in the advanced or quick search.
5.10. Filter Impact Selector
The filter impact selector allows you to choose which elements of the user interface will be impacted by the game search filter. By default the filter impacts both the games for position list, and the opening explorer stats. You can choose to change this to impact only the position list, the opening explorer stats, or neither of the two elements.
5.11. Database Related Board Buttons
The board shown on the database page has the following extra feature:
- Paste Position/Moves
-
The paste FEN position or moves button beneath the database board allows you to paste either a FEN position or a list of moves in standard PGN format into the database in order to initialize the board to a particular position or move list.
When pasting moves, an entire PGN file is not required, so for example you could paste in
1.e4 c5 2.Nf3 d6 3.d4 cxd4 4.Nxd4 Nf6 5.Nc3 a6 6.Bg5in order to see the Sicilian Najdorf, and start exploring further lines in that opening.
|
|
When moving through the moves in a game, the game database may indicate that it is busy loading related data, for example when loading opening explorer stats or updating the games for position list. If you want to quickly move though the moves in the game, you do not need to wait for these operations to finish before going on to the next move. If you don’t want to see the opening explorer or games for position results for each position, you can press the arrow keys (or click on the forward/previous buttons) as quickly as you like, without having to wait for the data for the current position to finish loading. |
6. Comment System
Comments allow you to express your opinion on tactic and endgame positions, games, players and openings.
6.1. Adding a New Comment
To create a new comment , click on the 'Add' comment button. Please read all existing comments before adding a new one, as someone may have already made the same point, or may have answered a question you plan to ask.
6.2. Comment Voting
Not all comments made are useful or informative. If you think a comment is low quality, then you can use the down vote button ( ) to vote a comment down. Similarly high quality comments can be voted up by using the vote up button ( ).
|
|
Please read the Problem Comment Guidelines for the rules and guidelines on commenting on tactic and endgame problems. |
6.3. Comment Boards
Comments can include mini-boards which either show a static board position, or a board with a list of moves and variations than can be played through. By default, boards need to be shown by clicking on the 'Show' button, this is to prevent slowing down older browsers on pages with a large number of boards. If you are using a new browser on a fast machine, you may wish to set the 'Automatically show comment boards' option on the 'Other Settings' preferences tab.
Boards can be inserted into a comment using the analysis board or 'Copy Fen' button which has a 'Copy to Comment' option. The 'Copy Fen' option creates a static board position represented by the current position on the board.
Boards can also be inserted manually using the following syntax:
- Board with Moves
[moves start=START_POSITION_FEN]PGN_MOVE_LIST[/moves]
                  [moves start=r5k1/b2brp1p/p1pN1pn1/q1N5/1p2P3/1Q4P1/PP2B1KP/2RR4 b - - 0 1]1... Bh3+ 2. Kxh3  Bxc5
                  3. Bf3  Bxd6 4. Rxd6  Ne5 5. Rxf6  Kh8 6. Rd6  Rd8 7. Rxd8+  Qxd8 8. Rd1  Rd7 9. Be2  Rxd1 10. Qxd1
                  [/moves]
- Static Position
[fen]FEN_POSITION[/fen]
[fen]3q3k/5p1p/p1p5/4n3/1p2P3/6PK/PP2B2P/3Q4 b - - 0 10[/fen]
6.4. Editing and Deleting Comments
If your comment is the most recent comment made, then you are allowed to either delete or edit the comment using the Edit or Delete buttons. The Edit button will place your existing comment into the add comment box, and once you have finished editing, the Submit button saves the edited comment.
6.5. My Comments
The 'My Comments' tab on the Problems Page provides a convenient way of viewing replies on problems you have commented on in the past. The 'My Comments' tab shows a list of problems you have commented on, and all the comments on those problems. The problems are ordered such that the problems that have been most recently commented on appear first. This means you can regularly read the list to view new comments on problems you have previously commented on. Your own comments are highlighted, and a colour bar separates the comments of one problem from another.
7. Problem Search and Custom Problem Sets
Problem search allows you to find problems matching a specified criteria, premium users can create custom problem sets based on these criteria.
7.1. Basic Search
Basic search allows you to choose a rating range and rating type (Blitz/Standard/Mixed for tactics and Theory/Practice for endgames). After clicking the 'Search' button, problems matching your chosen rating range in the chosen rating type will be returned in the problem list. By default the problem list returns all tactics problems, and any sorting is based on the problem number. You can sort by other columns by clicking on the column header.
The problem search results includes the following columns:
- Problem #
-
Each problem, has a unique number assigned to it, this makes it useful when communicating with others about the problem, for example when posting on the forum. The problem numbers are direct links to the problems. They can can be clicked on, or copy and pasted into the forum or emailed to allow others to go directly to the problem.
- Moves
-
The Moves column shows the number of moves in a problem, these are full moves, rather than ply, so 2 moves means at least two moves from the side to play.
- Rating
-
This is the current rating of the problem using the selected 'Rating Type', for example if you select 'Blitz' as the rating type then this will be the blitz rating of the problem.
- Av Secs
-
Average number of seconds taken to solve the problem. Note this only includes successful attempts. The number of seconds is for the rating type selected.
- Attempts
-
The number of times the problem has been attempted. This is the number of times for the rating type selected, and does not include unrated attempts, or attempts in other rating modes.
- % Correct
-
The percentage of people who solved the problem correctly. Again, this is for the rating type selected, and does not include unrated attempts, or attempts in other rating modes.
- Correct
-
The total number of times you have got the problem correct.
- Wrong
-
The total number of times you have got the problem wrong.
7.2. Advanced problem search and custom set criteria
Advanced search allows premium users to have greater control over the problem search, it includes criteria for problem specific features, including criteria related to previous attempts on the problems. These criteria can all be saved as custom problem sets for solving against the matching problems on the tactics or endgame training pages.
7.2.1. Advanced Search - Problem Features
- Number of Moves
-
The number of moves in the tactic. These are full moves, for tactics they are measured as the number of moves the solver must make to complete the problem. For endgames the number of moves is the fastest number of moves to reach mate. Due to pruning, the endgame problems often reach completion before mate is achieved.
- Total Attempts
-
This is the total number of times a problem has been attempted using the selected rating type. This number is across all solvers, not just the attempts of the person doing the search.
- Tactic Tags
-
This allows use to select tactic problems based on their tag, such as Fork, Pin etc. These tags can include positional as well as tactical motifs. To add a new tag, select the tag scope in the first column (Tag or Primary tag, where primary tag is a tag which has the most votes of all tags for the problem). The second column says if you are matching problems with the tag or only problems without the tag. The final column is the actual tag selector. You can add another tag using the + button. By default multiple tags need all tags to match on a problem for the problem to match. To change this, switch from the 'All' choice to the 'Any' choice which means a problem will match if any of the multiple tags match. If you need more complicated matching such as (Fork AND Pin) OR (Discovered attack) you can create tagging groups. Click on the group icon (the three circles next to the
button) to create a new sub-group of the current top level group and enter the criteria for the sub-group. To achieve (Fork AND Pin) OR (Discovered attack), you would create one sub-group with Fork and Pin as multiple tags and the 'All' criteria, and then a top level with one Discovered attack criteria, and have the top level changed from 'All' to 'Any'.Tag modifiers (attributes that modify the tag, such as the type of piece involved) can also be selected by choosing 'Modifier' in the first column (instead of 'Tag' or 'Primary tag'). If you select a modifier and are using the default 'All' attribute for the current group, then all the tags you select for the current group must have the modifier. This means if you want something like (Fork[Knight] AND Skewer[Queen]) you’ll need to create two groups , one with the Fork tag and the Knight modifier and the other with the Skewer tag and the Queen modifier). Note that if you want all Forks for example, you don’t need to specify all the possible modifiers, as Fork by itself will match all Fork tags using a modifier.
You can also choose the tag vote threshold which is how many more up votes than down votes is needed on a tag for it to match. The higher the number, the more certain the tag will be, but the less problems that will match.
- Endgame Type
-
This allows use to select endgame problems based on the endgame type, for example, KRPKR is the Rook and Pawn versus Rook endgame. To see this option, theory or practice rating type must be selected. Multiple endgame types can be selected. The numbers shown in brackets after each endgame type is the number of problems for that type. Currently only available on old site.
- Tactic Problem Types
-
Specifies if winning, non-winning, or both types of tactics problems are included in a problem search. Non-winning tactics are those that leave you close to even, and other moves would lead to a losing or lost position.
- Outcome type
-
The outcome option indicates if you want matching problems to be mates, non-mates or either. This options is only useful for tactics problems, as all endgames are deemed to be 'mates'.
- Quality rating
-
The quality range option allows you to select problems based on their quality rating. If you want to select a value that is not a whole number that is not supported by the slider, then you can click on the minimum or maximum value to enter an exact value.
- Colour to move
-
The colour of the pieces controlled by the player solving the problem.
- Number of pieces
-
The number of pieces on the board at the start of the problem.
- Game move number
-
The move number in the source game at which the problem starts.
The number of pieces, colour to move and game move number search criteria can be useful when combined with the opening name/ECO code search criteria, allowing you to choose tactics from games that used your opening of choice, and concentrate on the tactics that actually appeared in the opening phase of the game, rather than middle game/endgame positions that happened to arise out of the opening you searched for.
- Comment search
-
Matches only problems with the supplied search string in one of their problem comments. For example "boden" would return problems where people had discussed Boden’s mate (likely because the problem itself was of that type).
7.2.2. Advanced Search - Previous Attempts
The previous attempts criteria of the advanced search allows you specify problems based on the nature of your previous attempts against them.
- All Problems
-
This is the default option, and matches any problem, irrespective of your past history with the problem.
- Problems I got wrong at least once
-
This option specifies that you want to match problems you’ve made mistakes on in the past. This option will match any number of mistakes, and will still match problems you may have gotten correct on subsequent attempts.
- Problems I got right at least once
-
This option matches problems you have correctly solved in the past. It includes problems you’ve got wrong, as long as you’ve got them correct at least once.
- Problems I have tried
-
This criteria matches problems you have attempted in the past, irrespective of the outcome.
- Problems I have never tried
-
This option only matches problems you have never attempted in the past.
- Problems I have never got right
-
This option matches problems you have not got correct, it is a combination of problems you have never tried, and problems you may have tried, but never been able to solve correctly.
- Problems I always got wrong
-
The criteria matches problems that you have done in the past, but never been able to solve correctly. This criteria is very useful when creating custom sets designed to review past mistakes.
- Advanced history filter
-
Allows you to choose explicit ranges of correct and failed attempts to match. For example you can ask for problems you got correct less then 4 times by selecting the correct attempts range from 0 - 3 and leaving the Failed attempts range with the default setting. By default a problem will match if either the correct or failed range matches, however some types of attempt searches may require both range to match, and you can change the Attempt number match type to achieve that.
The problem set attempts criteria can be chosen to apply to all problems, or a subset of problems. All problems is the default , and includes any problem, both from the official sets, and custom sets. The other options are blitz, standard, mixed, theory and practice attempts. If for example you choose standard and apply the 'Problems I always got wrong' then this will match only problems you got wrong in standard mode.
If you would like ONLY your most recent attempt to be considered for all previous attempt matching criteria, select the "Match against most recent attempt only" option. A common use of this option is in conjunction with the history filters, as it allows you to search for problems you got wrong on your most recent attempt by using one of the history filter types that searches for incorrect problems. So for example "Problems I got wrong at least once" will return only problems where your last attempt was wrong if you turn on the "Match against most recent attempt only". Problems you got wrong on previous attempts if the most recent attempt was correct will be ignored in that situation. Note that sets created with this option will only work on the new site.
Solve time ranges of the problem attempts can also be chosen, here the solve time is the shortest solve time across all attempts, and is defined in number of seconds. You also choose to include all as yet unsolved problems in the search , which is useful if you want to solve a set of problems until you can solve them all under a specified minimum solve time. You can also choose to only use the most recent solve time for the solve time matching. This allows you to include problems that you may have solved quickly in the past, but where your most recent attempt was slower. Without using the "Use most recent time" option,the time that is matched is the shortest time across all problem attempts.
How recently you have seen a problem can also be used as an attempt filter criteria by entering a "Days since last seen" range. For example setting this to 0-31 would only give you problems you had seen in the last month. Setting it to 31-365 would only give you problems you hadn’t seen for at least a month, but had seen within the last year.
7.2.3. Advanced Search - Set Options
These are options to be applied to any custom set created based on the search criteria.
Rating adjustment method
Allows you to chose the method of rating your custom set, it can use the blitz, mixed or standard rating methods.
Problem selection method
This option selects how problems will be selected from your created problem set:
- Random
-
Randomly select any problem from those that match the search criteria.
- Target my rating
-
Use the same method used for the Blitz/Standard/Mixed sets which uses a bell curve centered around your rating and selects items based on that curve, meaning that problems close to your rating will be chosen much more often than problem further from your rating.
- Sorted/Looping
-
The sorted options allow you to control what order problems are served up from a custom set. You can also use sorted sets to loop through a set of problems multiple times. See the sorted sets section for more details.
- Spaced repetition
-
Select problems from your set based on a spaced repetition selection algorithm. See the spaced repetition section for more details.
7.2.4. Advanced Search - Game details
The advanced searched criteria used in the database is also available in the advanced problem search. This allows you to match problems based on their source game criteria. For example the player (or players) involved, their rating range, or the opening played. Please see the Advanced Search section of the database chapter for more detail on the criteria available here.
|
|
Currently only game detail parameters are available for problem search, material search is not yet supported as part of the problem set matching criteria. |
7.3. Custom set sorted selection
Sorted/looping custom sets go through the problems that match the custom set criteria in a particular order, and provide the ability to choose the sorting criteria and the direction of the sort. When you reach the end of a sorted set, the set is reset to start from the beginning, and you can continue to solve any problems left in the set that still match your custom set criteria.
Custom sets of this kind can be used to implement some popular tactics training methods such as the seven circles method described by Michael de la Maza, or the woodpecker method introduced by Axel Smith and Hans Tikkanen. Under these methods, a set of problems is gone through multiple times, with the aim of achieving faster solving rates and increased accuracy during each loop. The final goal being to improve pattern recognition by repeated exposure to a set of tactical patterns.
To help track your progress as you pass through each loop of your sorted set, some stats are available for accuracy, performance rating, time taken etc for each loop. Click on the icon next to the loop counter while solving to see these details.
If you’d like to have the contents of the first loop through a sorted set decide problems considered for subsequent loops, then enable the "First loop through set decides problems considered for subsequent loops" option when creating your sorted set (like the sort direction and sort criteria option, this will be shown after selecting "Sorted/Looping" as your problem selection method). To make use of this option, create a custom set criteria that includes a number of problems which may be greater than the total number you plan to train on each loop. Select the "first loop through" option before creating the set, then start solving using your new custom set. When you get to the point where you have done the amount of problems you want to train in each subsequent loop, then click on the 'looping set details icon' to the right of the loop counter in the solving interface, and click the 'Finish Loop' button. This will start "loop 2" from the beginning of the sort order, and only consider problems seen in loop 1. When you reach the end of those problems, the set will roll over into loop 3 , and continue on again with the problems you saw in loop 1.
Keep in mind that if you have dynamic criteria in your set such as "problems I always got wrong" and you get them right in loop 1, they will still drop out for loop 2. So in this example, only the problems you got wrong during the first loop will be considered in subsequent loops when using this method, rather than the entire set of problems you’ve previously got wrong, which would be the behaviour without the 'first loop through' option being used.
You can use the 'finish loop' button after the first loop, but it will simply increment the loop counter and start the sort order from the beginning for the next loop. The number of problems seen in the first loop will still remain the relevant problems for remaining loops. The 'finish loop' button can also be used in non-'first loop through' sorted sets, and in that situation, it will again simply increment the loop counter and reset to the start position for the next loop, and the entire set of relevant problems matching the custom set criteria will be relevant for all loops, irrespective of the use of the 'finish loop' button during the first loop.
Note, that if you are using a "first loop through" set and you simply reach the end of the available problems in loop 1, there is no need to use the 'finish loop' button. The subsequent loops in the set will still only include items done in the first loop, so if you have dynamic criteria such as "problems I got wrong", problems you get wrong in other sets after loop 1 was completed will not become available in subsequent loops (which is what would happen in a non-"first loop through" set).
If you’d like to make sure that dynamic criteria you have set, such as rating ranges or quality filters don’t lead items to drop out of your set as they fall out of the matching range, then you could edit your custom set criteria of a "first loop through" set after you have finished the first loop. For example if you set the rating range to say 1000-1100, and end up doing 500 problems during your first loop, and want to make sure they stay there for subsequent loops, irrespective of whether their problem ratings move outside of the 1000-1100 range, then edit the rating range of the set. To do this, use the manage sets button, select the set, and change the rating range criteria to cover the full rating range. This will not include any new problems that were not already seen during loop 1, but will make sure problems in loop 1 will not drop out if their range shifts over time to be outside the range. This is useful if you want to ensure you do only a fixed number of problems each cycle, but still want to use search criteria that might change over time. Tag votes and quality votes can also change over time, and you can use the same trick with those. For example, if you create a set that looks for only pins, remove the pin criteria from the set after loop 1 is completed to have a fixed set of 'pins' that doesn’t change in the face of tagging votes from other users.
The looping set details panel also has a 'reset' button, which resets the entire set back to the default situation. This means the loop counter goes back to 1, the sort order resets to the start, and the looping stats for this set will be cleared. For sets using the "First loop through" option, this will also reset the 'first loop' problem selection, and you can choose the size of the subsequent loops again by using the 'finish loop' when you reach the appropriate position in your first loop of the now reset custom set.
When creating training sets where you loop through a fixed set of problems multiple times in order to improve pattern recognition, we recommend choosing a reasonably large set size, and problems that are not too calculation heavy for your current level of skill. The reason for this suggestion is that if the set is too small, you will likely find yourself rote learning problems/solution pairings rather than acquiring the underlying patterns involved. While both outcomes can occur in parallel, you probably want to focus primarily on a more generalised internalisation of the patterns, rather than a literal memory of particular problem solutions. Ideally, you’d like the literal memory of a position to have faded by the time you see it again, and for recognition of the general pattern, rather than the literal position/solution pair to be the overriding method of solving each time. The larger the set size, the more the focus will be on generalising patterns rather than robotically repeating rote memorised problem/solution pairs.
Similarly, for positions that are complex enough to be largely exercises in calculation, the value of repeated learning of these structures is probably less valuable than trying to focus on simpler patterns. While it is possible to rote learn the solutions to complicated calculation problems - even for problems with difficulty well outside your range if you spend enough time - this time may be better spent on acquiring simpler patterns. This isn’t to say calculation practice is not useful, but repeating the same calculation exercise over and over again may not be the best way to train this aspect of the game.
There are also some potential optimisations you may want to consider for these types of looping sets. One downside of using this type of set is that you can waste time continually repeating a pattern you may already know very well. This time could be better spent on problems holding patterns you’ve not yet acquired. To help counter this, you could filter out problems you’ve got correct more than N times using the advanced history filter option. Alternatively, you could drop problems from the set by setting a minimal solve time under which items are not included, so that as soon as you can see a problem solution in under 5 seconds (for example), that problem would be automatically removed from the set.
If you want more manual control over what is included or excluded, you could create a new personal tag, such as "Patterns I know", and then use the custom set matcher to create a "not" match on the "patterns I know" tag for your custom set. That way, any time you vote up the "Patterns I know" tag on a problem in your set, it will be permanently dropped from all future loops through the set. You could extend this idea further by creating a review set that only includes the problems you’ve tagged with your "Patterns I know" tag, and use that for later review, voting down your tag on any item you got wrong, or felt you didn’t know well enough during the review, thus including it back into future loops in your looping set.
|
|
Because custom sets are dynamic and any new problems or existing problems that change to meet the criteria of the set search criteria will become available in the set, some problems may appear out of order according to the set’s sort criteria. For example if you are doing a custom set sorted on ascending problem rating with ratings in the 1000-1200 range, and you’ve already done all the problems rated from 1000-1100, but a problem that was previously rated 990 gets a rating adjustment that leads it to become rated over 1000 , then that will be the problem that is served next, as it will be the problem in the set, not yet solved during the current run that has the 'lowest' match on the sort criteria. |
|
|
Some ordered sets may have no problems left to do after they are complete. For example if you are doing a set ordered on rating and have selected 'Problems I always got wrong', then if you get all the problems in the matching set correct, then the set will eventually become empty. This behaviour allows you to repeat particular problem sets until you have completely mastered them, but without having to solve the same problems many times. In this example when you start getting new problems wrong, the empty set will start to fill up again. |
The following ordering options are available:
- Unsorted
-
This is the default ordering, and will serve up matching problems in random order.
- Problem Rating
-
Sort custom sets by problem rating. Combined with ascending sort direction, this option provides an effective way of creating custom sets that get more difficult as you go through the problems.
- Times Problem Correct
-
Sorts set by the number of times you have got each problem correct.
- Times Problem Wrong
-
Sorts custom sets by the number of times you have got each problem wrong. By also choosing descending sort direction, this allows you to be served the problems you’ve had the most difficulty with first.
- Times Problem Done
-
Sorts custom sets by the number of times you have done each problem. By using ascending sort order, you can use this option to be served unseen problems before those you have seen before.
- Date Last Seen
-
Allows ordering problems by how long it is since you have seen them. For example when setting the sort direction to ascending you will see the problems whose most recent attempts were the furthest into the past. + NOTE: Dates further into the past are considered 'smaller' than dates closer to the present when sorting is performed.
- Date created
-
Uses the date the problem was created as the sort criteria. This can be useful for "problems from my games" problems, allowing you to order by problems coming from either the most recently or least recently played games. This can also be useful if you’d prefer a more random ordering in a sorted set where the order is not dictated by the characteristics of the problem, or your previous performance on it.
- Minimum Solve Time
-
Sorts problems based on the fastest time you have solved them in the past. Using a descending sort direction allows you to do the problems you’ve taken the longest on first.
- Moves in Problem
-
Sorts problem sets by the number of moves in the problem. The most common use of this criteria is to combine it with outcome type "mate", to create custom sets that first give you mate in 1 problems, and then mate in 2 problems etc.
|
|
For endgame problems, the number of moves is the number of moves to mate from the starting position, not the number of moves to where the problem is pruned. |
7.4. Custom set spaced repetition selection
Spaced repetition is a memory learning method that allows you to maximise recall, while minimising learning time. Essentially it tries to present you with problems you are having trouble with more often that those that you have already shown you can do well. You can read more about spaced repetition at the Wikipedia Spaced Repetition Article.
You can create a spaced repetition set by enabling the "Spaced repetition" option for the problem selection type (instead of the default "Random Selection"). The selector can be found just above the problem set ordering options.
For spaced repetition sets, you get two new numbers next to the problem set count at the bottom of the problem board, for example: Problem Set: TestSR ( 91 in set) ( Learning: 8, Scheduled: 4 )
"Learning" is the number of problems in the set that we are currently actively learning.
"Scheduled" is the number of problems that are currently due for review.
When "Scheduled" = 0, each time you do a problem, a new problem will be added to the set for learning. When "Learning" is the same as the number of problems in the set , trying to do problems when Scheduled = 0 will lead to problems being done in order of the next one that would be scheduled (i.e. you’ll be solving problems "early", before they are due for review). If you can’t be given problems early without repeating the last scheduled problem, then you’ll be told you need to wait for the next scheduled problem to be due.
If you get a problem wrong, it will be scheduled for serving again in 5 minutes. The first time you get a problem correct, it is scheduled for review in 1 day from when you solved it. After the second correct attempt in a row, the next problem serving time is determined by the gap between the last two times you saw the problem, and a factor estimating how difficult the problem was for you. The difficulty factor is currently decided by the ratio of your most recent solve time on the problem compared to the average solve time for all users. By default, the problem will be scheduled to be served again at a time that is two times longer than the last time gap between solving it. If you solve it under the average time, then you will not see it again for up to 3 times longer (depending on how much quicker you solved it compared to average). If you solve it slower than the average time, then the gap to the next view will be reduced to as little as 1.3 times the last gap between solutions (again depending on exactly how much slower).
Over time, the problems you know well will get increasingly large gaps between serving times, those you are having trouble with will get served more often, until they too become "well known".
You can use most of the problem search/custom set options with spaced repetition sets, although there are some exceptions. Ordered sets, are not compatible with spaced repetition, as the spaced repetition scheduling will override the sort order of the set. Also some sets such as "problems I’ve never seen before" don’t make sense with SR sets, as they will lead problems to drop out of the set, as soon as you’ve done them the first time. Merged sets are also currently incompatible with spaced repetition sets, so merged sets where one or more subsets are spaced repetition set types will not work as expected.
It can be useful to create spaced repetition sets based on a personal tag as the search criteria , so you can add specific problems to your spaced repetition set by tagging the problems. You can also use other search criteria such as "all forks from 1200-1400" etc to define set membership.
7.4.1. Spaced Repetition Options
gap_factor=max(min(log(DIFFICULTY_ESTIMATE)+Spacing Growth Rate),Maximum Space Grow),Minimum Space Growth)
next gap interval = last_gap * gap_factor
So for example if the difficulty estimate is 1.0, Spacing Growth Rate is 2.0 and Maximum and Minimum space growth is 3.0 and 1.0, and the last gap between correct attempts on the problem was 10 days. The gap factor will be:
max(min(log(1.0)+2.0,3.0),1.0) or
max(min(0+2.0,3.0),1.0) =
2.0 so the next attempt on this problem will be scheduled 10 days *2.0 = 20 days into the future. A more difficult problem (i.e. one which was solved more slowly) would have a smaller gap factor, and would be served up again more quickly, how quickly would depend on how slow the attempt was, and the value of the Minimum Space Growth parameter.
DIFFICULTY_ESTIMATE is a value that approximates how hard you found your last attempt on the problem. The value used here depends on the difficulty estimate method chosen.
The current list of parameters are:
- Learning Period Length (in Problems)
-
The learning period is a period during which the gap between problems is not expanding , and instead uses a fixed gap between attempts. This gives you a chance to learn the problem with quickly scheduled attempts, before you switch to trying to retain the problem in memory during the spacing of subsequent attempts on the problem. By default, only the first correct attempt generates a fixed gap, after 2 or more correct attempts, the spacing algorithm mentioned above is applied.
- Learning Period Gap (in days)
-
This is the fixed gap between correct problem attempts during the initial learning period (e.g. 1 day).
- Spacing Growth Rate
-
Controls how quickly the gap between correct attempts will grow. Larger numbers lead to a more rapidly expanding gap after each correct attempt.
- Minimum Space Growth
-
The minimum growth rate that the previous gap between attempts will be multiplied by to give the next gap in serving time.
- Maximum Space Growth
-
The maximum growth rate that the previous gap between attempts will be multiplied by to give the next gap in serving time.
- Difficulty Estimate Method
-
This option selects the method used to determine the difficulty of the previous correct attempt on the problem. The difficulty estimate then helps control how quickly the next attempt will be scheduled. Methods are: +
- Average Time
-
Difficulty is estimated by your most recent solve time compared to the average solve time by all users on the problem.
- Minimum Time
-
Difficulty is estimated by comparing your shortest time during the current sequence of correct attempts to your most recent solve time.
- Recent Time
-
Difficulty is estimated by comparing the average solve time of your own current sequence of correct attempts to your most recent solve time.
- Target Seconds/Move
-
Difficulty is estimated by comparing a fixed amount of time per move to your most recent correct solve time (in which case the time you took on the last attempt is also calculated as seconds/move).
- Target Seconds/Problem
-
Difficulty is estimated by comparing a fixed total problem solve time to your most recent correct solve time on the problem.
7.5. Creating Custom Problem Sets
The first step in creating a custom problem set is to create search and ordering criteria that you would like to have used in your custom set. Once the search and ordering criteria are set, you can use the "Search" button to check which problems will be included in your set, and the order of those problems (where ordering has been requested). If you are satisfied with the results shown, you can then use the "Create Set" button to turn the search into a custom set. Choose a name for the set (preferably something that helps you to remember the criteria for the set), and click the "Create" button to confirm the creation of the set.
Once you have created a problem set you need to choose it as your current problem set in order to use it. You can choose to set it as the current upon creation or you can change the set on the solving page or in your preferences.
|
|
Custom problem sets are dynamic, such that new problems may enter the set at any time. For example if you create a set with the "problems I always got wrong" criteria, and end up solving all those problems, then if you get more problems wrong in the future, they will automatically appear in this set, and will not be removed until you get them correct. |
7.6. Managing Custom Problem Sets
the Managing sets button launches the manage problem sets panel from where you can delete, merge, view or edit existing custom sets. After selecting a set and clicking show you will be given the search results based on the criteria of the problem set. If you wish to modify the set, you can change any of the options and chose the Save set button to save the new settings over the old set.create a new custom problem set with the modified criteria (the original problem set will not be changed). If you click multiple problem sets, you can also click the Merge button, to merge multiple sets into one "super" set. Please see the Creating Merged Problem Sets section for more details on merging sets.
7.7. Creating Merged Problem Sets
Merged custom sets allow you to merge several existing custom sets into one merged set. You can select the weights of each subset to control how many problems from each subset will be served. For example you could create three subsets Fork, Pin and Discovered Attack, asking for 70% forks, 20% pins and 10% discovered attacks. Another example would be a merged subset of mate and non-mate sets with say 80% non-mates and 20% mates, you could also merge a larger number of sets, and control mates versus non-mates based on mate length, so for example 80% non-mates, 15% mate in ones, and 5% mate in twos. Problem attempt based sets can also be merged, for example, two sets for problems you have seen before and problems you have not seen before could be merged with say a 90% weight on new problems and 10% on old problems, allowing you to review old problems on average 1 in every 10 attempts. Any existing user created custom sets can be merged as long as all subsets are of the same problem type, i.e. you cannot merge tactic and endgame sets.
To merge sets you need to go to the manage custom problem sets panel (see Managing Custom Problem Sets section of the manual). You can then select the two, or more problem sets you wish to merge, and then click the Merge button. You will then be prompted to enter a name for the new merged set, ad will need to provide percentage weights for each subset. Weights will need to total 100%.
Once you have chosen your merged set as your current problem set, problems will be served up based on the percentage weights you have provided.
|
|
Short term random fluctuations may occur in merged set distribution, where one set may be used more than others, in the long term however, the distribution will match the requested weighting. |
8. Problem Tagging
Problem tagging allows you to mark the tactical motifs on tactical problems and to create personal tags for customised tagging requirements. Voting allows you to vote for a new tag, or for or against an existing tag.
8.1. Tag Display
Tags that have 2 or more votes in favour than against are shown in bright green, and are considered active. Tags which have at least as many votes against as votes for, are are shown in red and are considered inactive. Tags with only one more vote for than against are shown in drab green, these are "pending" tags. Tags that have been overwhelmingly voted against are not displayed at all.
The number of votes for and against each tag is shown when hovering over the tags. Tags modifiers such as "Check" or the type of piece moved will be shown in the tag name, for example a knight fork that gives check would be shown as Fork[Check,Knight].
8.2. Tag Voting
Tag voting adds up all the votes for and against a particular tag on a problem and if there is more votes for the tag than against then the problem will be marked as having that tag. This means that if you already see a problem with a tag that you agree with, then it would be useful for you to add your vote for the tag even though the problem was already marked with that tag. The reason for this is that if there was only one vote for the tag and someone else incorrectly voted against the tag, then the tag would become inactive (coloured red), however if you add your vote for the tag then it would take two votes against the tag to disable it.
Users can only vote for a particular tag once on a problem, however users CAN vote for multiple different tags per problems, so if you see more than one appropriate tag for a problem, please vote for all of them.
The number of votes for and against a tag are shown when hovering over the tag. You can click on the + or - votes to add for or against votes to an existing tag, or you can use the + button beneath the tags to vote for new tags, and the available tags to select from will be displayed.
On the list of tags already applied, you can click on the tag name to see a description of the tag if you want to check your understanding of the tag definition before voting. If you haven’t voted on a tag before or haven’t voted recently, you’ll also be shown the description view, even when clicking directly on the up/down vote scores to add your vote.
When choosing a new tag, the tags are layed out in a folder structure in the tag selection panel. Higher level folders such as 'Non-mate Motifs' can’t be voted on directly, however some folders are also voteable tags, for example inside the 'Non-mate Motifs' folder you’ll find a 'Discovery' folder. You can vote directly on the 'Discovery' folder (click on the name instead of the expand/collapse icon to vote on a folder tag). Voting on child tags of such a voteable folder tag will also vote on any voteable parents that lead to the child tag being voted on. For example there is a 'Discover Checks' tag inside the 'Discovered Attack' folder that is inside the 'Discovery' folder. So the 'Discover Checks' tag has the full folder path of 'Tactical Motifs → Non-mate Motifs → Discovery → Discovered Attack → Discoverer Checks'. If you vote on 'Discoverer Checks' then 'Discovered Attack' and 'Discovery' will also have your vote applied. This allows more flexibility in the custom set search, as it means by voting for 'Discoverer Checks' people will also be able to find items you’ve tagged in this way via the higher level motifs of 'Discovery' or 'Discovered Attack'. Down votes work in the same way as up votes in the folder hierachy, so a down vote for 'Discoverer Checks' will also down vote its relevant parents.
8.3. Needs More Moves and Different Opponent Move Tags
Needs more moves and Different Opponent Move tags allow you to add suggestions on how to improve a problem.
Needs more move tags allow you to suggest a move to continue the line when the problem may finish too early to show the point of the tactic. Only the first move in the follow up line should be entered, and when processed later, the engine will try to further extend the line from that move.
Needs different opponent move tags let you suggest a different move for the opponent that might allow the point of the position to be shown more clearly. Only a single move should be entered, and it should replace an existing move by the opponent in the main line of the tactic.
8.4. Personal Tags
Personal tags allow you to create your own tags and tag problems with those new tags.
Personal tags are most powerful when combined with custom problem sets and problem search. For example a personal tag can act as a bookmarking system where you can create a 'favourites' tag, and tag problems with that tag that you can search for in the problem search/custom sets page. Another example is a 'review' tag that you use to tag problems you feel need reviewing at a later stage. You then create a custom set that matches against problems with your 'review' tag. As you go through the set, you can remove the reviewed problem from the set by voting down the tag. This could be combined with the 'Problems I always got wrong' criteria to produce a review custom set that keeps giving you the review problems until you’ve successfully got them correct, avoiding the need to manually remove the tag yourself.
To create a new personal tag, click the Manage Personal Tags icon in the tagging panel, and then click the Create Tag button. After creating the new tag, you can start adding it to problems in the same way you add existing tactical motif tags.
8.5. Tag Modifiers
Tag modifiers allow more specific versions of tags to be represented without creating a massive number of new top level tags. For example it may be useful to recognize that a motif occurs with check, or that a particular piece was moved during the tactic. For example a Fork with check could be presented by Fork[Check,Knight] indicating that a Knight delivered a fork with check.
Modifiers can only be added when creating a new tag. You can’t add a modifier to a tag that has already been added to a problem. This means if there is an existing Fork tag with no modifiers, and you want to add a Fork[Check,Knight] tag, you would need to add a new tag using the '+' button , and then on the add tag panel, choose the Check and Knight modifiers. We also want to avoid an acculumation of the same tag with different sets of modifiers , so if you believe your new tag with modifiers is the most specific available, then you should also vote down Fork tags without modifiers. The tag without modifiers is not wrong, but your new tag is more specific, so we would prefer that it becomes the primary way of tagging the Fork on the problem. People using tag searches based on 'Fork' will still find the modifier version, with the added bonus of also being able to search for problems with more specific versions involving check or the specific piece involved. If other taggers agree with your modifiers, they can click directly on your modifier version of the tag to vote it up without having to add their own modifier version, and they can also vote down the less specific version.
We currently support three types of modifiers, the Check modifier, the attacking piece modifier (Pawn, Bishop, Knight, Rook, Queen , King) and the Prophylaxis modifer. The Check modifier is to be used when the motif involves checking the opponent king. The attacking piece modifier designates the piece(s) involved in the attack. The Prophylaxis modifier provides a way of indicating that a move is required in order to protect against a potential attack from your opponent. It is most commonly applicable on mixed mode defensive problems, but may also be relevant in non-defensive tactics.
Please note that piece modifiers (Pawn, Bishop, Knight, Rook, Queen , King) only refer to the moving piece, please don’t use these to denote the type of pieces attacked. So for example a Fork[King] is a fork made by a King on two pieces, NOT a fork on a king. Similarly Pin[Rook] is pin where a rook is pinning another piece, NOT a pin on a rook. You can use the piece modifier for opponent pieces when combined with the Prophylaxis modifier, indicating the opponent piece is the piece capable of making the potential threat. Similarly if a move is a prophylactic move that defends against check from your opponent, then tagging with both Prophylaxis and Check as modifiers is also fine.
For a small number of tags , modifiers will be redundant , as we decided to have a specific tag that overlaps with a modifier. For example 'Discoverer Checks' could be 'Discovered Attack[Check]'. To avoid clutter it is best to avoid marking 'Discoverer Checks' with the Check modifier, given the name already holds this information.
8.6. Positional Motifs
Initially, positional motifs were only available for tagging positions in the Guess the move feature. However we now allow positional tags to be used in chess problems. When deciding if a positional tag could be used on a problem, please try to limit tagging to features that were relevant to the problem solution. For example, if a tactical position has connected pawns, but they don’t feature in the tactic, then they should not be tagged. If however, the tactic involves utilising an advanced pawn to gain material, it is possible the connected nature of your pawns was relevant, and if that is the case, they should be tagged. Some positional motifs will tend to be more commonly associated with tactics than others. For example motifs in the positional list like 'Rook On 7th Rank', 'Pawn Storm', 'Rook Lift' will tend to be more commonly featured in tactics problems than some of the less aggressive positional tags.
9. User Preferences
The user preference settings are available via a link in the top right hand corner of all non-forum pages. Preferences allow customisation of many of the site features.
9.1. Solving
- Display Show Solution Button
-
The "Show Solution" button option now allows you to avoid seeing the solution immediately after a problem is complete, allowing you to continue to search for the best move after failing a problem, and eventually clicking the "Show Solution" button in order to see to answer. This option is off by default. c
- Enable Resizable Problem Board
-
Allows solving boards to be resizable. Requires a reload for resize handles to be added to the board.
- Hide Clock
-
Option to hide clock showing solve time
- Use Distraction Free Solving in Fullscreen
-
Uses distraction free mode which hides much of the non-essential UI elements while solving.
- Distraction Free Board Size
-
By default distraction free mode will attempt to use a full size board, this option allows choosing the board size.
- Continue on
-
The "Continue On" option defines under what conditions you automatically continue on to the next problem after completely the current one. You can choose to continue automatically when failing a problem, getting a problem correct, or never (by selecting neither of the options). Continue on fail is not recommended, as it is a good idea if you review your mistakes before continuing on to the next problem.
- Board Orientation
-
This option allows you to view problems from the losing side’s point of view. Some users use this mode to help train in finding threats your opponent may have against you.
9.2. Engines
- Engine Arrows
-
Chooses if arrows are shown on the board while engine analysis is progressing. Choices are between no arrows, arrows for the current best move, or arrows for the current move and the next move (the default).
- Use Cloud Engines
-
This option should be left on, as the alternative is to attempt to use the legacy Java engines which are no longer available on most pages.
- Evaluation From White’s View
-
By default engine analysis evaluation outputs are from the point of view of the player to move. So a positive evaluation is a good move and a negative evaluation is a bad move in the current position, irrespective of which colour is moving. This option allows you to use the more traditional white based evaluation. Note that in order to keep comment discussion consistent on problems, annotations shown on the solving page move lists are always shown from the 'player to move' point of view.
- Play vs Computer think time
-
The time used for computer think time in play vs computer, and computer vs computer features.
9.3. My Problems
This panel offers options to control how problems are created from games you have played on chesstempo. Hover over the ? button next to each option for details. Click the x button to reset the value to the default.
9.4. Coaches
- Coach Usernames
-
Allows entering the username of any coach you may have on Chesstempo.
Click on the 'manage your students' button to manage the list of students.
See Student coach section on coach nomination for more details.
9.5. Parent
Parent controls allow you to specify another chesstempo account as the 'parent' of the current account, and thus providing parent control options that only the parent can turn on and off.
To enable the parent control options, enter the username and password of another chesstempo account to be used as the parent account set to control this account. Once set, the parent password must be entered in order to view and change parent control options.
- Disable Game Communications
-
Disable game communication pathways such as game chat and private chat.
- Disable access to forum
-
Disable the forum for this account.
|
|
If the child account is using the old site (at https://old.chesstempo.com/play-chess-online.html), the account will need to be logged out and logged back for the parent control setting changes to take effect. A page reload on the new site will be sufficient. The app will require restarting. |
|
|
You should avoid asking the browser to remember the parent account password on browsers your child has access to , in order to avoid them unlocking the settings themselves. |
9.6. Game Database
- Search Filter Impacts
-
Determines the scope of the database search filtering, which can apply to the opening explorer, the game list, or both.
9.7. Guess The Move
- Move to Next Move
-
Selects if the game moves to the next move automatically after providing the score for your current move, or only after clicking the next move button.
9.8. Playing
Playing preferences covers settings for play online feature, and are broken down into sub-tabs.
9.8.1. Playing - Display
- Player name and clock layout
-
There are currently three options on where the player name and clock can be positioned relative to the board. The 'beside board - top/bottom' option has the names to the right of the board, with one name above the move list, and the other name at the bottom of the right panel below the chat. 'Beside board - top' is similar to the beside board top/bottom option except that both names are together above the move list. 'Above and below board' places the names directly above and below the board.
The layout settings are the default only, if you have a 'beside board' position set, but resize the board such that the game panel is not wide enough to hold the player name and clock, then they will be moved to an 'Above and below board' position. - Hide Ratings in Game Tab
-
This option allows you to hide the ratings of you and your opponent, and any output showing rating adjustments after a game. This option is intended for those who find rating information distracting while they play. It only applies to information shown within the game tab, or notifications related to the current game. It will not hide ratings in places like the challenge list or user list.
9.8.2. Playing - Correspondence
- Confirm All Correspondence Moves
-
This setting turns on the confirm move board settings for all correspondence games. It overrides the game board setting, and forces the confirm move button to be used in all correspondence games. This means you can turn the per board confirm move option off to play live games, and have it automatically turned on when you play correspondence games without impacting the setting for live games.
- Correspondence Email Notifications
-
The correspondence notification settings allow you to turn on email notifications separately for move notifications, game state changes (start, end, draw offers etc), and time warnings. Time warnings are sent when your clock dips below 12 hours of time remaining. These options will be on by default if you gave permission for Chesstempo to send you email related to the site when first registering. If you did not give permission and want email notifications, then you will need to turn the options on here.
9.9. Achievements
- Achievement Notifications
-
Determines if achievement notifications are enabled or not. If disabled, Achievement points will still be collected, and achievement awards rewarded and visible on your achievements panel, but no notifications will occur.
- Achievement Notification Method
-
Controls how achievement notifications are displayed when enabled. Achievements can either be displayed in a dialog that will appear over the board, or less obtrusively via an automatically dismissed notification panel.
9.10. Account
Account preferences controls settings specific to your Chesstempo user account, such as email address and password.
- Current Password
-
To change your password or email or you first need to enter your current password for authentication.
- Change Password
-
After entering your current password, you can change you password by entering the new password and a confirmation to make sure you’ve typed the password correctly.
-
After entering your current password, you can also choose a new email address. A verification email will be sent to your new address, and needs to be clicked before the email update is completed. Please check your spam folder if you don’t see the verification email in your inbox.
- FIDE Id #
-
Chesstempo collects FIDE Id#'s for three reasons. The first is that it used to display title information next to usernames, and secondly, it is used to collect stats that allow the effectiveness of different training techniques to be made. The final reason is that it provides data used in creating the regression equation used to provide FIDE estimates. If you have a FIDE id, please enter it here, it is kept confidential , and FIDE ids entered are not visible to other users.
- Email Permission
-
Decides if you will receive chesstempo newsletters. Default value is set at registration, and can be turned off here or by clicking the unsubscribe link in a newsletter email.
9.10.1. Membership Details
This section of the account tab provides information relevant to any premium membership or membership credits you may have. This will include whether the payment type is auto-renewing , the method of payment, and the date of expiration or auto-renew.
If you would like to sign up to a premium membership you can use the premium membership signup page
If you have an auto-renew subscription purchased on the web site via paypal or credit card, you can cancel the subscription here using the Cancel Subscription button. Your membership will continue for the remainder of the membership period, but will not automatically renew once cancelled. Note that auto-renew subscriptions made on mobile devices via the Apple app store or Google Play can be cancelled by going to the list of active subscriptions on your device.
Assigning membership credits
If you have purchased a group membership this section of the membership details of the settings account section is where you will find the number of credits you currently have on hand, and the interface for assigning credits to users.
To assign any unused credits you have available, type the usernames of the users into the usernames box, and then click the Assign Memberships button. Note that memberships cannot be assigned to users with currently active auto-renew memberships, however users with existing active one-time memberships can have their membership period extended by assigning credits to their account.
10. Stats
The Stats page provides a dashboard view showing a variety of statistics and graphs related to the user’s activities on Chesstempo.
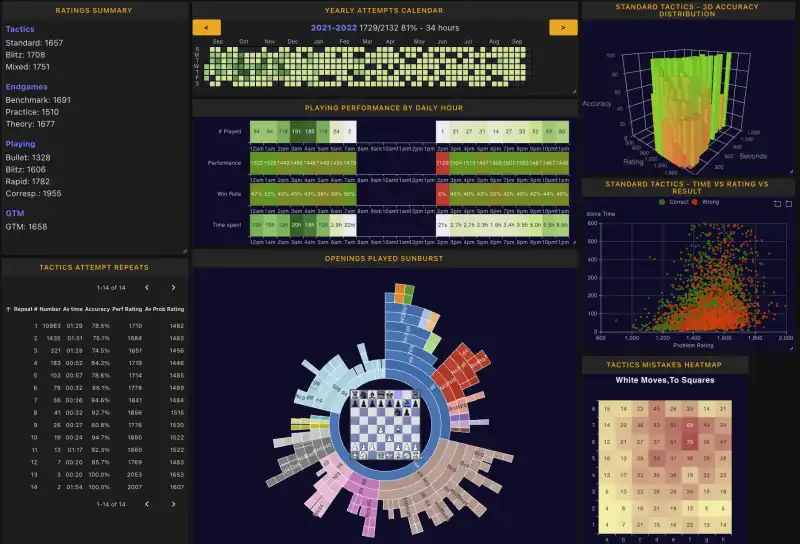
Stats are broken down into sections and subsections, and clicking on the section name on the left will switch to that view. Each view has a user selectable number of stats panels, and panels can be dragged by their header or resized using the panel resize handle on the bottom right corner of each panel. Resizing or dragging panels around will re-layout the panel view to try to pack the available panels into the smallest possible space. Clicking on the panel titles shows a menu of options such as renaming , copying , showing filters or setting panel specific settings.
10.1. Stats home
The stats home view provides an overview of the user’s performance across a variety of areas. If there is a panel on one of the other pages that you use often you may want to use the 'add stats' button to insert the panel into the stats home view.
The default panels available on the stats home view are:
10.1.1. Activity Summary
This panel shows the total solving time on the site (excluding outliers), the number of star ratings and problem comments made, and the total number of tags added.
10.1.2. Rating Summary
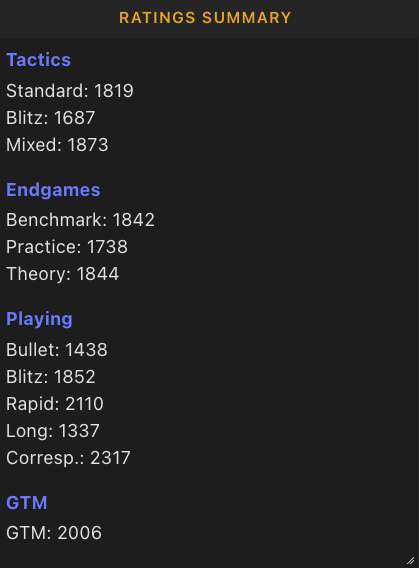
The rating summary shows the ratings in each of the main rating types in the tactics, endgames, playing and guess the move (GTM) categories.
10.1.3. Monthly Attempts Calendar
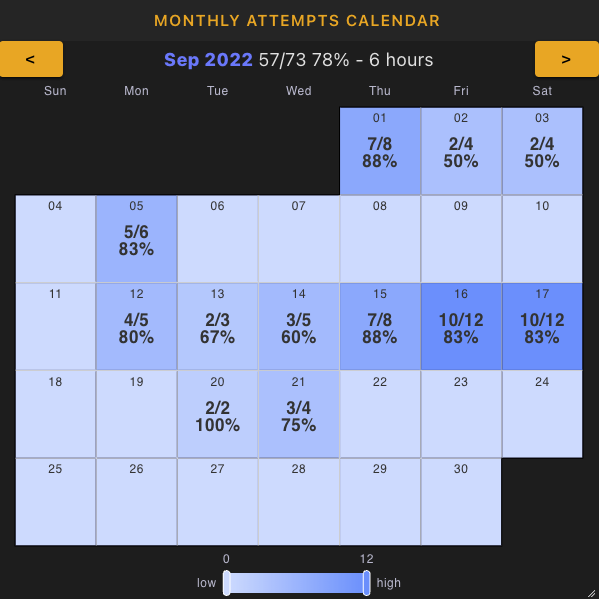
The monthly attempts calendar presents a month by month daily view of your problem solving activity. The top of the calendar shows the current year and month along with how many problems were done for the month, how many were correct and the percentage success rate and number of hours spent solving. You can hover over this monthly summary to see the month’s attempts broken down by problem set.
Each day shows the number correct, number done and success rate. You can hover your mouse over each day to see further details of that day, including total time spent, a breakdown of performance in the different rating types, the gain or loss for each rating type across all attempts, and a performance rating for that day’s results. The intensity of the colour of each day is dictated by how active you were on that day compared to other days in the month.
The calendar can be moved backwards and forwards in time by clicking the left and right arrows at the top of the calendar.
10.1.4. Yearly Attempts Calendar

The yearly attempts calendar is similar to the monthly calendar, but provides a full year view. The yearly view is useful for seeing training consistency trends over the last 12 months. The individual days have no labels, but daily details can be seen by hovering over each day with a mouse.
10.1.5. Problem Attempts Table
The problem attempts table allows you to view a record of all your problem attempts, the following columns are shown on the table:
- #
-
The number of the problem attempts, the most recent problem is marked 1, the second most recent 2, etc.
- Time
-
The date and time the attempt was made, this is displayed relative to your local time zone.
- Problem Id
-
The ID number of the problem attempted. The problem ids are also links, and clicking on them will go to the problem page showing that particular problem in problem view mode. Hovering over the problem id link with your mouse will show a tooltip depicting a board displaying the start position of the current problem (with any problem pre-move available shown as a move animation).
- Rating
-
The problem rating before the solving attempt.
- Tags
-
The most upvoted tag (and the vote total) are shown for each problem, if multiple tags exist on the problem, the tag name is shown with an ellipsis and hovering over the tag name will show the rest of the tags in a tooltip.
- Type
-
This is the type of problem set you were using when solving the problem, for example blitz, standard etc. For custom problem sets, this will show the name of the custom problem set.
- Avg Time
-
This column shows the average solve time for this problem, this is the current average solve time across all users for this problem, which may not be the same as the average at the time the problem was solved.
- Used Time
-
This shows the amount of time spent on the problem attempt.
- After First Time
-
This column shows the amount of time spent after the first move was made. This is important in blitz mode where time after the first move is punished at a higher rate than time spent before the first move.
- User Rating
-
This column shows the users new rating, and the rating change made to reach it. The colour of the user rating text indicates if the problem was right or wrong. Green is used for correct problems, and red for incorrect problems. Problems that were correct but lost rating points due to taking too long in blitz or playing too many sub-optimal moves in endgame problems are shown in a drab olive colour.
- Wrong Move
-
For tactical problems this column shows the mistake move for incorrect problems.
The history table can be sorted by clicking on the column headings.
The history table also has an extensive range of filters, see the problem attempts filters section below for more details. You can add filters by clicking on the panel header and using the 'show filters' option, if filters were already available on the panel, you can also click the 'filter' indicator on the top right of the panel.
The problem attempt history table also provides summary statistics, summarising the history data. See the problem attempts summary data section for more details. Click the summary stats button to launch the summary stats panel.
Benchmarking against other groups of users is also available on the problem attempts panel. Benchmarking allows you to compare your performance against the performance of others of a chosen rating range, so for example you can see how users in the 2000-2100 rating range compare to your own performance on the summary statistics data metrics. See the problem attempts benchmarking section for more details. Click the icon in the table header with the +- button to perform a benchmark analysis.
The problem attempts table header also has a Download History icon. Click the icon to download the entire history in a spreadsheet compatible format. This allows you to easily load your data into a spreadsheet and perform your own analysis on the data.
Problem History Filters
By clicking the Show Filters button on the panel menu (accessible by clicking on the header of the panel), you can enter search criteria used to filter problem attempt related filters. These filters are available on several of the problem related stats panels, including the problem attempts panel.
On the problem attempts history panel, filters impact both the data returned in the attempts table and the statistics summarised in the summary and benchmarking data (see the problem attempts summary data and problem attempts benchmarking section for more details.
Note that any filters added while viewing your own stats pages will be saved to the server, so if you want to create a temporary filter, remember to remove it afterwards, otherwise it will impact the results for the current panel in an ongoing manner, even after reloading the page.
The available filters:
- Duplicate Status
-
Selects if matching problems include all attempts, or only duplicates or non-duplicates.
NOTE: Duplicate status is only accurate for problem attempts made after 26th of June 2010.
- Problem Type
-
Choose if all problem attempts, or only tactic or endgame problems will be returned.
- Problem result
-
Filter based on correct or incorrect problem attempts.
- Tags
-
Select problems based on tags, for example selecting Pin and Attraction tags. You can choose to match problems that match any of the chosen tags (i.e a boolean OR operation on all selected tags), all of the chosen tags (i.e a boolean AND operation on all selected tags), or none of the chosen tags (i.e only return problems that were not tagged with any of the selected tags).
- Endgame Type
-
Filters endgame problems based on the endgame type of the problem (i.e the pieces on the board when the problem started), like tactic type filtering multiple selections can be used.
- Problem Set
-
Allows filtering based on the problem set an attempt came from. As well as the officially rated Standard, Blitz, Mixed, Benchmark , Theory and Practice sets, you can also choose any of your custom sets here.
- Time Used
-
Filters based on the number of seconds used to solve a problem, for example choosing a range of 0 to 10 will return all problems solved in 10 seconds or less.
- Date solved
-
Choose the time range to filter problem attempts by. This filter criteria can be useful in comparing performance changes over time, for example by comparing the previous 6 months, to the 6 month period before that.
- Attempt Range
-
Allows you to filter based on sequential attempt number, like the Date Range filter , this can also be used to compare performance over time, for example, comparing problem attempts 1-1000 to problem attempts 1001-2000. Problem attempt number 1 is always the most recent attempt, so as the number for the end of the range grows, you are looking at older problem attempts.
- Problem Rating
-
Allows filtering on the rating of the problems seen during your problem attempts.
- User Problem rating
-
Allows filtering on your own rating during your problem attempts. For example setting the range to 1200-1400 would return problem attempts done while your rating was in that range.
- Points Gained
-
Filter attempts based on how many rating points you gained (or lost). For example setting the range to -100 to 0 would return problem attempts where you either gained no points, or lost up to as much as 100 points. This kind of filter is useful for blitz or endgame filtering, where being correct is not the only measure of problem success.
- Book names
-
Filter on attempts from problems sourced from particular books.
- Books only
-
Enabling this filter only includes problems that came from a book without having to specify the exact book with the book names filter.
- Number of moves
-
Filter by the number of moves in a problem. Note that for endgame problems this is the full path to mate from the original position if the problem has 6 or fewer pieces, and undefined for 7 piece endgames.
- From user game
-
Enabling this filter set to 'on' includes only problems extracted from your games played on Chesstempo. Enabling the filter and setting it to 'off' will exclude user games.
- Move colour
-
The colour of the side you were playing from when solving.
- Is mate
-
If enabled and set to 'on' will include only mates, if enabled and set to 'off' will exclude mates. Combine this with the number of moves filter to select mates of a particular length.
Problem Attempts Summary Statistics
The problem attempts summary statistics is viewable by clicking the summary data icon in the header of the problem attempt history table shows a number of stats summarising all the data available in the problem history that matches the current filters. For example, details such as accuracy, performance rating, average time taken etc.
By performing two searches in a row, with different filter criteria, you can compare the differences between your solving patterns based on the different filtering criteria. For example how your performance differs across different time periods, or different tag types, or how performance changes when you take different amounts of time on a problem. The "Prev values" column will be the data from the previous filter, and the "Current values" column shows the values from the current filter.
If when launching the problem attempts summary stats panel, you had performed a previous filter, a comparison between the current filter and previous filter will be shown in the "Change" column.
The following summary statistics are provided:
- No. attempts
-
The total number of attempts matched by the current filter settings.
- Performance Rating
-
A performance rating based only on the current filtered results.
NOTE: Performance rating is based purely on success rate and problem rating, it does not include elements such as time taken, or number of moves, even if the problem attempts were done in blitz or an endgame mode.
- Average User Rating
-
Average rating of the user across the filtered problem attempts.
- Best User Rating
-
Best rating of the user across the filtered problem attempts.
- Worst User Rating
-
Worst rating of the user across the filtered problem attempts.
- Best Percentile Rank
-
Best percentile rank of the user across the filtered problem attempts.
- Worst Percentile Rank
-
Worst percentile rank of the user across the filtered problem attempts.
- Accuracy
-
Percentage accuracy achieved over the filtered problem attempts.
- Average Time
-
Your own average solve time over the filtered problem attempts.
- Average Time All Solvers
-
The average solve time of all users on the problems in your filtered problem attempts. Comparing this to the "Average Time" of your own solve times gives you an idea of how your solve times compare to the average for the current filter.
- Average Time Correct
-
Shows the average of your own solve time for filtered attempts that were correct.
- Average Time Incorrect
-
Shows the average of your own solve time for filtered attempts that were incorrect.
- Average Time After First
-
Shows the average time taken to solve the filtered problems after your first move.
- Average Problem Rating
-
The average problem rating of filter attempts. Gives you an estimate of the difficulty of the filtered problems.
- Highest Problem Rating
-
The highest rating of any problem in your filtered problem attempts.
- Lowest Problem Rating
-
The lowest rating of any problem in your filtered problem attempts.
- Total Non-Duplicates
-
The total number of non-duplicate problem attempts in your filtered problem attempts.
NOTE: Duplicate status is only accurate for problem attempts made after 26th of June 2010.
- Total Duplicates
-
The total number of duplicate problem attempts in your filtered problem attempts.
NOTE: Duplicate status is only accurate for problem attempts made after 26th of June 2010.
- Total Time Taken (with outliers)
-
The total time taken across all your filtered problem attempts.
- Total Time Taken (without outliers)
-
The total time taken across all your filtered problem attempts, but excluding outliers.
- Total Points Gained
-
The rating points gained (or lost for negative numbers) across all your filtered problem attempts.
Problem Attempts Benchmarking
Problem attempts benchmarking allows you to select a group of chesstempo users based on a rating range and then comparing their performance on the problem attempts summary data to either your own performance or the performance of other rating range groups. Any currently active filters are also applied, so for example if you filter by correct attempts you can compare the summary data of correct attempts for 1500-1600 players compared to your own correct attempts or the correct attempts of another rating group. Click on the summary icon in the problem attempts table header to initiate a benchmark comparison.
Note that the rating range applied for benchmarking is essentially a filter on the user ratings for problem attempts, and without any other filters being applied it will match any ratings in the range from any rating type. This means if you specify 1500-1600 and don’t have any other filters applied then you will be benchmarking against problem attempts across a wide range of solving types, which will by default include both tactics and endgames and custom sets for both. You may want to consider setting a filter to target a particular rating type such as "blitz" for tactics or "practice" for endgames to create a more targeted benchmark. The playing games history benchmarking is similar, with rating range matching any games by default, and setting a rating type/time control type will produce a more targeted benchmark on the game history table too.
10.2. Tactics Stats
The tactics stats shows problem solving stats specific to tactics problems such as rating graphs, and rating type summary data for Standard, Blitz and Mixed modes (including FIDE estimates based on performance on each of these rating types) and many other stats and graphs.
The currently available panels are discussed in the next section.
10.2.1. Tactics Rating Stats
Tactics Rating Type Summary
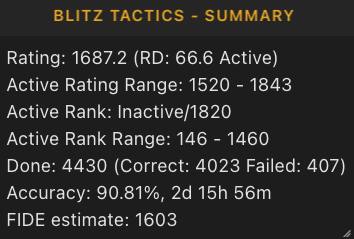
The tactics rating summary panels summarise details for each of the default tactics types (i.e Standard, Blitz, Mixed). For each rating type the following details are shown:
- Rating
-
The current rating.
- RD
-
The current RD. RD is a measure of rating stability , and is also used to determine if a user is currently active. For problem ratings, having an RD less than 70 is the trigger for becoming active. When your RD is high, you receive larger rating movements. As your RD decreases your rating becomes more stable, and you receive smaller rating adjustments.
- Active rating range
-
Shows the lowest and highest rating achieved while active.
- Active Rank
-
Shows the current rank for this rating type amongst all active users (assuming the user themselves is currently active).
- Best Active/Worst Active Rank
-
Shows the highest and lowest rank achieved for this rating type.
- Done
-
Shows the number of rated events for the rating type, for problems, this is the number of problems done. The number of successful and unsuccessful events are shown (Correct and failed problems for problem ratings), as is the total percentage success rate.
- FIDE Estimate
-
Standard,Blitz and Mixed ratings have an associated FIDE rating estimate based on a regression equation designed to estimate FIDE rating based on analysis of several factors (including performance and think time compared to site averages for each problem ) and their correlation with actual FIDE ratings.
NOTE: The FIDE rating estimate, is just that , an estimate, while on average it is within around 150 rating points of your actual FIDE rating, there will be large differences for some users (especially those with lower than average ratings where overestimates are more common), and therefore the estimate should not be taken too seriously.
Rating Graph
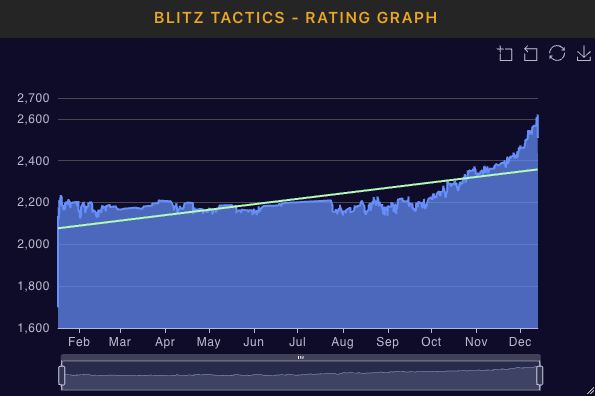
A graph of ratings across time. The time range can be selected by clicking and dragging in the time selector below the graph, and then adjusted by dragging the range selector left or right. You can also switch to zoom mode by clicking the zoom icon in the top right. This allows zooming by selecting ranges directly on the graph itself. The icon next to the zoom will reset the zoom, and the reset button next to that will reset both zoom and time range selections. The fourth button provides a download image button which will export the current view as an image. Hovering over a point will show the rating and date for that particular point.
By default the rating graph uses time as the default x-axis unit, this can lead to a 'jaggy' appearance of the graph if you don’t solve regularly. If you’d prefer the smoother version used on the old site you can switch to 'problem attempt number' as the x-axis metric by clicking on the panel header label and selecting the settings option. When time is chosen as the x-axis unit the graph will also show a trend line, which is a linear regression of rating against time, providing a way of seeing the directional trend of the graph.
Percentile Rank
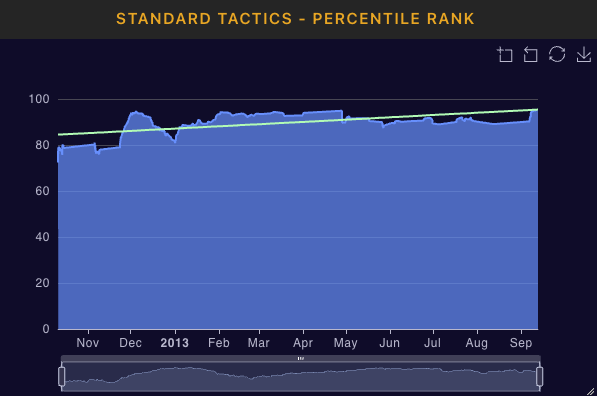
A graph showing the percentile rank of the user. 100% is the highest rank and 0% the lowest. This graph has the same features as the rating graph mentioned in the previous section.
Period Change Graphs
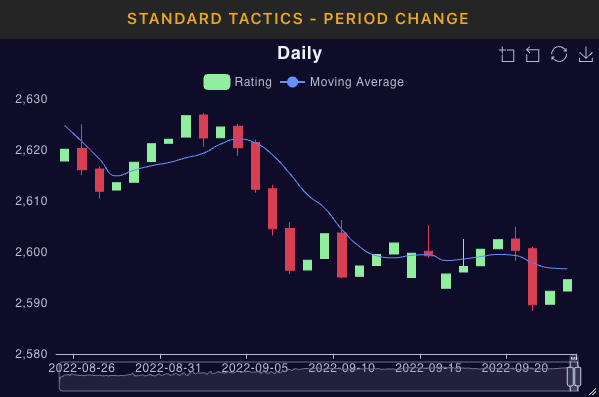
Candlestick graph showing daily, weekly , monthly or yearly rating fluctuations over the time period. Each vertical bar represents the rating range for the period. The solid rectangular part of the bar shows the starting and ending range of the rating for the period. The narrow lines at the top and bottom of the bars show the full fluctuation range for the rating during that period. A moving average is also overlaid over the graph.
For example if the rating started at 2000, ended at 2020 but ranged as low as 1950 and as high as 2030 then there would be a solid rectangle from 2000 to 2020, and narrow vertical lines from 2000 to 1950 at the bottom of the rectangle, and a shorter one at the top from 2020 to 2030. Periods that had a total rating gain are marked green, periods with a total rating loss are marked red. By default a daily range is shown, but you can see rating fluctuation trends over larger periods by clicking on the panel header, and choosing the 'Settings' option. There is also a setting for the moving average which defaults to 7 days when 'Day' is set as the fluctuation period. The moving average days setting is only relevant when the 'Day' period type is selected. Otherwise the moving average period units when the period type is set to weeks, months and days are 4 weeks, 3 months and 2 years respectively.
Hovering over each candlestick bar with the pointer will display summary details for the period. The full set of problem attempt filters described in the problem history filters section are available for use on the period change graph.
Problem Rating Distribution
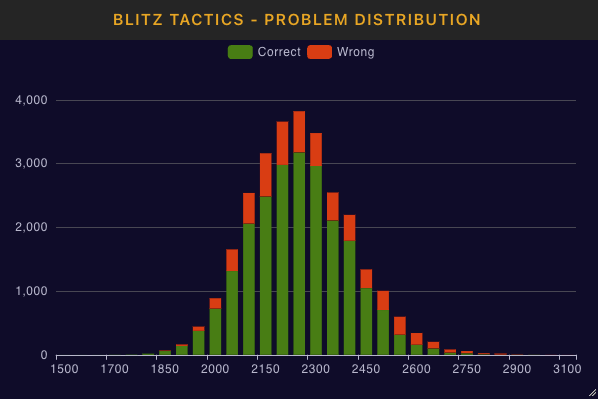
This graph shows how the rating of the problems being attempted are distributed. The green bars show the number of correct problems within that rating range, and the red bars show the number of incorrect problems within the rating range.
10.2.2. Tactics Stats Advanced Panels
Time vs Rating vs Result
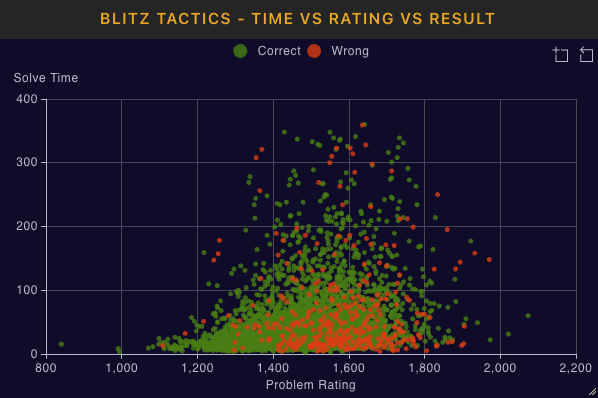
A scatter graph showing correct and incorrect attempts mapped against solve time on the y-axis and problem rating on the x-axis. Click on the zoom icon to enable zooming into a particular area of the graph via mouse selection. All the problem attempt filters are available, and a default filter to remove outliers of over 600 seconds (i.e 10 minutes) is applied. Show the filters to add more filters or adjust the outlier removal to a different range.
Number of moves result distribution
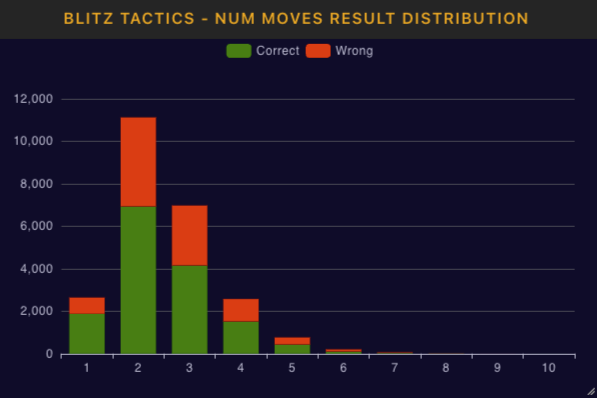
This bar graph shows correct/incorrect responses based on the number of moves in the solution.
Number of pieces result distribution
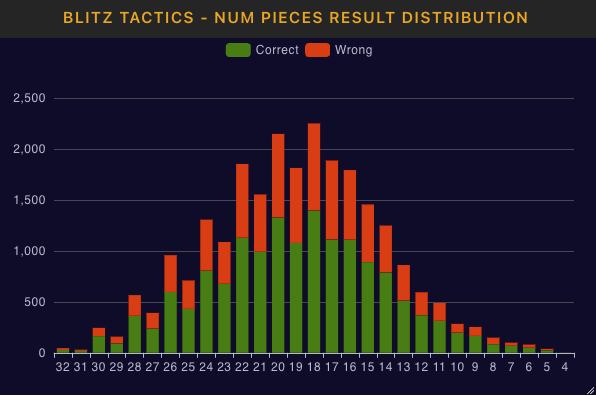
This bar graph shows correct/incorrect responses based on the number of pieces on the board at the start of the problem.
Think time distribution
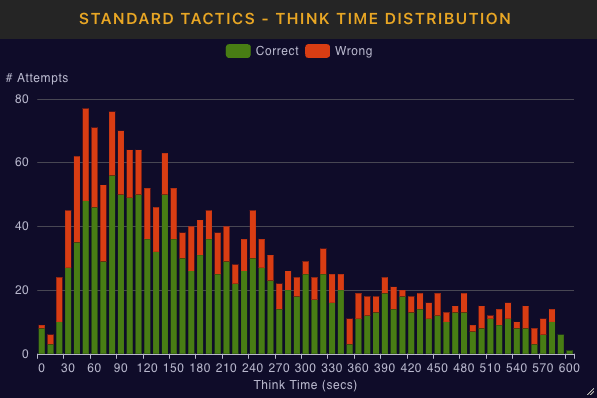
This bar graph shows correct/incorrect responses based on the think time, with think time broken down into brackets of 10 second intervals. The default outlier removal for this graph removes items with >600 seconds (i.e more than 10 minutes), you can adjust the outlier level by showing the current filters and selecting a new value.
3d Accuracy distribution
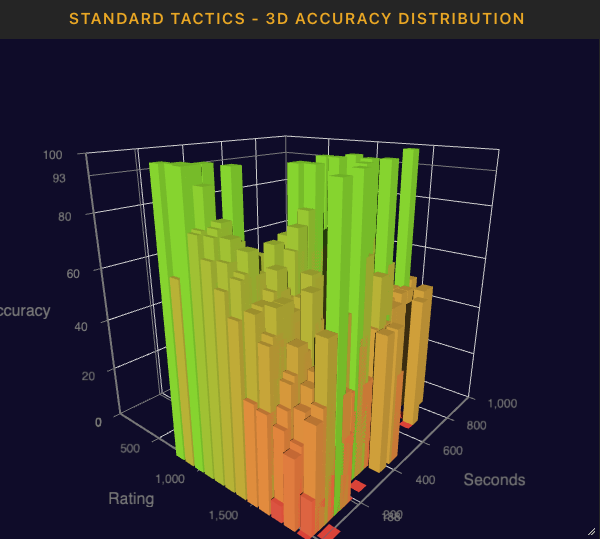
A three dimensional graph highlighting the relationship between think time, accuracy and problem rating. Click and drag to rotate the graph, use the mouse wheel to zoom in and out. You may find it useful to add your own think time and problem rating outlier filters to focus the graph more directly on the most common range of solving conditions for your personal situation.
Tactics Mistakes Heatmap
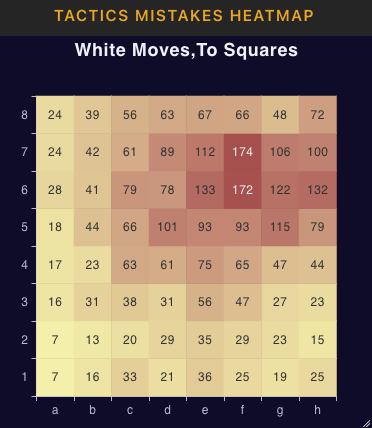
This is a piece movement heatmap showing patterns on the board related to piece movement of the mistakes made in tactics problems. The heatmap by default highlights the most common target squares for mistakes made as white. By clicking on the header of the panel and selecting the settings option, you can select the move colour, whether from, to or both types of squares are counted , targeting of specific moved pieces, such as mistakes resulting from moving only the queen, and whether the mistake was a capture or check. You can also change the counting method used to colour the squares from the default number of moves to average problem rating. Average problem rating gives you an idea of how the squares involved in mistake moves changes in relation to problem difficulty. All the problem attempt filters are also available for filtering on this graph, allowing you to get heatmap views based on particular problem difficulty or think time ranges for example.
Tactics Performance by Daily Hour
This group of graphs aggregates all matching problem attempts over each hour of the day, providing a heatmap showing several metrics by time of day, allowing you to see how your performance (or activity levels) differ across different times of day. The number of attempts, performance rating, accuracy and time spent can be visualised by the hour of the day.
Problem Spaced Repetition Due Panel
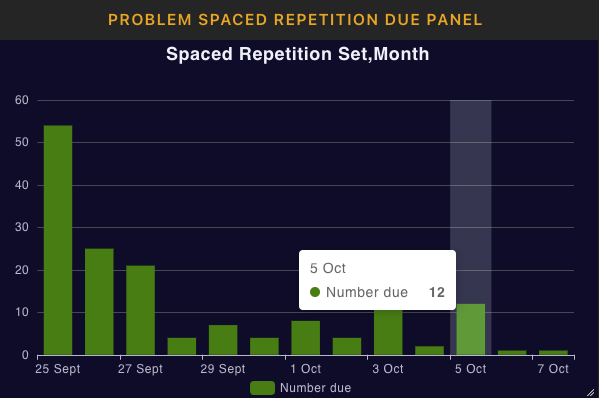
This bar graph displays the number of problems for a particular spaced repetition set that are scheduled for the upcoming time period. By default the resolution of the graph is based on the current week and shows items due each day, you can also select different time resolutions other than weekly, namely Monthly, Yearly, and "all years" by clicking on the panel header and selecting the 'settings' option. You also need to explicitly choose the problem set to be visualised via the settings. If you have several spaced repetition sets that you want to visualise you can create a panel for each by first copying the first panel by clicking on the panel header and selecting the 'copy' action, and then changing the problem set name. You should also change the panel name by again clicking on the header and choosing the 'rename' action and choosing a name that reflects the set being monitored. The image above shows the chart using the 'Month' option.
Tactical Motif Performance

This table shows the user’s performance for each of the tactical motif tags in the officially rated tactics sets (i.e standard, blitz and mixed modes), and summarises custom set performance in the catch all 'other' category. As the performance is provided on all the the officially rated sets separated from custom sets, performance reflects the ability to spot the motifs in general problems , without the hint that often comes from doing custom set based solving where specific subsets of motifs can be chosen.
For each tag type, the average rating (blitz, standard, mixed and 'other'), number correct/number done, accuracy and performance rating for blitz, standard, mixed and 'other' attempts are shown. Performance for problems tagged with Personal Tags you have created for your own tagging are also shown. By sorting this table by the performance or accuracy columns (click on the header to sort), this table can be used to identify relative tactical weaknesses, and you may want to consider using this data to concentrate on motifs you are performing poorly on, via custom problem sets specific to those motifs.
We provide a direct link to solve against the problems you got wrong on your last attempt for each tag. However keep in mind that the 'last wrong' link (and count) only includes problems where the tag is the primary (i.e most upvoted) tag on the problem, and has at least 4 votes and >=3.5 star quality rating. More subtle tags that tend to be less tagged compared to other more general tags may lack examples where they are primary tags, with sufficient votes and quality score. So you may wish to target these by creating your own custom sets that do not use the primary tag filtering and/or has a lower quality threshold.
Problem Set Performance
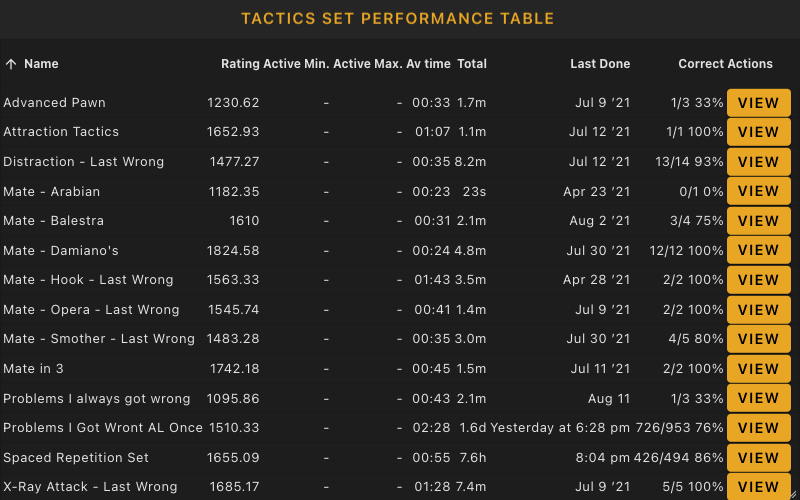
This table shows the personal rating (current,minimum and maximum), average time, number correct, number done, and accuracy achieved for each of the custom problem sets (including the pre-canned custom sets such as "problems I always got wrong" and the 'last wrong' sets). Custom sets with rated attempts (any custom set with attempts made after November 29th 2010) can now have graphs shown for rating history, problem rating distribution, and daily rating fluctuations. You can access the graphs by clicking on the View button shown next to each relevant row in the table. You can jump directly to the training set by clicking on the Train button shown next to each relevant row in the table. Most columns can be used as sort criteria by clicking on the column header title.
Rated Mate Length Performance::
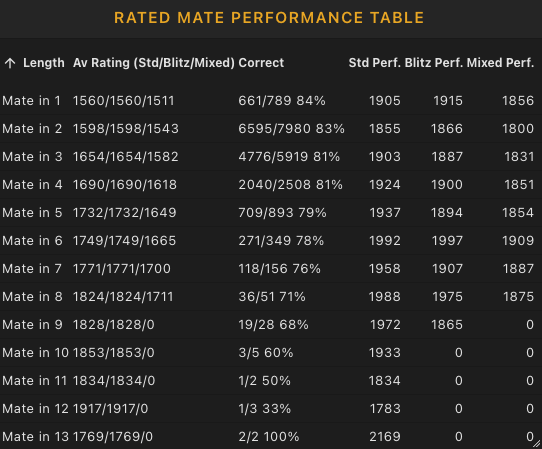
This table shows a summary of how you perform in the officially rated standard, blitz and mixed problem sets in forced mates of different lengths. You can sort by most columns with a click on the column title, including performance rating. Because performance rating adjusts for difficulty of the problems, lower performance ratings for longer problems may indicate a relative weakness in calculation compared to other users.
Tactics Attempts Repeats
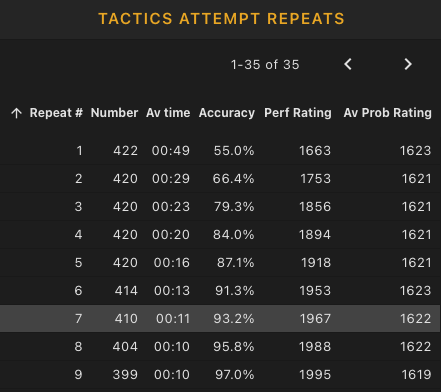
This table shows how your performance on problems evolves across multiple attempts. Using the default sorting, the first row summarises the problems you’ve only done once, the second row the problems you’ve done twice, etc. Ideally your performance should improve as the number of repeats on a problem increases, and if it is not you may want to reconsider your training strategy. Note that accuracy, performance rating , average problem rating and time taken columns should all be considered together.
For example your accuracy may go down as attempt numbers increase if you deliberately target drilling previous mistakes as mistakes will likely be of a higher difficulty than the problems you only see once. For that situation, performance rating is a better metric than accuracy. Similarly, you may be improving your pattern recognition capability if you are able to solve repeated attempts significantly more quickly, even if the performance rating is not changing, as you may be relying more on pattern recognition than calculation as time goes on for these problems, allowing faster decisions to be reached. This table allows all problem attempt filter options.
Tactics Game Move Number Performance
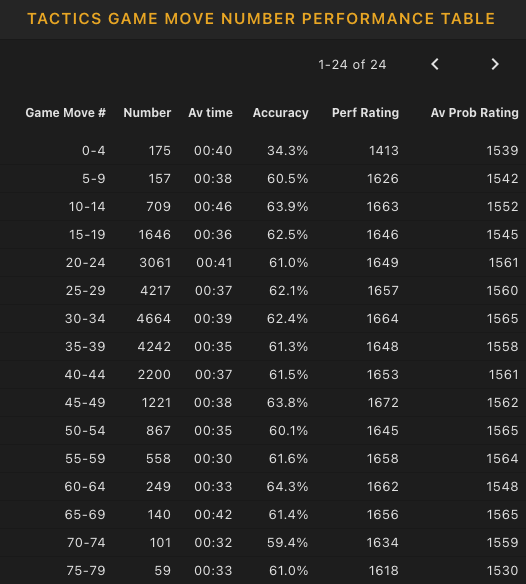
This table shows how your performance changes depending on which move number the problem position came from in the original game from which the problem was extracted. Performance is broken down into 5 move brackets and allows you to see how performance might change during different phases of the game. All of the problem attempt filters are available, and most column headers can be clicked to sort the column by that metric.
10.3. Endgame Stats
The endgame stats page provides most of the stats panels available on the Tactics Stats page, except that it does not include the Tactical Motif performance table (replacing it with an endgame types performance table), and does not have a tactics mistakes heatmap. Please see the Tactics Stats section for descriptions on the equivalent endgame panels.
10.4. Playing Stats
The playing stats view provides a breakdown of the performance in games played on chesstempo across the available range of time control/rating types (i.e Bullet, Blitz, Rapid, Long and Correspondence).
Some of the playing stats provided overlap with the old 'Your games' view on the old site game database. These stats are not meant to be a complete replacement for the game database view of your games, and a new site version of the game database will also include a version of the current 'Your games' view, which will likely borrow some of the functionality of the stats provided here.
10.4.1. Games played history table
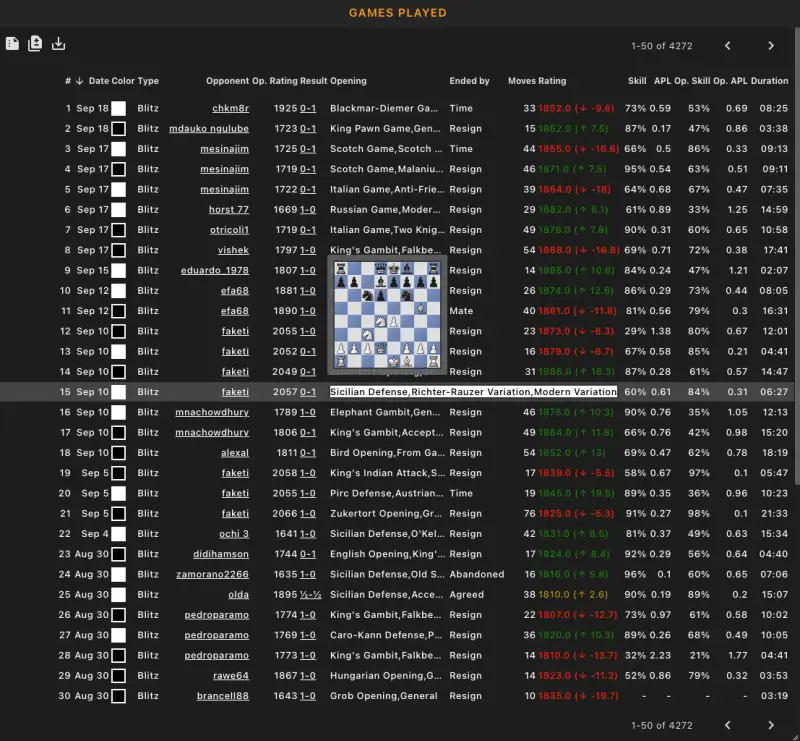
This is the playing feature equivalent of the problem solving attempt history table, and has a similar set of functionality in terms of providing filtering, summary stats, benchmarking and game attempt result data download, so please refer to the problem attempts table section of the user guide for a more detailed discussion of some of those features.
Below is an example of the playing summary data using a filter to target the last 500 bullet and blitz games for a player (the bullet figures on the left, the blitz figures on the right, with the difference shown in the third column).
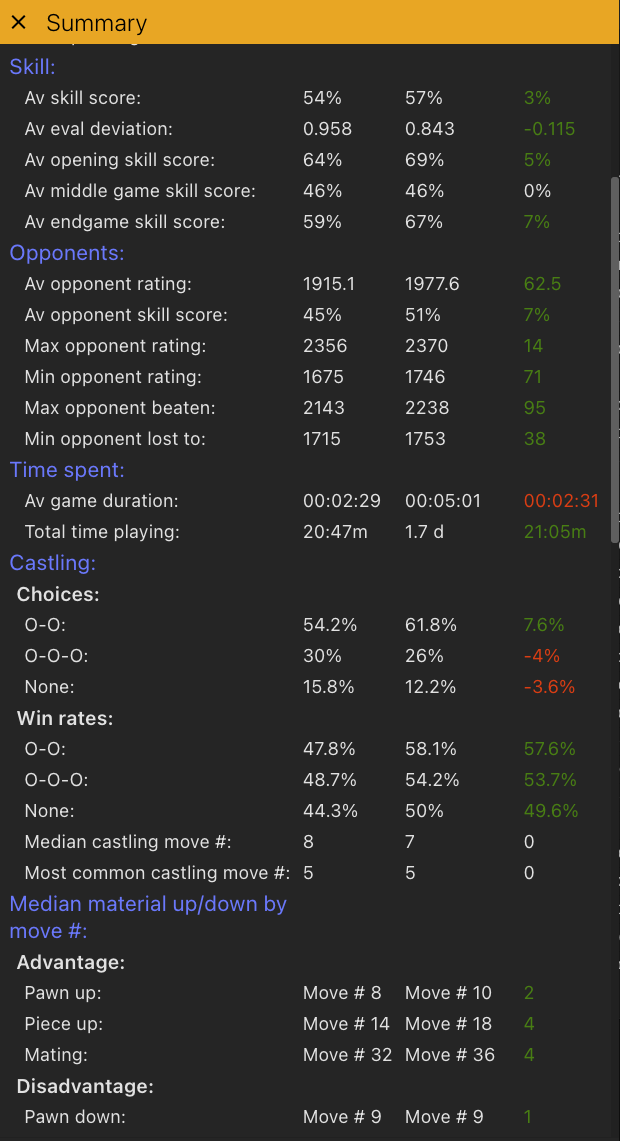
And in the next screenshot you can see a subset of the summary stats shown comparing recent blitz games from 1500-1600 players against 2100-2200 players:
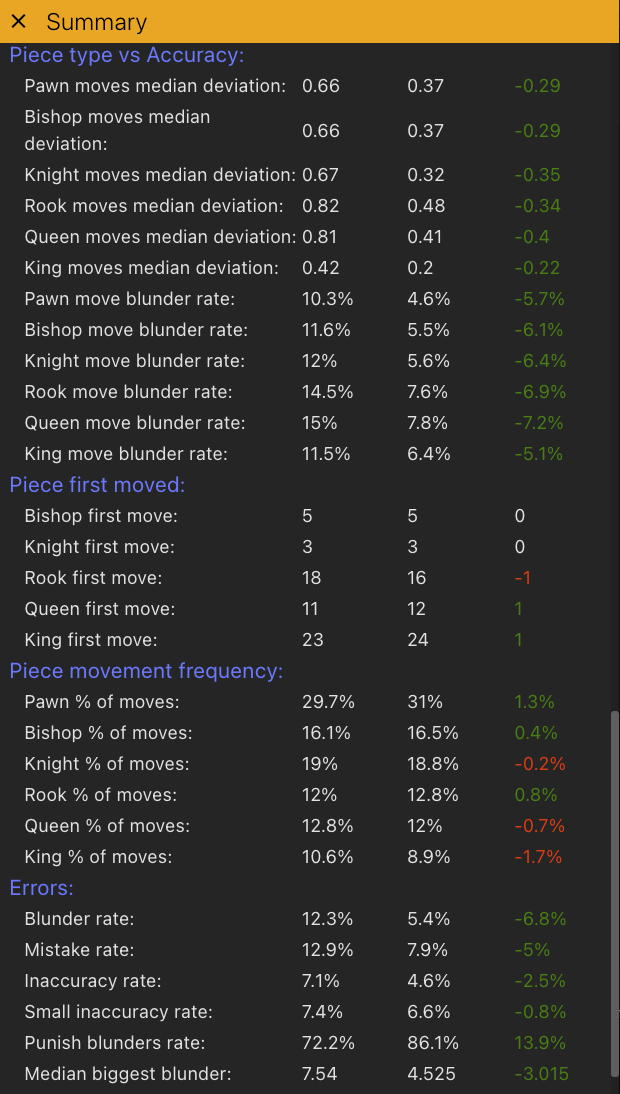
Here we will only mention the columns and list of filters and summary stats available that are specific to the games played history.
The columns available are:
- #
-
The number of the game, the most recent problem is marked 1, the second most recent 2, etc.
- Date
-
The date/time the game was completed.
- Color
-
The colour of the pieces you played the game with (i.e a white square means you played as white, a black square as black).
- Type
-
The rating type of the game, i.e Bullet/Blitz/Rapid etc.
- Opponent
-
The name of the opponent. Click on the opponent’s name to jump to the playing stats page for that user.
- Opponent rating
-
The rating of your opponent.
- Result
-
The result of the game, i.e 1-0, 0-1 or 1/2-1/2. Click on the result to jump to the game loaded into the playing interface. Hovering over the result with the mouse will shown the board as it appeared at the end of the game.
- Opening
-
The name of the opening. Depending on the width you’ve configured for the games played panel this may be abbreviated, with an ellipsis shown at the end if that is the case. You can hover over abbreviated names to see the full name. Hovering over the name will also show the position that defines that particular opening.
- Ended by
-
The reason the game ended, e,g resign, time, mate etc.
- Skill
-
The skill estimate for the game. Skill is a number calculated from the engine evaluation of the moves in the game, and differs from the pure engine match scores by putting more emphasis on moves which contributed to the final outcome, so for example dropping a rook when you are still up a queen after the rook is gone will have less impact on the score than blunders made when the game was still even. Scores range from 0% (a terrible game) to 100% (a great game). Note that both the Skill and APL calculations have been slightly adjusted over time, and comparison with games played before mid 2022 may show slightly different score calibrations compared to games played after that time, and this should be taken into account if comparing games before July 2022 to data after July 2022.
- APL
-
Average pawn loss. The average engine evaluation deviation of the player’s moves from the best move in pawn units. So for example 1.1 would indicate your moves were on average 1.1 pawns worse than the best engine move across the course of the game. Blundering into mate is given the equivalent of being down a queen and a piece (so 12 evaluation points).
- Op. Skill
-
The opponent skill score for the game.
- Op. APL
-
The opponent APL score. Please note that both opponent skill and opponent average pawn loss stats from a single game should not be used as evidence your opponent may have cheated. Under the right game conditions (especially in shorter games), engine based matchup scores can be very high , even for a lower rated player.
- Duration
-
The total time the game took to complete.
Games played summary stats
The available game summary stats for the current filter data are available by clicking the summary icon in the table header. Note that these can be compared against each other using different filters and against different groups of other users using the benchmarking feature, please see the problem history summary stats and benchmarking sections for more details on the comparison features. The summary metrics for the games played table are:
- No. games
-
The number of games played that match the current filters.
- Performance rating
-
The performance rating across the matched games.
- Winning percentage
-
The win rate across all games. Calculated using the formula: 100*(wins + 0.5 * draws)/total games.
- Av player rating
-
Average rating of the player across all the games.
- Max player rating
-
The highest rating the player achieved across all games.
- Min player rating
-
The lowest rating the player achieved across all games.
- Best Percentile
-
The highest percentile achieved across all games.
- Worst Percentile
-
The lowest percentile achieved across all games.
- Total points gained
-
The total points gained or lost (i.e adding up rating point adjustments across all games).
- Av skill score
-
The average skill score across all games, see the column descriptions for more details on skill score.
- Av eval deviation
-
The average engine deviation (also referred to as the average pawn loss or APL). Again, see column description for more details.
- Av opening skill score
-
The average skill score in the opening phase of the game.
- Av middle game skill score
-
The average skill score in the middle game.
- Av endgame skill score
-
The average skill score in the endgame.
- Av opponent rating
-
The average opponent rating.
- Av opponent skill score
-
The average opponent skill score.
- Max opponent rating
-
The highest rated opponent met.
- Min opponent rating
-
The lowest rated opponent met.
- Max opponent beaten
-
The highest rated opponent beaten.
- Min opponent lost to
-
The lowest rated opponent lost to.
- End reasons
-
The percentage of games finished by each reason.
- Av game duration
-
The average duration of all games. Note if you want meaningful data for this and the total playing time metrics, you may want to create a filter that excludes correspondence games.
- Total time playing
-
Total time spent playing across all games.
- Castling Choices
-
Percentage of times you castled king side, queenside or not at all.
- Castling Win rates
-
Win rates for king side, queen side and no castling options.
- Median castling move #
-
The median move at which the player castled.
- Most common castling move #
-
The most common move (i.e the modal) number at which castling occurred.
- Median material up/down by move #
-
The median move number the player was up or down different amounts of material (up/down pawn, up/down piece, or mating/getting mated).
- Fast/Medium/Slow/Very slow move speed median deviations
-
The median pawn loss engine deviations for different move speeds (move speeds are classified relative to the time control type the game was played in).
- Fast/Medium/Slow/Very slow move speed blunder rates
-
The blunder rate percentages at different move speeds.
- Pawn/Bishop/Knight/Rook/Queen/King move median engine deviation scores
-
The median pawn loss engine deviation scores for each type of piece move.
Pawn/Bishop/Knight/Rook/Queen/King blunder rate: Percentage of blunders made for each type of piece.
- Bishop/Knight/Rook/Queen/King first move number
-
The average move number at which each piece type first moved in the game.
- Pawn/Bishop/Knight/Rook/Queen/King moves percentages
-
The percentage each piece moved as a total of all moves during the games.
- Blunder/Mistake/Inaccuracy/Small Inaccuracy rates
-
The different magnitudes of mistakes and the percentage of total moves they comprise.
- Punish blunders rate
-
The percentage of opponent blunders that the player punished (i.e found the best move to exploit the mistake).
- Median biggest blunder
-
The median size of the biggest blunder in each game calculated across all games.
- Median biggest blunder move #
-
The median move number at which the biggest blunder occurred across all games.
- Top move played
-
The percentage of moves that were the top engine move.
- Top two moves played
-
the percentage of moves that were the best or second best engine moves.
- Av eval at end
-
The average evaluation at the end of games. Note that this metric was inaccurate in games prior to 8th July 2022, so games before that date are excluded from the calculation of this metric.
Games played filters
There is a large number of metrics that can be used to filter the list of games (and these filters will also apply to the summary data returned). Note that these filters are also available on several of the other game related stats panels.
For more details on how filters work, please see the problem attempts history filters description.
Available filters are:
- Game finish time
-
The time at which the game finished.
- Playing rating type
-
The rating type/time control type (i.e Bullet/Blitz/Rapid etc).
- Opponent rating
-
The rating of the opponent.
- Playing rating
-
The player’s rating.
- Game played number
-
The index of the game into the total number played, 1 being the most recent 1000 being the game played 1000 games ago.
- Time used
-
The amount of time used in the game.
- Skill
-
The skill level of the player (see the column descriptions for more details on this metric).
- Opponent skill
-
The skill level of the opponent.
- Castling
-
The type of castling choice of the player.
- Opponent Castling
-
The type of castling choice of the opponent.
- Rated
-
Whether the game was rated or not.
- Opponent
-
The name of your opponent.
- Average Pawn Loss
-
The average engine deviation of the player’s moves in pawn units (see the column descriptions for more details of this metric).
- Opponent Average Pawn Loss
-
The average engine deviation of the opponent’s moves in pawn units.
- Worst eval
-
The worst engine evaluation from the player’s point of view (in pawn units) in the game.
- Best eval
-
The worst engine evaluation from the player’s point of view (in pawn units) in the game.
- Worst mate length
-
The shortest mate length against the player during the game, e.g if there was a mate in 1 AGAINST the player during the game then this would be the worst mate length.
- Best mate length
-
The shortest mate length against the player during the game, e.g if there was a mate in 1 FOR the player during the game then this would be the best mate length.
- Eval at end
-
The engine evaluation at the end of the game in pawn units, and from the player’s point of view. So a positive eval would be in favour of the player, and a negative eval in favour of the opponent. Note that this and the next filter will only act on games played after the 8th of July due to problems with the metric stored before that date.
- Mate length at end
-
The mate length (if any) of the position at the end of the game (from the player’s point of view). So if the player had a mate there would be a positive mate number, if the player was getting mated there would be a negative mate number.
- Result reason
-
The reason for the game to be over (i.e resign, time, checkmate etc).
- Result
-
The win/draw/loss status of the game.
- Color
-
The color pieces the player was playing with.
- Opening names
-
A list of opening names to filter the games by. You can use this filter in conjunction with the summary data and benchmarking feature to compare your performance in a particular opening against other subsets of your games or against other groups of players across all the summary data metrics.
- Opponent is bot
-
Filter by the bot status of your opponent. Bots are the computer players of varying strengths marked with a computer icon next to their name, and a capitalised first letter in their names (where the first letter equates to strength with H=hard, M=medium and E=easy). Bot challenges are not shown by default and you need to adjust the filter options on the playing challenge window to see bot challenges.
10.4.2. Other playing stats panels
Please see the Tactics Stats section for a description of the rating and percentile graphs which operate in the same manner as the problem based rating and percentile charts. The opponent distribution bar chart from the playing stats is also equivalent to the problem distribution tactics charts.
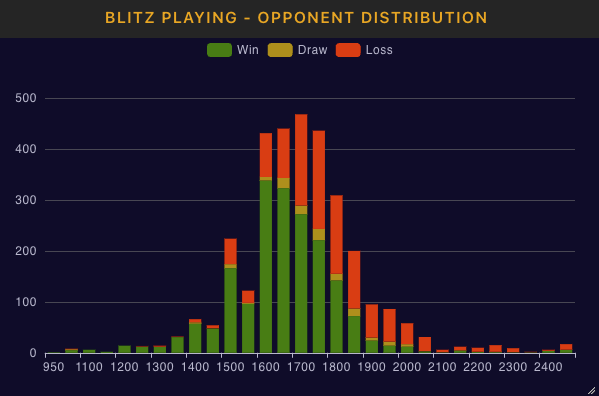
Other playing specific panels are:
Playing Rating Type Summary
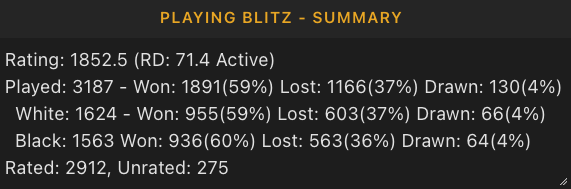
The playing rating summary panels summarise details for each of the rating types (i.e time control types, Bullet, Blitz, Rapid, Long and Correspondence) For each rating type the following details are shown:
- Rating
-
The current rating.
- RD
-
The current RD. RD is a measure of rating stability , and is also used to determine if a user is currently active. When your RD is high, you receive larger rating movements in order to move you quickly towards a stable rating. As your RD decreases your rating becomes more stable, and you receive smaller rating adjustments.
- Played
-
Total games played for the rating type, also broken down into win/loss/draw with number of games and percentages shown. Breakdown by piece colour played is also shown.
- Rated/Unrated
-
Shows the split of games played in rated and unrated mode for this time control type.
Playing Opening Summary
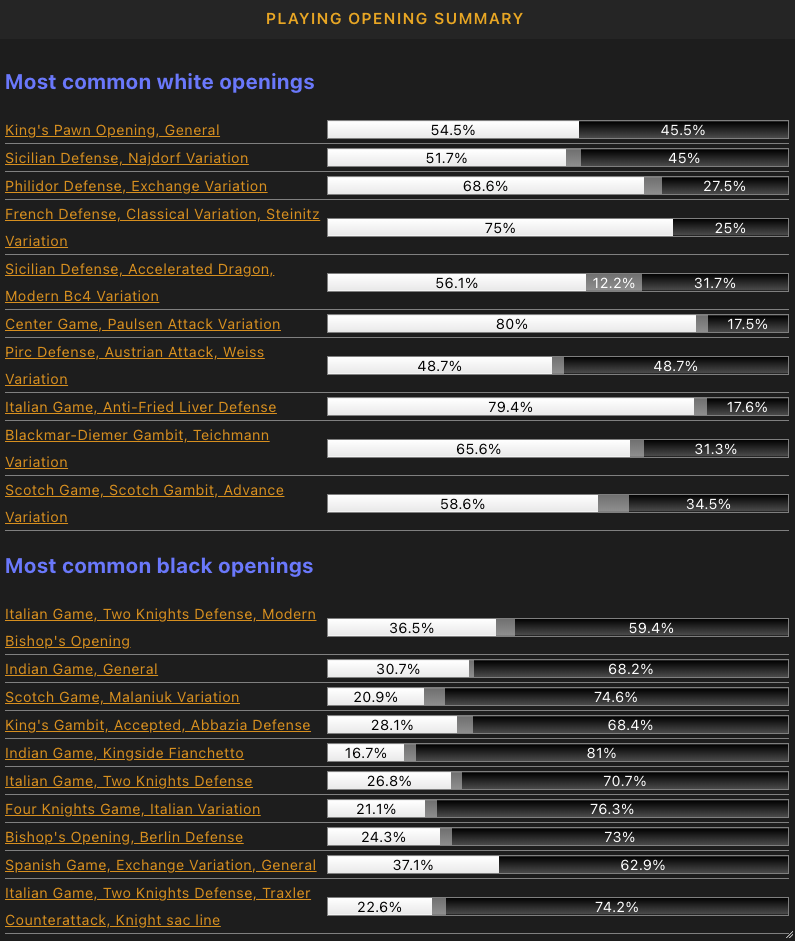
Shows a breakdown of the most common white and black piece openings played. Win/Draw/Loss percentages are shown , hover over the win/draw/loss bars with the mouse to see a tooltip providing the exact numbers for each opening. Hovering over the opening name links shows the position associated with the opening , and click on the link to jump to the opening details page in the game database for that particular opening.
Openings Played Sunburst
Sunburst visualisation of the initial opening moves played in Chesstempo games.
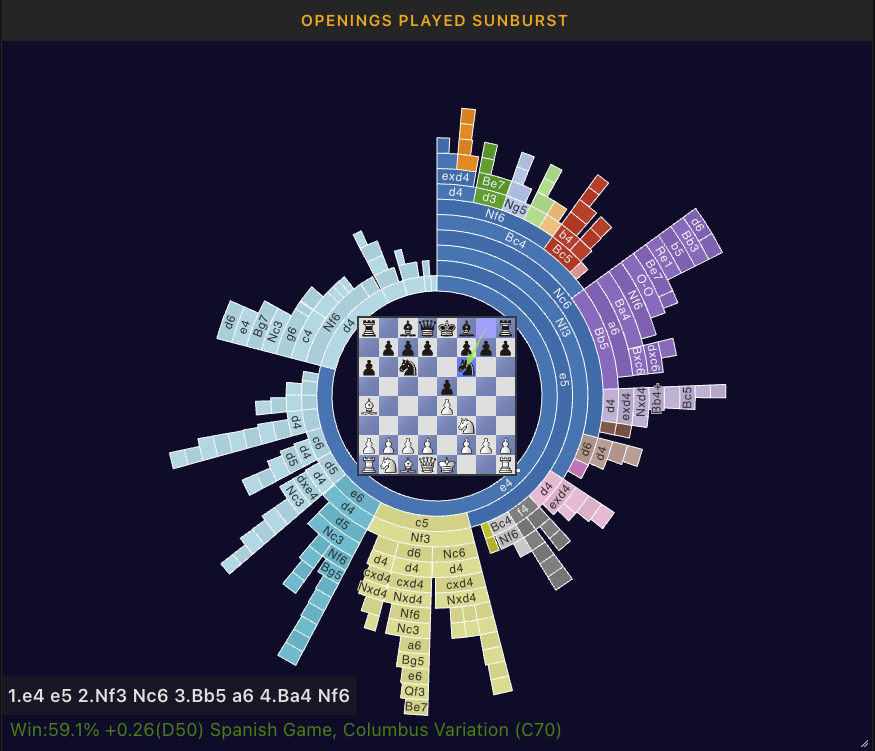
As well as a number of filters for which games' moves are included in the visualisations, several settings are available (click on the panel header and choose 'settings'):
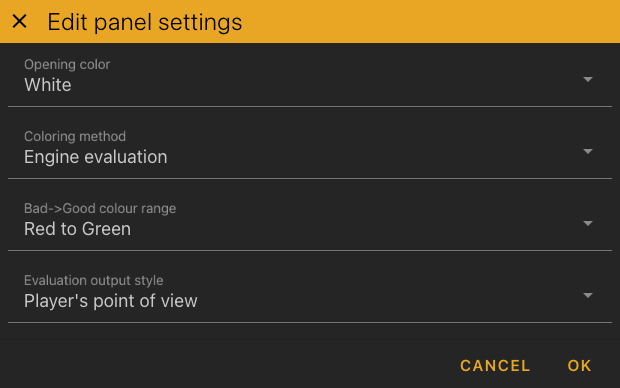
Several methods are available for colouring the moves in the visualisation:
-
Line separation (the default)
-
Engine evaluation (for positions we have cached stockfish evaluations for).
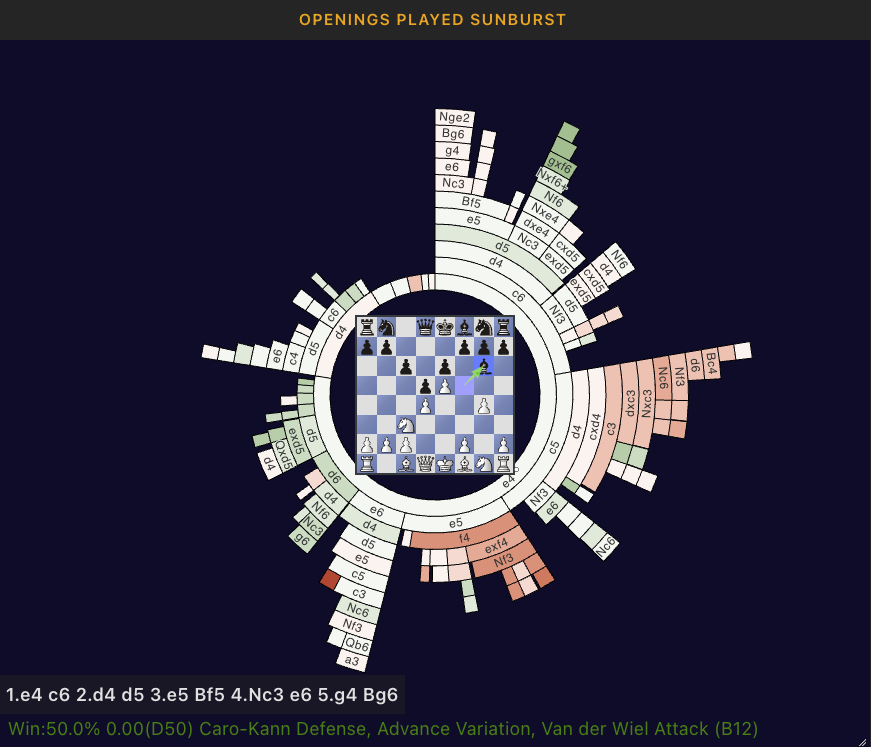
-
Win rate (the win rate in your games from the position after the move).
The latter two can be very useful to highlight parts of your repertoire that are performing poorly, or are considered unwise by stockfish.
Typically, if you’ve played a large number of games, not all the moves can be shown at once, click on a move in the visualisation to drill down into that branch. Clicking on the board in the middle will jump back one move, double click the board to jump all the way back to the start position.
Opening names, win rates and engine evals (where available) are shown at the bottom of the panel.
Game finish reason pie charts
A breakdown of game finish reasons, i.e checkmate, resign, timeout, draw etc with a pie charts for all games , won games and lost games.
Playing performance by daily hour
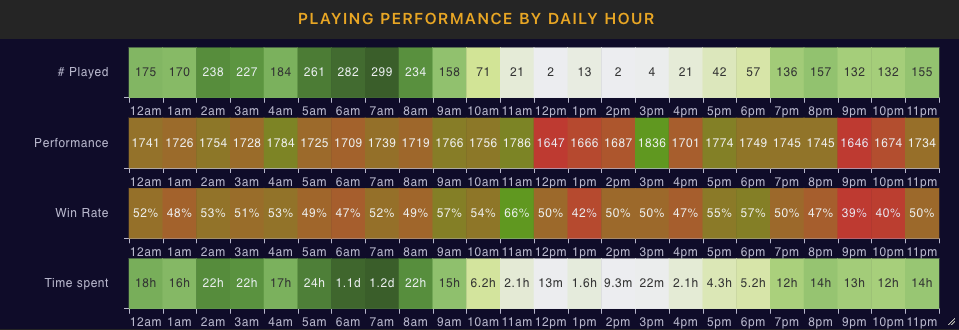
Similar to the equivalent tactics/endgames panel , showing how your playing performance and activity levels differs at different hours of the day.
10.5. Repertoire Stats
Repertoire stats are available to provide details on activity related to the opening trainer. Several stats are already available directly on the opening trainer page, and for now these will remain there.
10.5.1. Repertoire Summary
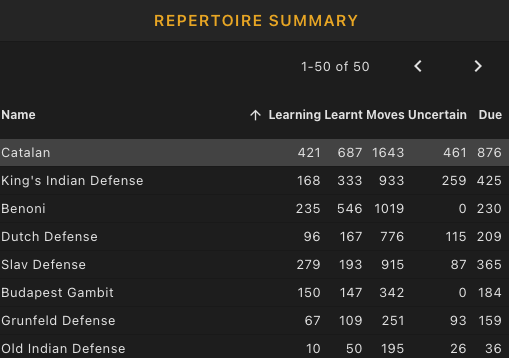
The repertoire summary summarises learning data across all your repertoires, it shows the current number of positions in learning status (i.e the number of items seen at least once, but not yet deemed to be known well enough to be learnt), the number of items deemed to be known well enough to be 'learnt', and the number of items not yet seen. The number of uncertain items are also shown (items that are technically learnt, but have not been tested recently enough to be sure of their current status). The final column is the due column, and will either show the current number of items currently due for drilling or if all items are up to date, then the date at which the next item will become due.
You can click on any of the repertoire names to jump directly to the opening trainer with that repertoire selected for training.
Note that the data from this table relies on data stored by loading the desktop version of the opening trainer. If your most recent interaction was with the app, then these values will currently all read 0. We will be fixing this in the next app update.
10.6. Book Stats
The book stats show stats related to activity associated with chesstempo books. Note that some of the other panels can also be used for visualising performance related to book related content by using the specific book filter, the general 'only from books' filter or by filtering for problem sets associated with a book.
10.6.1. Book problem attempts
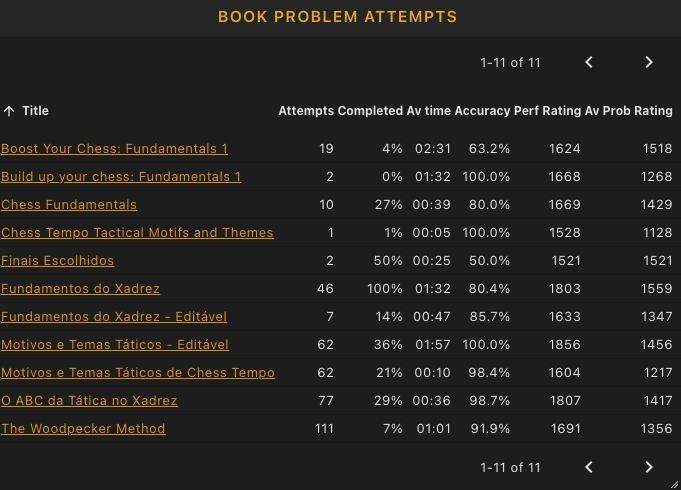
A table summarising problem solving attempts for each book that contains problem based material. This summarises activity across all problem sets for each book, so may include data for solving done across more than one book problem set, including any custom sets you may have created for the book. Total attempts, percentage completed, average solve time, accuracy, performance rating and average problem difficulty are all shown. You can also sort the table by clicking on the column headers, and all the problem attempt related filters are available for use on this table.
10.6.2. Book repertoires summary
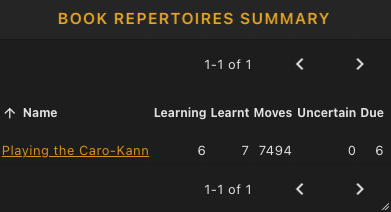
This shows the same data shown on the repertoire summary panel but with only repertoires sourced from a book shown.
10.7. Achievement stats
The achievement stats page shows the list of completed and incomplete achievements. By default the completed achievements are shown, click on the 'incomplete achievements' button to view the not yet complete achievements.
10.8. Activity Stats
The activity stats panel summarises the underlying data collected in order to provide the achievements data, and provides activity specific statistics for a wide range of side activities, such as current and best activity streaks, correct/won streaks, records for number correct or games won over different periods of time, total time spent on activity etc.
10.9. Student stats
The student stats panel shows data related to the students who have nominated you as coach. See the student/coach relationships section of the user guide for more details on the information available here.
10.10. Guess the move (GTM) stats
The guess the move stats section holds stats panels specific to moves you have made in the guess the move feature.
The GTM rating summary and rating graph shows the same data shown in the equivalent tactics stats panels.
10.10.1. GTM rating/score distribution
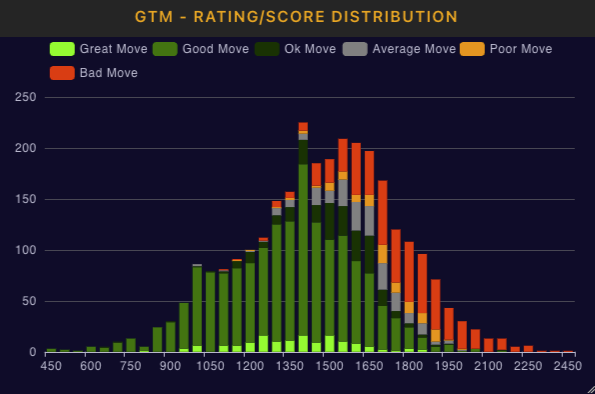
A bar graph showing your move scores across the range of GTM move difficulty ratings.
10.10.2. GTM Motif Performance
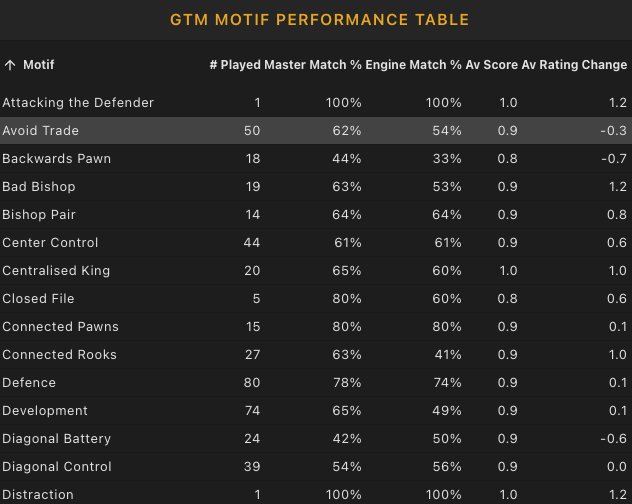
A table showing performance on GTM games on a per motif basis.
10.10.3. GTM moves heatmap
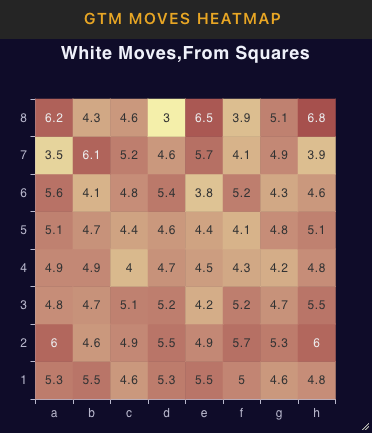
Similar to the Problem mistakes heatmap, but for all GTM moves played, and with different metrics for colouring. The choices being number of moves, average move rating (i.e the average difficulty of the moves) and the average move score received. You can choose to view the heatmap for either your move or the master move from the games, and comparing both may be useful (copy the heatmap panel and set one to master and one to 'our moves' if you’d like to see them side by side). For most people, the majority of moves will get a good move score, especially in the opening, so if you want to look at bad moves on the heatmap, you might want to filter by scores under 10. The image above is an example GTM move heatmap using average move scores as the heatmap colouring metric.
10.10.4. GTM rating/match type distribution
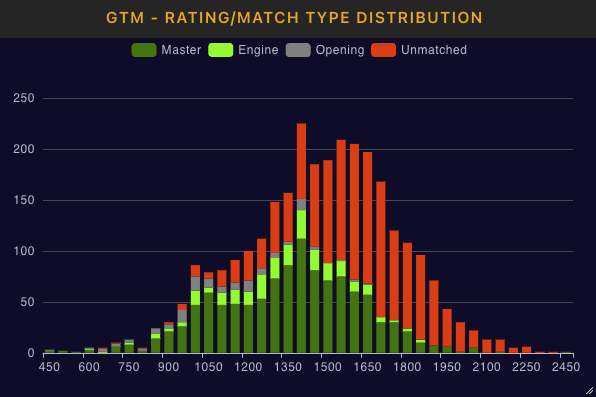
Stacked bar graph showing the number of moves broken down into master/engine/opening/unmatched status for different rating ranges. Note for counting a move as either master/engine/opening/unmatched , a hierarchy is used such that if a move matches multiple types it will be attributed to the highest member of the hierarchy, with the highest to lowest being master/engine/opening. So if a move was both best engine and best master move, it will be counted as a master move match, if it was both an opening theory match and an engine match, but not a master move match it will be counted as an engine match. Any move matching none of the three types will be counted as 'unmatched'.
10.10.5. GTM score/match type distribution
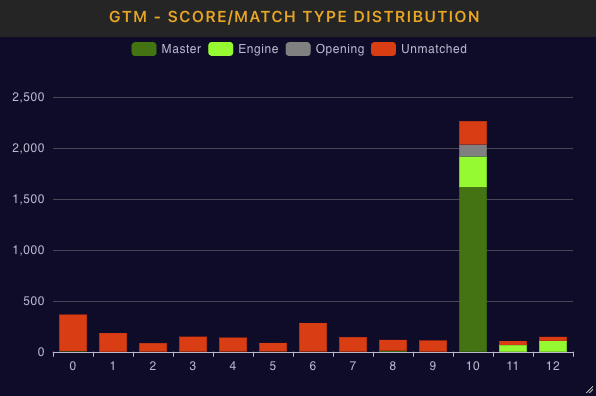
Stacked bar graph showing the number of moves broken down into master/engine/opening/unmatched status for different moves scores. Accounting for which match type is used uses the same method as for the rating/match type distribution.
11. Training Targets
Training targets provide a way of setting training goals, such as the number of problems per day you want to try to solve, or a particular rating you want to achieve. Feedback is provided on progress towards your goal as you perform activities on the site related to your goals such as problem solving or game playing.
To create a new training target go to the training targets page available on the training menu. Enter your training target details and then click the create button to create your new target.
11.1. Training Target settings
- Description
-
The name of training target. To avoid clutter in the notification panels, smaller names are better.
- Training Type
-
The training area type such as Tactics, Endgames, Guess the Move and Playing. Setting this will also display a second area specific type selector so you can choose sub types such as Standard/Blitz/Mixed for tactics or Bullet/Blitz/Rapid etc for playing.
- Target Type
-
The type of target you will be aiming for. Number targets target a number of attempts, so for example 10 tactics attempted. Number won/correct targets only won games or correct problems. Rating target, rank target and percentile target all target a particular rating, rank or percentile rank for the activity.
- Period Type
-
There are two period types. Calendar period types target a goal for a particular calendar period (day, week, month or year). End date periods specify a target that must be completed by a particular date. For calendar period types you need to pick the period (day, week, month or year) , the period span (e.g. selecting 2 and days will create a target that needs to be achieved over two days) and the start of the period (default to now if not selected). If you want the target to repeat at the end of the period then tick the repeating target checkbox. For example if you want try to solve 10 problems every day, then choose the calendar period type, a period of day and a span of 1, and then tick the repeating target checkbox. You will have until midnight in your current timezone to complete the target, and the target will reset at the end of each day.
- Assign to
-
The assignment field allows you to assign training targets to students. Multiple students can be entered by separating their usernames with a comma. Coaches get extra details on student training target progress on their student stats page.
12. Achievements
Achievements and achievement badges provide motivation and progress tracking. Badges and associated points are awarded for completing tasks on the site. These tasks include achieving personal bests, achieving volume based goals, such as number of problems solved or games played, success and activity streaks and exploration of site features.
Your preferences has a tab for achievement related settings, and if you would like to turn off achievement notifications you can do so there. Achievements will still be tracked, but you will need to go to your achievement stats page to see which achievements have been completed. If you would like less obtrusive noticiations, change notification method from dialog to notification panel which will use an automatically hidden slide out panel to the right of the page to display all achievements rather than a large dialog centered in the page. Note that for frequently awarded achievements they will often be shown as notification panels instead of dialogs to avoid disrupting your sessions.
|
|
Achievements are calculated based on data collected after the achievements system was put in place. This means awards such as all time personal bests are for personal bests achieved after the achievements system existed, so may not include your peak rating if that was achieved before the achievement system was created. |
12.1. Achievement Stats
You can see your completed achievement badges by going to the achievements tab on your stats page. Click on the incomplete acheivements tab to see a list of all the incomplete achievements and an indication of any progress that has been made towards each badges completion.
If you’d like to see details activity stats that the achievements are based on , you can see the details on the activity stats tab of your stats page.
12.2. Achievement Points Leaderboard
The achievement points leaderboard allows you to see a list of the top point scorers for the week, month, year and all time. Your current rank and number of points for the period are also shown.
12.3. Achievement Types
- Feature Exploration
-
Badges awarded after a site feature has been used.
- Activity Streaks
-
Badges awarded for consecutive days or weeks of continual activity in an area. For example, a daily tactics streak of 10 is achieved by solving tactical problems for 10 consecutive days in a row. A weekly tactics streak of 6 would be achieved by solving at least once a week for 6 weeks. Activity streaks are tracked for tactics, endgames, guess the move, and online play. There is also a global activity streak tracker which is a daily streak maintained by being active in any activity on the site. For example if you solve tactics problems one day, and play games the next day, that would be an activity streak of 2. The current global activity streak is shown at the top of most pages on the site, and a tick on the streak icon indicates you have achieved your daily activity for today.
NOTE: Activity streak days are based on the time in your current timezone. Weeks are measured with Monday as the first day of the week.
- Comment Likes
-
Badges awarded based on the number of comment likes received from other users.
- Success Sequences
-
Badges awarded for sequences of successful outcomes. For example when solving tactics, 10 correct in a row would be a success sequence of 10. Similarly, 10 won online games in a row would also be a success sequence of 10. Success sequences are tracked for sub types of an activity, so you if you get 5 blitz problems correct, then 1 standard problem wrong, then 5 more blitz problems correct, that is still a success sequence of 10 in blitz problems. The same applies for different rating types in online play.
- Successes In Period
-
Successes in period tracks the number of successes for periods of an hour, day, week, month or year. For example if you win 20 games in a week that is a weekly success number of 20.
- Total Time Spent
-
Total time spent tracks achievements for the total time spent on each activity area. Outliers are truncated when calculating these values to avoid accounting for time spent while a CT page is open but not being actively used.
- Upsets
-
Badges for upsets are awarded for success against an opponent or training problem well above your own rating.
- Personal Best Activity Streaks
-
Your personal best for each activity type is tracked and badges are awarded for achieving a new personal best.
- Personal Best Defeated Opponent Ratings
-
This tracks your all time high oppenent rating for won games or correct problems.
- Personal Best Highest Ratings
-
Badges awarded when all time high ratings achieved in any of the activities.
- Personal Best Success Sequences
-
Badges related to all time high runs of success (won games/correct problems).
- Personal Best Successes in Period
-
Achievements for reaching new personal records for total correct problems or won games in a period.
13. Analysis Board
The Analysis Board allows you to explore different lines in a position, add and remove variations and annotations, and copy the results to a comment if required.
- Copy to Comment
-
Copies all of the current analysis to a comment on the entity the board was launched from. The label for the copy comment button changes to reflect the target entity. For examples if you launched the analysis board from a board showing a game in the chess database, then the label will be "Copy to Game Comment".
- Copy Selection to Comment
-
If you drag the mouse over a subset of the move list, you can copy only the selected moves to a comment.
- Delete to End
-
This button deletes all moves from the currently selected move to the end of the line, any variations and annotations attached to the deleted moves will also be copied. If you want to delete the entire line, then select the first move before using this button.
- Promote Variation
-
This button promotes a variation into a main line (or parent variation for deeply nested variations). For the simple case where there is a variation straight off the main line, this button will promote the variation to become the new main line, and the existing main line will become a sub-variation to the main line. To operate the button, select any move in the variation you wish to promote, and then click the button.
- Annotation Entry
-
To add an annotation to your analysis, enter the text of your annotation comment in the before move or after move annotation boxes, and then click on save, the comment will be added in the appropriate position in the move list relative to the currently selected move.
- Engine Analysis…
-
Displays the engine analysis panel. See the Engine Analysis Section of the User Guide for more details.
14. Engine Analysis
Engine analysis allows you to use chess engines running on the Chesstempo servers.
14.1. Analysis Panel
The engine analysis panel shows engine analysis results, and allows you to start and stop analysis, control the number of lines analysed, and initiate full game annotations.
The analysis panel has the following buttons:
- Go - Start Engine Analysis
-
Starts analysing the current position shown on the board. Analysis will continue until the Stop button is clicked, or the page holding the analysis panel is closed.
- Stop - Stop Engine Analysis
-
Stop engine analysis. You can leave the engine running while using other pages, however you should stop the engine when you’ve finished using it, as it will use up CPU on your machine while still running. Closing a window with a running engine should automatically stop the engine.
- Annotate - Annotate Game
-
The Annotate feature allows you to use the engine to analyse a full game. It is described in more detail in the Annotate Game section of the User Guide.
- Lock/Unlock Engine - Lock the engine to the current position
-
The lock/unlock button allows you to control if the engine follows the current position as you move around the move list. If the engine is locked, it will continue to analyse the current position until the engine is stopped, and restarted on a new position. When unlocked, the engine will automatically start analysing new positions as you move through the move list.
- Engine Settings - Jump to engine settings page
-
The engine settings button launches the engine settings window. Any new engines added will require a page load before showing up in the engine list.
- Decrease Lines /Increase Lines
-
The increase and decrease lines button controls how many lines the engine will examine at each position. Increasing the number of lines will decrease the depth you will be able to reach in a given period of time, so you should allow for this when deciding how long to take on each position. You can change the number of lines during analysis, however any change to this setting will restart the analysis of the current position and changing these settings is much quicker when the engine is stopped.
- Play Best - Play the best move found so far
-
The play best button allows you to insert the best move found by the engine into the move list. If the engine is currently unlocked, the move will be played, and the engine will start analysing the position resulting after the move. This action can also be triggered using the keyboard, by pressing the Space bar.
14.2. Engine Lines Display
The engine lines display shows an evaluation and best line for the top moves found by the engine in the current position. The moves are ordered from best move to worst move, and the maximum number of moves shown is determined by the currently selected number of lines. The order of display of each line is, Analysis Depth, Evaluation, Move, Best Line following move.
The evaluation shown before each line indicates the best material situation that the engine thinks will result from playing the particular move (i.e. the evaluation of the position at the end of the best line shown). The evaluation shown is in pawn units. So for example +1.00 would show the move leads to a position that is 1 pawn ahead for the player playing the move, -1.00 would indicate the move leads to a position that is 1 pawn behind for the person playing the move. +3.40 would show a position where the player to move is up a piece worth of material, plus some extra evaluation attributed to some positional advantage in the current position. By default, evaluations are shown from the player to move’s point of view, this means a positive evaluation indicates a move that leads to a position where the player to move is in front, and a negative evaluation indicates a resulting position where the player to move would be behind. Many chess engine interfaces have an alternative form of display where the evaluation is always shown from white’s perspective. For example if it was black’s turn to move a +1.00 score would not be a 1 pawn advantage to black, but instead a 1 pawn advantage to white, with black being behind. If you’d prefer to use this method of evaluationd display select the 'Evaluation from white’s view' option available on the "Chess Engines" tab of your user preferences (not the engine settings page).
Moves that would lead the player to move to be ahead of their opponent are marked green, and moves that would lead the player to be behind are marked red, moves deemed to lead to even or drawn positions are marked blue. Note that 'green' moves are not necessarily 'good' moves, for example if the player is a rook up and a move might lead to being only 1 pawn up, that move will be marked green as the player is still in front, but it would not be a good move.
The list of moves in each engine line will be coloured orange up to the point that they match the line played in the current list. You can click on any move in the best line display and the moves upto and including the clicked on move will be inserted into the move list for the current board.
During analysis, stats on the progress of the engine are displayed above the engine lines. The current time spent analysing the current position is displayed, along with the current move being examined (and the number of this move out of the list of candidate moves for the position). The Nodes show the total number of positions examined, and the Nodes per Second (NPS) shows the number of positions the engine is examining each second. The NPS will vary depending on the speed of your machine, how busy your machine is with other tasks, and the nature of the position being analysed.
14.3. Annotate Game using Chess Engine
The annotate feature allows you to use your engine to automatically annotate all the moves in a game. For example after using the Explore button on the play versus computer page to examine the game in the database, you can use the annotate feature to ask for a full game analysis from the engine, with blunders and the improved lines inserted into the move list. You can also paste games you have played elsewhere into the game database move list using the 'paste' button beneath the board, and analyse those games inside the Chesstempo web page.
|
|
All evaluations inserted into the move list during engine annotations are from white’s point of view, rather than the point of view of the player to move (so +1.00 would always indicate white is in front, even when attached to a black move). |
To initiate game analysis click on the Annotate button which will launch a dialog that allows you to select game annotation settings. The following settings are available:
- Max Time per move/Max Depth
-
Max Time per move and Max depth settings control how many resources are spent analysing each posiiton. The engine will stop analysing when it reaches either one of the settings. For example, if 15 seconds and depth 10 is selected, the engine will stop analysing and move on to the next position when either 15 seconds has been used, or depth 10 as been reached, whichever happens first.
NOTE: When a maximum time setting is used, some engines will not exit immediately upon reaching the maximum time, but may continue until all moves at the current depth have been examined.
- Side to Analyse
-
Allows you to select only a particular side’s moves for analysis, for example when analysing your own games, you may want to save time by requesting only moves from the side which you played.
NOTE: Selecting a particular side does not completely prevent analysis for that side’s moves, as analysis from the opposite side may still be required to determine when sub-optimal moves have been played.
- Insert Eval For Each Move
-
If selected, this option inserts an Engine evaluation for each move analysed, irrespective of whether the move was above the output threshold. All evalaution scores will be shown from white’s point of view.
- Show Depth With Eval Score
-
When selected, the current depth reached during the analysis is shown for any evaluations inserted into the move list.
- Auto scroll move list
-
If this option is selected, the move list will be scrolled to show the currently analysed move.
- Maximum Length of Inserted Lines
-
This setting controls how many moves are used when inserting lines into the move list. Moves at the end of lines start to become unreliable due to the horizon effect, so you may want to set this value to a smaller number to avoid outputting longer lines. You can also set this to 1 to avoid clutter and only output the best move instead of the full move list. This value is defined in ply rather than full moves, so 2 means one white move, and one black move.
- Last Move
-
The move number of the last move to analyse, unlike the length setting, this number is defined in terms of full game moves. It is set by default to the last move in the game. The first position to analyse is chosen by selecting the start move before the Annotate button is clicked.
- Output Threshold
-
The output threshold controls the evaluation gap required between the move played and the best engine move before an annotation line is inserted into the move list. The value is in terms of pawns, so 0.5 would indicate that the best engine move would need to be at least half a pawn better than the move that was played for an annotation to be created. If you want every move annotated you can set this value to zero.
15. Student/Coach Relationships
The Student/Coach relationships feature allows users to nominate a coach, who then receives access to otherwise hidden stats, such as the students' per problem mistake moves, play versus computer stats, tagging stats and FIDE rating estimates. Coaches can also edit their students' preferences, including assigning custom problem sets to students. Coaches have a new tab on their stats page showing a list of their students, and a summary of recent student accuracy. Coaches are also able to download problem history for their students, and can use the new problem history filtering on their students' problem attempts.
15.1. Nominating a Coach
To use the new coaching features, students must nominate their coach (or coaches) on the "Coaches" tab in their preference settings. More than one coach can be nominated, by entering a comma separated list of coach usernames, for example "john,bill". To use these features, both the coach and the students must have active gold or diamond memberships.
Once a coach is nominated, the coach must confirm the nomination. To do this, the coach needs to go to the 'Coaches' tab on their settings, where they should see a "Manage your students" button. Click this to see a list of all students, and select the students marked as requiring confirmation , then click the 'Confirm' button (or 'Reject' if you don’t want to add them to your list of students). The same panel can also be used to remove students that you no longer which to coach, again select the students you wish to remove and then click the 'Drop' button.
15.2. Coach Access to Student Stats
The Students tab on the coaches' stats page has a list of all their current students. The list shows a summary of recent accuracy, and also contains a link to each student’s stats page. Coach’s can access several stats usually only available to the user themself, including:
- Per Problem Mistakes
-
Visibility of the mistakes made by students on their tactics problems.
- Play versus Computer Stats
-
Per rating stats and graphs for each play versus computer rating type.
- Tagging Stats
-
View the tag agreement/disagreement stats for each student.
- FIDE rating estimates
-
View the standard and blitz problem based FIDE estimates for each student.
- Problem History Download
-
Access to the download history button for each student.
15.3. Coach Access to Student Preferences
The student list has a preferences button next to each student which allows the coach to edit the student’s settings. Clicking on a student’s preferences button brings up the preferences panel for the user. Any user preference can be changed (other than the Student’s list of coaches). Once you have completed the changes, click the save button to finish. Commonly changed settings would be difficulty settings, and current problem set.
15.4. Coach Assigned Problem Sets
Coaches can assign problem sets in two ways. Firstly, when creating a new problem set, coaches with students are given the option of assigning a problem set to a user. The assignment choice is made after using the Create Set button. Sets assigned in this manner belong to the student, rather than the coach. Problem sets can also be assigned via the preferences button next to each student in the coach’s student list. The current problem set can be changed and saved, just as any other preference, and this allows you to assign previously created sets to the user.
16. Play Online
The Chesstempo play online feature allows you to play chess games against other Chesstempo users. Chesstempo playing supports both correspondence, and non-correspondence play.
16.1. Playing page startup
When the playing page first loads, the presentation will differ depending on whether you have any games currently active or not. If you have one or more currently active games, the game with the most urgent move requirement will be loaded first. If you have more games where it is your turn to move, the next button will navigate to those games, or you can bring up the My Games view via the blue mode menu in the top left of the page, or via the g key, and select an individual game to jump to that game.
If you have no games to be played the challenge list display will be shown. The Create challenge button will create a challenge that others can respond to. Responding to an existing challenge by clicking the challenge, will lead the new game board to appear. You can toggle back and forth between the game board view and the challenge view with the c key.
16.2. Starting a new Game
There are several ways of starting a new game:
-
You can use the option in the top level playing menu to create a new game challenge.
-
You can go to the challenge view ( or the c key), then click on any of the challenges you see listed. Double clicking on a challenge will bypass the confirmation check.
-
You can go to the user list (), and click on the Challenge button next to a user you wish to challenge.
-
Any place you see a username in the playing interface you can click on the username to bring up the player action menu and then select the option.
-
Lastly, you can click on the Friends panel, and challenge a friend to a game.
Please see the Challenge Dialog, Challenge List,User List, and Friends List sections of the user guide for more details.
16.3. Challenge Dialog
The challenge dialog is used to issue challenges to other users. Game challenges can be direct challenges, sent to a particular user (by entering their name in the opponent name field), or an open challenge available to any user who matches the challenge parameters.
You can issue a challenge by clicking any of the time control buttons in the Challenge Dialog, and then clicking the Ok button to confirm. Change the time control type to see default time controls for Bullet/Blitz/Rapid/Long/Correspondence.
If you want to create a challenge using the same parameters as your most recently created challenge, then click the 'Ok' button immediately after the challenge dialog displays (the Ok button label will show the current time control that will be used). To avoid confirming the challenge with the 'Ok' button, you can double click on the challenge button which will automatically create a challenge of that time control.
If a challenge created by another user matches your game challenge parameters, you will be immediately matched up to play, otherwise your challenge will be added to the list of current challenges, and a new game will start when someone either explicitly accepts your challenge, or creates their own challenge with matching parameters. Automatic challenge matching will only occur on challenges created by human players, challenges created by bots need to be accepted manually, and will not be used to match your own challenges.
|
|
For time controls shorter than correspondence, any challenges you create that are pending will be cancelled as soon as you start a new non-correspondence time control game. This avoids the situation where you create a short time control challenge, and then accept a direct challenge for a short game from another user, but also have your original pending challenge accepted by a third user, thus creating the situation where you now need to play two short time control games simultaneously. You can still choose to play more than one short time control game at once, but you need to choose to do so explicitly by accepting other active challenges. |
When you logout (or disconnect by closing your browser or losing your network connection), any pending non-correspondence challenges will be automatically cancelled. Correspondence challenges will survive logout, and will persist in the system until you either cancel them, or they are accepted by another user.
The custom time control type allows you to create challenges with a time control not supported in the quick select panel.
16.3.1. Time Controls
Chesstempo time controls are defined using three values, a start time, an increment time, and a maximum time. The start time defines the initial time on the clock, the increment time, defines how much time is added to the user’s clock after each time they move, and the maximum time defines a ceiling on the total time after adding the increment. By ignoring the maximum time, you can define most of the common time controls seen in online play. The maximum time allows you to define some time control types more common in correspondece play. So for example, a correspondence type time control with a start time of 1 day, an increment time of 1 day, and a maximum of 1 day is equivalent to a 1 move per day time control. As no matter how many times you move in a day, the increment will never increase your clock over 1 day, and each time you move, your clock will grow back to 1 day, leaving 1 day until you must play again.
Another example is using the start time to provide an initial "time bank" where for example you set it to 10 days with a increment of 1 day and a maximum of 10 days. You can miss playing for up to 10 days without timing out, if you have played all your previous moves on time. The 10 day time bank will start to decrease if you play less often than once per day, but can be replenished up to the maximum if you play more quickly. Setting an initial "time bank" in this manner allows you some flexibility during a game without having to resort to taking vacations. For example, if you need to spend a couple of days away, the time bank makes this possible with minimal iconvenience.
If you’d like to play a correspodence game that is certain to finish within a particular time frame, you could set the start time to say 30 days, and the game will go no longer than 60 days (maximum 30 days for each player). You can choose to play as slowly or as quickly as you like, but all of your own moves must be played within the 30 days of total available time.
16.3.2. Rating filter
The rating filter allow you to define the rating range of the opponents who will see your challenge. If you don’t want to play people outside of a particular range, please use this filter to avoid them seeing the challenge. If you don’t use the filter, but instead attempt to filter your opponents by not playing after the game starts, and forcing them to abort the game, you may be blocked from playing in the future. NOTE: Using a restricted rating range on your challenges will likely increase the time it takes to find an opponent.
16.3.3. Direct challenges
By default a newly created challenge will be available to anyone that matches the challenge filter parameters. If you want to send a direct challenge to a particular user, then enter their name in the 'Opponent name' field.
16.3.4. Rated/Unrated game types
Challenges can be defined as being for rated or unrated games. If you are creating an unrated challenge, you can also define which colour pieces you wish to play with, otherwise piece colour is always assigned randomly.
16.3.5. Challenges from arbitrary start positions
If you create unrated challenges, you can choose to start the game from any position. You can paste a FEN string into the 'Start position' field, or use the Setup button to setup a board with the position you want. Other players will see the challenge in the challenge list, and will be able to check the position they are opting in to before the game starts. Non-initial start posiiton games might take a while to get a response, so they are probably more useful when either creating correspondence challenges which can be responded to at any time, or when challening bots who will accept any direct challenge for any start position.
16.3.6. Challenge Favourites
If you regularly create custom challenges with custom time controls and filters, it can be annoying to have to recreate the challenge parameters each time. Similarly if you play time controls from multiple time control types, switching between types to find the challenge button can also be annoying.
To avoid this, you can turn any set of challenge settings into a challenge 'favourite'. Enter the challenge parameters for your new favourite, and then click on the 'Create Favourite' button, and enter the name of the new favourite. Challenge favourite buttons appear at the top of the challenge panel, and can be clicked on the same way as the existing default challenge buttons.
When a favourite has been clicked, several new options appear in the buttons at the bottom of the challenge dialog. There is a 'delete' button, and if you have more than one favourite, two left and right buttons to re-order the favourites.
16.4. History
The history view shows a list of your games, with the most recent shown first. The history view can be accessed via the blue action menu in the top level of the playing page, or by using the h key. You can select individual games for viewing by clicking on the game board which loads the game into the game view. By scrolling down the page more game boards from your history will be loaded into view.
For more sophisticated history options, and the ability explore your games in the opening explorer go to the top level menu option.
16.5. Player list
The player list panel shows the list of currently online players, and their rating for each rating type. To access the player list panel choose the option from the blue action menu in the top left of the page.
You can challenge a player to a game by clicking on their Challenge button. Other player specific actions, such as friend requests or bringing up the player’s stats page can be accessed by clicking on their username.
The player list can be filtered by username or rating range by clicking on the filter icon in the top left corner of the player list panel. To filter by rating range, you will need to select the rating type the range applies to. If you’d like to ignore the rating range filter, choose the 'Ignore' type for the rating type. The username filter is a case sensitive substring search, so for example "ern" would not match "Ernest", but "Ern" would.
16.6. Challenge List
The challenge list shows a list of all the currently available game challenges. Only the challenges that have a filter matching the current user will be shown, so you only see challenges you are able to accept. Click on any challenge in the list to accept that challenge. You will need to confirm your choice to avoid accidental challenge accepts, you can avoid the confirmation step by double clicking instead of single click on the challenge.
Your own challenges will be shown at the top of the list, and can be cancelled by clicking on the challenge.
Challenges can be filtered by rating range and whether they are rated or unrated by clicking on the filter icon in the top right corner of the challenge list panel. You can also sort the challenge list by clicking on the column header of the criteria you wish to sort by.
16.7. Friends List
The friends list provides a view of your list of friends, and shows if any of them are currently online. Online friends will appear in the top half of the list, and will have a Challenge button next to their names that can be used to send them a direct game challenge. Friends can be added by clicking on any username on the playing page and from the player actions menu selecting the option. The friend candidate must accept your request to move from pending to full friend status.
16.8. All Games List
The All Games list lets you see all the games currently being played. You can click on any of the game rows to start viewing the game.
The playing list can be filtered by username substring search, and rating type.
16.9. My Games
The my games panel allows you to see all your currently active games. Click on any of the game boards to load the game.
Games are ordered first by those where it is your turn to play first, and then by the urgency based on time left to play.
As moves are played, both by you , and your opponent, the games will re-sort the games so that the most urgent games where it is your turn are always sorted first.
16.10. Game playing interface
The Chesstempo online play interface is made up of the board and clocks, the move list, in game chat, and navigation and action buttons. The board is resizable by dragging the drag handle on the right of the board. Resize settings are remembered via a browser cookie, so will be used when you next use the site from the same machine and web browser.
16.10.1. Game Board
Moves can be made on the game board by either dragging the pieces or clicking on the piece and then the target square.
Pre-moves are supported by making a move while it is your opponent’s turn, once your opponent moves the move will be sent to the server.
Board Settings
The board settings panel is launched by clicking on the blue circle menu below the move list. The settings panel lets you choose a number of board options and all options are stored in a browser cookie, so they are remembered as long as you use the same browser, on the same machine. For more details see the board settings section of the user guide.
Pre-Moves
Pre-moves allows you to enter a move while it is your opponent’s turn to play. The move will be automatically played after your opponent moves. Move legality is only checked after your opponent moves, and illegal moves are not-played. You can cancel your pre-move by clicking anywhere on the board. The pre-move will be highlighted using the method chosen in the board settings.
|
|
Pre-moves are only remembered when the board is still open, so they can’t be used to play moves in correspondence games after you’ve logged off or disconnected |
Game Clocks
The game clocks and player names are shown either to the right of the board or above and below the board , depending on the preferences set. The currently ticking clock is shown in green (or red when time is running low), and the time control of the current game can be seen by hovering over the clock display with the mouse.
Move List
The move list displays all moves in the current game. You can move through the move list using the navigation buttons beneath the move list, by clicking a move in the list, or by using the arrow keys to move forwards and backwards in the move list.
Game Chat
The game chat window allows you to communicate with your opponent, other players viewing the game can also participate in the chat, however game particpants and non-playing kibitzers are not able to see each others chats made while the game is in progress. Special chat commands start with a '/' character, you can see a full list of chat commands by typing /help into the chat entry box.
Game chats persist across logouts, so when returning to the game you can still read all previous chats. This also applies to completed games, and chats can be reviewed at any time from the history tab or by launching games in your database archive in the playing interface using the 'view in playing' button.
The circular icon in the far right of the chat entry field shows if the chat is currently enabled or disabled. If the icon is a green tick then the chat is enabled, if it is a red cross then the chat is disabled. Click the icon to toggle between enabled/disabled.
When you disable chats, it is a global setting and you will not be shown any incoming chats in all games, not just the current game. However, chat messages sent by others will still be archived even when you have chat disabled. This means at a later point if you disable chat and view the game again the archived chats will all be loaded. Your opponent or other game visitors kibitzing on the game will be told when you disable or enable your chat status, and when you first connect to a game, your opponent will be told if your chat is currently disabled.
Game Actions
Several game actions are available as icon buttons under the move list:
- Abort game
-
Chesstempo doesn’t allow you to arbitrarily abort a game that has started. However if your opponent has not made their first move within a reasonable amount of time (specific to the time control being played), you will be given the option to abort the game, with no result or rating adjustment made for either player.
Users who continually refuse to play their first move , forcing their opponents to abort because they didn’t like their opponent’s first move, opponent rating or the colour they’ve been given may have their playing rights permanently removed. If you want to play people in a specific rating range, created challenges with a rating range limit. - Draw
-
This is a multi purpose draw button that allows you to both offer a draw AND claim draws that require explicit claiming under FIDE rules, such as draws by repetition, and draws by the 50 move rule. Note that claimable draws will not be given unless you explicitly claim them. Where a draw can be claimed either on the move or after the current move, the system will handle both cases automatically. If you click draw and then make a move that would lead to a claimable draw then the server will treat that as an 'after the current move' draw.
- Resign
-
Resign the current game.
- Analyse
-
Launch the analysis window. Only available once a game is over.
- Next game
-
The next game button jumps to the next most urgent game when you are playing multiple games (most commonly correspondence games). This button is not visible if you only have one game in play.
- Auto jump toggle
-
When playing multiple games you can choose to automatically jump to the next available game after playing a move in the current game. This can be useful if you are playing a large number of correspondence games. This button allows you to toggle between auto-jump and non-auto jump modes.
- Board Actions menu
-
The blue circular menu provides several more actions, some of which are only available once a game is over or in the case of exploring the game in the opening explorer, only correspondence games. See the board actions menu section of the user guide for more details.
- Game Notes
-
Game notes allow you to write notes about the current game. This can be useful for correspondence games where you may need to keep track of plans across a large number of games. It can also provide a way of providing some post-game analysis thoughts. Notes are private by default, if you’d like to share your notes with others, chose the public option when creating the note. Notes can be deleted or edited after they have been created.
16.11. Vacation and Sleep
The Vacation/Sleep feature allows you to take time out from correspondence time control games, freezing your game clocks during the period of the vacation or sleep. Clicking the Vacation/Sleep button in the top level playing menu (only available when already on the playing page) will show a dialog indicating the amount of sleep and vacation time you currently have available, indicating whether you are currently "alseep" or on vacation, and allowing you to return from, or go into sleep/vacation mode.
|
|
Vacation/Sleep only applies to correspondence time control games, your clocks will continue to tick on all non-correspondence time control games , so sleep/vacation will not save you from timing out on shorter time control games. |
16.11.1. Vacation
Vacation time allows you to take extended time off from playing during periods when it is difficult for you to regularly make moves, for example holidays, or extended illness.
All users start with 2 weeks of vacation time, and vacation time accumulates at 2 hours per day, until reaching a maximum of 30 days. Each time you go on vacation you use a minimum of 1 day vacation time, even if you return from vacation before 1 day is up. No extra vacation time accumulates while you are actually on vacation.
|
|
Vacation should not be used as a strategic means of managing your clocks, but is intended only for situations where circumstances make it difficult to play. Starting too many correspondence games should not be a legitimate reason for vacation time usage, consider resigning games if you’ve overcomitted your time. |
16.11.2. Sleep
Sleep time is similar to vacation time, but applicable to shorter times away from playing. The main purpose of sleep time is to allow relatively short correspondence time control games to be played. If you wish to play a game with 24 hours per side, time zone or sleep pattern differences can give one player a big advantage over the other. For example, if a player involved in a 24 hour game goes to bed with 6 hours left on their clock after playing their last move, then their opponent can immediately play their move, and then win on time if the sleeping player sleeps for more than 6 hours. Sleep time allows the first player to go into sleep mode before going to bed, and this would prevent their clock from ticking again until they wake up, at which point, they would return from sleep mode to play their next move.
After you set your state as "Sleeping", none of your correspondence time control game clocks will tick until your sleeping time has run out. You have 10 hours of sleeping to use each day, and once you have started sleeping, you use the entire 10 hours, even if you return from sleep before the 10 hours expires. Once waking up, you cannot go to sleep again for at least another 10 hours, in other words, your available sleep time is zero as soon as you wake up, and does not go back up to 10 hours until at least 10 hours has passed since waking.
16.12. Online Players List
The ranked list of all online players is available from the "CT players" item on the top level Playing menu. You can search for users by username (substring search), rating range , and activity level. Activity level is defined by the user’s RD, the lower the RD, the higher their activity level. Activity level filtering applies to the most active rating in any of the rating types the user has played games in. The player list can be sorted by clicking on the relevant table headings.
16.13. Online Playing Game Archive and Stats Page
Most of the places showing player names in the online play user interface can be clicked to show a menu of actions, one of which is to display the user’s stats page. Clicking on the "Stats" option will open a new window with the players game archive and stats page. Users can access their own page by clicking on the "My Chess Games" option in the Chess Database menu. This page is where the player’s previous games can be accessed, and stats related to each of the rating types is shown. Clicking on the details button for a rating type shows extra stats and a rating graph for that rating type. The game archive and opening explorer can be searched/filtered using most of the tools and options available in the main game database. This allows you to do things like examine your opening explorer stats against a particular player, or against players in a particular rating range, or look at your opening explorer stats for games played more than a year ago, and compare them to your most recent games. For more details on the generic database functionality please see the Chess Database chapter.
The opening explorer on the player game archive page has a Rating Type filter above it which allows you to filter games based on the rating type of the game. This selector also applies to any game archive searches, as well as the opening explorer stats, allowing you to see opening stats specific to each rating type.
The game archive page also has two "Games for position" tabs, one shows only games from the player’s own archive (labelled as "Games for position: USERNAME"), and the other shows games from the main chesstempo database. By switching between both while traversing the moves of one of their own games, you can look at either your own previous games that followed the current line, or look for master level games that also followed your line, and these may provide hints on improvements that could be applied next time you play, or give you an idea on the kind of middle or endgames that arise from your openings when played by masters.
16.14. Online Playing Rating Types
Chesstempo uses the following rating types to help differentiate performance on games with different time controls:
- Bullet
-
Estimated time of less than 3 minutes.
- Blitz
-
Estimated time greater than or equal to 3 minutes, and less than 15 minutes.
- Rapid
-
Estimated time greater than or equal to 15 minutes, and less than 1 hour.
- Long
-
Estimated time greater than or equal to 1 hour, and less than 12 hours.
- Correspondence
-
Estimated time of 12 hours or greater.
Estimated time for games with no increment is simply the initial time on the clock. Time for games with an increment are calculated by assuming the game will go for 40 moves. For example, 5 minutes start time with a 12 second increment would lead to an estimate time of 5*60+12*40 which equals 780 seconds, or 13 minutes, leading to a classification as a blitz time control. Increasing the increment to 18 seconds would produce 5*60+18*40, giving an estimate of 17 minutes, which would now be classified as a rapid time control.
16.15. Challenge Formula
The challenge (or seek) formula allows you to create a description on the kind of challenges you will accept from direct challenges sent by other players. Challenges not matching your formula will have a challenge rejection message automatically sent to your opponent indicating that your formula does not currently match their challenge request.
Challenge formulas can be very expressive, and can combine a number of logical and mathematical operators to produce complex challenge preferences such as : (playing_time_left>5mins or (from="bjork" and time=60mins)) or correspondence would only accept challenges that are either correspondence challenges or non-correspondence challenges where you either have more than 5 minutes left in the current game you are playing, or the challenge is from a person with the username "bjork" and she is asking for a game with initial time set to 60 minutes.
You can change your challenge formula using the Challenge Formula option in the playing menu at the top of the page (only available when on the playing page). The default challenge formula looks like this: ` !playing or (playing_time_left > 15 minutes and (correspondence or playing_correspondence)) `
This only allows challenges if you are either not actively playing a game in the current game tab, or the game you are actively playing has more than 15 minutes left on your clock, and either the incoming challenge request is for a correspondence game, or the game you are playing is a correspondence game.
This default rule prevents you receiving challenge requests for any type of game if you are low on time in an actively played game, and prevents receiving challenges for live games when you are already playing a live game. If you are not low on time, then if you are playing a live game you can still receive correspondence challenges, or if you are playing a correspondence game then you can receive challenges of any type.
16.15.1. Challenge Formula Time Handling
Several challenge formula variables deal with time.
All time stored in any variable is stored as seconds in order to avoid confusion on which variables might be minutes or seconds, or indeed hours or days for some longer time controls.
In order to make this convenient , and avoid having to do things like time = 24*60*60 to match 1 day, you can use the time operators of 'm','s','h','d' and 'y' to provide the relevant time unit.
For example etime>=50 days to match a correspondence game which is estimated to take at least 50 days for both players' moves. time=5m would match a game with start time of 5 minutes , while time<1 hour would match any start time below 1 hour.
The 'm','s' etc markers are simply converting the time units into seconds for matching against the seconds based time variables.
You could do the same thing with multiplication but "time=1 year" is much more convenient than "time=365*24*60*60".
The following time markers are valid: m,s,h,d,y,mins,secs,hours,days,years,min,sec,hour,day,year,minutes,seconds
16.15.2. Challenge Formula Operator List
The following logical and arithmetic operations are available for use within the challenge formula:
- &,&&,and,AND
-
The AND operator returns true if it’s left and right arguments are both true. e.g. + rated and blitz +
- |,||,or,OR
-
The OR operator returns true if one of or both of it’s left or right arguments returns true. e.g. + bullet or blitz +
- !,not,NOT
-
The NOT operator negates its argument. e.g. + !playing +
- =,==,equals
-
The equality operator returns true if both it’s left and right arguments are equal. e.g. + from="bjork" +
- <,⇐,>=,>
-
Inequality operators. e.g. + time>=5m or (inc>2 and inc<10) and (max_time>0) +
- +,-,*,/
-
Arithmetic operators. e.g. + time>2m+20 && inc>time/20 && max_time<20*(inc+2) +
16.15.3. Challenge Formula Variable List
The current list of variables that can be used in a challenge formula are:
- playing
-
true if you are currently playing a game in the active game tab. Note that if you have games you are playing, but you currently have no game tabs open , or the game you are currently viewing is over, then this will return false.
- playing_correspondence
-
Similar to the 'playing' variable, but only returns true if the game being played is a correspondence game. Must be playing an in-progress correspondence game in the currently active game tab to return true.
- playing_live
-
Similar to the 'playing' variable, but only returns true if the game being played is a non-correspondence game. Must be playing an in-progress non-correspondence game in the currently active game tab to return true.
- playing_time_left
-
If you are actively playing a game (i.e. the selected game tab is an in progress game) this variable will return the time left in that game. For example: + playing_time_left > 5m + will match situations where you are playing a game with more than 5 minutes left. This can be useful to avoid distractions when you are running low on time. If the currently selected game tab does not contain an in progress game or you dont have any game tabs open, this value will return 10 years. This ensures + playing_time_left > 5m + would match if you are not currently playing, which is usually the desired behaviour.
- playing_computer
-
True if the game in the currently active game tab is one you are playing against a computer. This variable allows you to receive challenges you might not want to receive when playing against a human, but would be happy to receive when playing against a computer.
- playing_human
-
True if the game in the currently active game tab is one you are playing against a human. Note that + playing_human != !playing_computer + as it is possible for both playing_human and playing_computer to be false if you are not currently playing a game.
- black
-
The challenge requests that the opponent plays as black
- white
-
The challenge requests that the opponent plays as white
- nocolour
-
true if the opponent did not request a colour preference, and auto-colour selection will be made.
- autocolour
-
Synonym for nocolour. Set to true if the opponent did not request a colour preference, and auto-colour selection will be made.
- bullet
-
The challenge request is for a bullet time control.
- blitz
-
The challenge request is for a blitz time control.
- rapid
-
The challenge request is for a rapid time control.
- long
-
The challenge request is for a long time control.
- correspondence
-
The challenge request is for a correspondence time control.
- computer
-
The challenge request is from a computer. Note that currently computers do not send direct challenges, so this variable is most useful when the challenge formula is used to filter the challenge list, rather than incoming challenge direct challenge requests.
- human
-
The challenge request is from a human.
- time
-
The clock start time. Time is in seconds so use the time modifiers such as 'time=5m','time=1hour' etc to conveniently refer to non-second based values here.
- inc
-
The per move clock increment used in the time control. Set to 0 if no increment is used. Again, this is stored in seconds, so use time modifiers if you want to specify increment matches in larger than second values for example, + inc>1 day
- max_inc_time
-
The maximum time the clock is allowed to increase to via per move increments for example: + max_inc_time<(1 day+4 hours)
- etime
-
The estimated total time for the game (i.e. includes time taken for both sides, so a 10 minute game would have an etime of 20 minutes. This will be calculated using + 2*(start time + increment time*40) + , allowing for the 'max time' truncation if any is set. Time is stored in seconds.
- myetime
-
The estimated total time available for your moves , this is half the etime. See etime for how this value is calculated.
- direct
-
true if the challenge is a direct challenge. This will always be true when filtering incoming direct challenges, but is useful if you use the challenge formula as a filter on the challenge list or challenge graph, and only want to see direct challenges there.
- from
-
The name of the opponent creating the challenge. Using quotes around any matched name for example: + from="han"
- rating
-
The rating of the opponent in the rating type relevent to this challenge.
- rd
-
The rating deviation of the opponent , which is a measure of the reliability of the opponents rating, and also their recent activity levels. The lower the rd value, the more active, and more reliable the rating, for example: + rd<40 + would indicate a very active user.
- myrating
-
Your rating in the rating type associated with the challenge. Useful for relative rather than absolute rating comparison for example: + rating>=myrating-300 + would match only challenges where the challenge creator had a rating no more than 300 points below your own rating.
- ratingdiff
-
ratingdiff is the absolute value of the difference between your rating and the rating of the challenge creator in the relevant rating type. For example, if your rating is 1600 and your opponent’s rating is 1400 the ratingdiff is 200. If your rating is 1400, and your opponent’s rating is 1600, the value will also be 200 (i.e. the ratingdiff variable is unsigned). This variable allows concise specifications of relative rating ranges, so for example you can specify: + ratingdiff<200 + as a short cut for + rating-myrating>-200 AND rating-myrating<200 + which restricts the acceptible difference between your rating and the opponent rating to less than 200 rating points.
- rated
-
True if the challenge is for a rated game.
- unrated
-
True if the challenge is for an unrated game.
16.15.4. Challenge formula as challenge list filter
By default the challenge formula is only used to filter incoming direct challenges, however the challenge list/challenge graph filters also have an option to allow the formula to be used as an additional filter on top of the challenge list/graph filters. Open the challenge filters when on the challenges tab to turn this option on. The option is stored in a cookie on the browser, so will be recalled next time you visit the playing page on the same machine.
17. Opening Training
The Opening trainer allows you to create and manage an opening repertoire, and then train to learn the moves using spaced repetition and other drilling modes. The opening repertoire also integrates into the Play online feature by providing immediate post-game feedback on where your games deviated from your opening repertoire.
17.1. Getting started
To start opening training you first need to create a new repertoire. Click on the New repertoire button to create your first repertoire. Repertoires can be either black or white repertoires, so choose a repertoire name and colour and click the Create button. If you already have a repertoire in PGN format, you can also import your repertoire from PGN by clicking on the Import PGN button.
To add new moves to your repertoire simply make the move on the board and it will be added to the currently selected repertoire. When you have some moves entered, you can enter training mode by clicking on the Train or Train branch buttons. Train branch will only train moves from under the currently selected move in the opening tree panel. See the training mode section for more details on training.
You may also want to explore the different settings that can be used to control training and viewing your repertoire. Settings can be viewed by clicking on the blue circle menu under the board and then clicking on the settings icon.
17.2. PGN import
When creating a new repertoire, you can use an existing PGN file as the import source. If there are multiple games in your PGN file , and the file is not the result of a Chesstempo opening repertoire export, then each game will be interpreted as multiple lines for the same imported repertoire.
By default, any comments from your repertoire will be imported as private comments. If you’d like your PGN comments to be visible to others or ignored completely, you can choose those options on the create repertoire dialog. NOTE: If you are using a PGN with comments made by someone else, such as a chess book author, please do not make the comments public. If you are an author and find any of your annotations being used in comments on Chesstempo, please contact us to have them removed.
By default, any alternative moves at the same position for the colour of your repertoire will be imported disabled, but you can choose to have them imported enabled as alternative lines to train or not imported at all.
There is no size limit on the PGN, but there are quotas for the total number of positions you are able to have across all your repertoires. For details on the quotas which differ by membership type , please see the Chesstempo memberships page.
The quota for free accounts is fairly generous (currently 20000 positions can be stored). However you should be careful when importing repertoires that you are not trying to import a large collection of games. Loading repertoires made up of entire games, including the middle game and endgame parts of each game will eat up your quota very quickly with positions that are not useful for training purposes.
17.3. Adding repertoire moves
You can enter a new move for a repertoire any time you are not in training mode by playing the move on the board. Played moves are automatically stored in your repertoire, and saved on the server. Moves will be attached to the currently selected repertoire which is shown in the repertoire tree to the left of the board.
To delete moves (or branches of moves) right click on the move in the opening tree and choose the delete option. Deleting a non-final move in a line will also remove all sub-moves and variations that appear after that move.
|
|
Note if you are deleting a line that other moves could have transposed into you will also be truncating those transposition lines as you will be removing the moves from the line they transposed into. If you want to delete a line holding transposed moves that you would like to preserve, then promote the truncated tranposing line first, and this will move the following moves into the promoted transposing line and out of the line you plan to delete. You can then delete the moves left in the demoted line (which will now be marked as the truncated transposing line) without losing the moves that are now attached to the newly promoted transposition destination line. When promoting lines holding transpositions, you may need to reload the opening trainer page in order for the canonical line to be shown as moved in the interface. |
17.3.1. Changing main line
Most repertoires will have positions where your opponent has multiple choices, and in some cases you may have more than one move you want to play in a position. The first move shown in the opening tree will be the main line move, and the subsequent moves in the sub-positions will be seen as sub-lines. If you’d like to change the order of lines you can right click on a sub-line in the opening tree and use the promote line option. The line will move up in order, swapping with the next highest line. If the line was one below the main line, then it will swap with the main line, and become the new main line move for that positions. When promoting lines holding transpositions, you may need to reload the opening trainer page in order for the canonical line to be shown as moved in the interface.
17.4. Training mode
Training mode is where you practice the moves in your repertoire. Training mode can be entered by clicking on the Train or Train branch buttons. Train branch will only train moves from under the currently selected move in the opening tree.
17.4.1. Move hints
By default if you are seeing a move for the first time you’ll be shown an arrow indicating the correct move. Similarly if you have turned on the preview moves wrong on last attempt option in your settings, and are seeing a move you got wrong last time you’ll also see an arrow showing the correct move.
17.4.2. Training depth
If you want to focus only on moves from lines up to a particular depth , then you can set the Maximum learning depth in your opening trainer settings. When a maximum depth is set , the summary stats shown under the board will reflect the current depth limit. NOTE: Graphs showing training status always use the full depth when displaying data.
The training depth option can be used to create a good compromise between the main lines first and breadth over depth learning priority settings. With main lines first selected, you can end up having to learn some very deep lines before seeing any side branches further up the tree. By setting a maximum depth you can force the main line learning priority to start to select side lines earlier than would otherwise be the case, creating a hybrid priority between main line and breadth over depth options.
17.4.3. Available Training Modes
The opening trainer currently provides the following training modes that can be selected in the opening trainer settings.
Spaced repetition
Spaced repetition is a learning method that tries to optimize your time so less time is spent on items you know well, and more time is spent on items that are causing trouble. Once a move is first served up for training it is given a scheduled time for its next appearance. If you continue to get the move correct, the next scheduled time will be moved further and further into the future. If you get the move incorrect the system will decide you have forgotten the move and will start to present it more frequently. This process of serving up mistakes more quickly, and delaying the reappearance of correct moves allows you to maximize the time you spend on the moves you are having the most problem remembering.
When you get a move wrong, you are shown the correct move and can then play it to advance on to the next scheduled move. If you choose to play the move at this point it will not be considered a correct response for the purposes of the spaced repetition system, so will not impact how soon you will see the mistake again.
Incorrect moves are by default scheduled almost immediately for review. This means as soon as you finish all the moves that were already scheduled due when you started your current training session, you’ll be able to review the mistakes you made during the session.
Learning priority order
Before you begin training, none of your moves will be scheduled. Any time there are no moves scheduled and you start training when there are still moves left that have not been scheduled, the system will select an as yet unseen move and from that point will start to schedule it using the spaced repetition system.
There are four ways of selecting how the system chooses which of the unseen moves from your repertoire will be used first, and these are controlled via the Learning priority setting in your opening training settings. The default method is the "Depth first" method which tries to traverse your repertoire in a depth first manner. Most repertoires will have multiple lines for your opponent in many positions, and in some cases for your own moves. The "Depth first" option will start with the first main line, go as deep as possible in that line, before selecting the first variation of that main line and training all the moves in that line, before selecting the first variation off the initial variation. This process of going to the end of the current line and then repeating the process on sub-lines is repeated at all levels until the entire repertoire has been covered.
The "Breadth over depth" is the opposite of the "Depth first" option. Instead of going deep first, it will investigate your repertoire looking broadly, before going deep. So this option will look at all the moves in the first position in your repertoire, then all the moves at move 2, and then all the moves at move 3 across all branches of your repertoire. This option allows you to get a broad but shallow view of your repertoire, prioritising a broad range of knowledge before moving to deeper material.
The "Main lines first" option will train the main lines before side lines. When all the main lines are done it will start to look at the first sub-lines in each position. This option works by viewing your repertoire as variation levels. The top level main line is level 1. A variation that branches off that main line will be level 2, and a variation that branches off that level 2 variation will be level 3. This option will first show you all the level one moves, then all the moves in level 2 variations, then only after those have been covered, all the level 3 variations will be shown. This process continues down the levels, until the most deeply nested variation moves have been visited. This method provides a mid-way point between breadth over depth and depth first approaches. By making sure you place the most important lines as possible in the main lines or main variations when constructing your repertoire, this method will allow you to choose to train those most important lines first, and only start to tackle the more nested levels of variations after mastering the more popular variations.
The "Common positions first" option will use the opening explorer data that has been synced with the repertoire in order to prioritise moves that have been played more often in the source games over moves played less often. Moves that have no opening explorer data associated with them will not be used until all moves with opening explorer data have been used, at that point moves with no opening explorer data, but having engine evaluations will use engine evaluations to prioritise learning order, and for moves with neither opening data nor engine evaluation data, breadth first order will be used as a fall back method for prioritisation . See the syncing opening explorer stats and syncing engine evals sections for further details on how to attach opening explorer and engine evaluations to repertoire moves. NOTE: This is a desktop only feature until the next app update.
|
|
Learning priority settings only impact which moves are taken from an unseen state into a scheduled state, an operation that only occurs in spaced repetition mode when you elect to continue training when no moves already being trained are scheduled. For moves already scheduled, the spaced repetition system rather than the learning priority will dictate which moves are selected. Eventually you will reach a state where all moves have been introduced into training and are scheduled for training. At that point, the main lines first and breadth over depth options will not be relevant again until you add new moves into your repertoire. If you would like to train all positions using the learning priority order rather than the spaced repetition scheduling algorithm’s choice for move order on moves you’ve already seen once, then choose the review in order learning mode insted of spaced repetition mode, as it will using the learning priority method to determine the order, allowing you to train the entire repertoire in the chosen order irrespective of the spaced repetition scheduling state. |
Context for training moves
When a move is scheduled for training (or added from the set of unseen moves), the system may choose to add some context moves to help orientate you to the position. Once you have a large repertoire, it can be confusing to jump from random position to random position without any context.
To determine how much context is shown, the system looks at the full line from the move chosen for display up to the start position in the game. If the moves are extremely well known the system may skip them completely, if they are somewhat less known the system will choose to display them as context, with how well known dictating how fast the system will move through the moves. This enables the system to provide you some context, but make sure you are not wasting your time seeing context that is already second nature to you. The system may also decide that a move that appears earlier in the line than the move that is chosen for display was close to being scheduled, and so present that move as a training move before reaching the target move. This further optimizes the use of context by using the context to present more than one training target from the context line for training. There are several settings to control the context behaviours in your opening trainer settings, including options that can be used to make the system ask you to play ALL the leadup context moves.
Review in order
Review in order mode allows you go through an entire repertoire (or repertoire branch) in order, bypassing the scheduling algorithm used by the default spaced repetition learning mode. The order chosen will be the same as that chosen by the Learning priority order setting. Each repertoire will keep track of the current review position, and once you’ve reached the end of order, the order will reset and start again. This mode is designed for use in situations where you want a review of all your moves, such as before a tournament. Any attempts made in review mode will also impact spaced repetition scheduling, so if you get a move wrong in review mode, when you return to spaced repetition mode, it will be recognised as a move requiring more work. Similarly, correct responses in review mode will increase the time for an item to be later scheduled in spaced repetition mode. Any moves in your repertoire that had previously not been seen will move out of unseen status into learning status when encountered in review mode.
Note that review mode aims for you to play all moves in your repertoire only once during the review. This means when you reach the end of the line, the system will autoplay any moves leading up to the next move that you have already played during this review cycle.
We don’t recommend using review mode as your main training mode as it will not make the most efficient use of your training time, due to not priotising your time on items you know least well. So leaving review mode for situations where a complete review of a repertoire (or repertoire branch) is required is probably best.
To reset the review to the start position, go to the 'Resert' option in the opening trainer actions menu, and then click the Reset Review Order button.
Least recent/unseen first
Least recent/unseen first is similar to review in order mode. However instead of reiviewing items in a fixed order, the order is largely decided by how long it has been since you’ve played the move in any of the training modes. Moves you haven’t yet seen at all are shown first (in the order dictated by Learning priority order), and after no more unseen moves are left, the moves you had seen least recently are shown. You will end up seeing every move in your repertoire if you continue to train in this mode. Like review in order mode, items attempted in this mode will also impact spaced repetition mode scheduling.
This mode can also be used to review an entire repertoire before a tournament, but can also provide a way of refreshing moves that the spaced repetition system may have scheduled a long way into the future, due to previous accurate performances, and that you may be starting to forget. Any moves you’ve forgotten since last training them , and so marked wrong during training in this mode will then be priotised for more rapid ongoing review within the spaced repetition system when you return to using spaced repetition for training.
Note that context moves shown before a currently targeted move may be requested in the same way they may be requested in spaced repetition mode. So while each target move follows the least recent/unseen ordering rule, it is possible for you to be asked to play some context moves early if the system decided they were already due for review now or soon into the future. Context removes reviewed in this manner will be deemed to have been already reviewed as part of the current sequence, and will not be requested again in this mode until you’ve seen all possible moves.
17.4.4. Training all repertoires
If you click on the folder holding the white or black repertoires before you start training, positions will be taken from all the repertoires of that colour. NOTE: that with a high level repertoire selected, some operations are not allowed, such as adding moves, or deleting lines. If you want to remove moves or add new moves you’ll need to have a single repertoire selected first. If you are in a high level grouping repertoire, and want to know which repertoire(s) a move comes from , you can find that information in the candidate moves panel.
17.4.5. Resistant repertoires
Resistant moves are moves that you’ve been training for some time, but are still having trouble consistently getting right. Once a move is deemed to be resistant, it will take more than one correct answer in a row to move back to being non-resistant. While the spaced repetition system does a reasonably good job of prioritizing moves you keep getting wrong, the resistant moves may still need extra attention, especially if you are still getting them right sometimes, just not consistently enough to indicate mastery has been achieved. To help prioritize your time on these types of moves, there are two specific global repertoires available in the repertoire tree that hold all the white and black resistant moves. This allows you to select the resistant repertoire and then start training in order to preferentially target scheduled moves that are proving difficult to master.
17.4.6. Transpositions
The underlying representation of your repertoire uses positions as the primary entity, rather than explicit move orders. This allows a natural treatment of transpositions as moves are secondary to positions and there is only one instance of each position, no matter how many repertoires or transpositions it appears in. If a particular repertoire contains a transposition to another line already stored elsewhere in the repertoire, the opening tree will not fill in a move branch for the transposition. If you play the transposition move on the board the tree will jump to the transposition position in the tree where the rest of the line will be presented.
Transpositions across repertoires are handled slightly differently. To avoid confusion, a move that transposes from repertoire A to repertoire B will have the full line appear in both repertoires within the opening tree. However, In both the single repertoire and cross repertoire transposition cases there is only one representation of the position in the underlying repertoire data. It doesn’t matter which path you reach a position from, once you’ve transposed into a line the learning stats and spaced repetition scheduling treats the positions the same. So if you train moves in repertoire A that are from positions that transposed to repertoire B you’ll get credit in both repertoires, because in the internal representation the positions are the same.
The same is true for any overlap between multiple repertoires, not just transpositions. If you have two repertoires that overlap, training in one will also impact the scheduling of the same moves in any other repertoire in which the same position and move exists.
17.5. Syncing opening explorer stats
You can choose to add opening explorer statistics to your repertoire, which , as well as provide extra information on each move, enables several other features, such as common positions first learning prioritisation, colouring options in the opening tree and opening sunburst visualisations, and extra sorting and filtering options in the move list table.
To initiate the opening explorer sync, click on the blue circle menu launcher under the board, and select the sync explorer option. Several options are available for the sync:
- Game Source
-
Choose between our main chesstempo game database (the one containing OTB games, including master games), a recent snapshot of games played on the playing server (the last 3 million games matching the rating criteria), and your own games played on chesstempo. Each of these has different pros and cons. Using the main game database produces stats that reflect quality game play, especially if you choose a master level rating range for the rating filter. Stats based on move choices in master games will produce a better estimate of move quality than estimates extracted from games played on chesstempo or most likely your own games. Using data from chesstempo games will not reflect the high quality play of the OTB master games, but if you want to use the opening explorer data in conjunction with the common positions first option, the data may better reflect the positions you will experience when playing online, especially if you choose a rating range that reflects players of a strength you regularly play against. Choosing your own chesstempo games as the playing source provides game counts that are very specific to the lines you are playing in your online games, but may lack statistical power in low frequency lines.
- Rating range
-
The rating range for games used from the source database can be specified. Note that the narrower the range , the fewer games will be available , and while setting a higher minimum rating number will increase the quality of the games, and so the reliability of the win/loss based stats for moves with sufficient games, it will also reduce the total games and so decrease the statistical power of the less common positions.
- Only add explorer stats to moves without existing values
-
This option controls if syncing will overwrite any existing values already synced on previous syncs. The option is off by default, which means any old values on moves found to have stats on the current sync will be overwritten. If you’d prefer to keep old values in preference over new values, then turn this option on.
- Clear explorer stats from non-matched moves
-
This option controls what happens to moves that are not found to have any explorer data (i.e no matching games) in the current sync. By default this option is on, and such moves will have any existing stats cleared. If you want to keep stats on non-matching moves then turn this option off. An example of a situation where you may want to turn this option off is if you want to sync from several game sources. For example if you want to use the 'common positions' learning priority option, then you may want to first sync with the main database, then the CT playing database, and then finally your own CT games, thus ensuring that the common positions first option will at least use moves played in any matching games across all 3 sources in preference to moves in games not found in any source. To do this you would need to turn off the 'clear explorer stats for non-matches moves' option for each of your 3 syncs. You can also use a combination of either the order of syncing or use the "Only add explorer stats to moves without existing values" option to control which stats source is preferred if stats are available for a move from all 3 sources. Note that if you want to prioritise based on the count of your own games over other sources, then you probably want to sync that source first, and only after running out of moves with explorer data from your own games, syncing one or both of the other sources, otherwise the larger counts from the main game db and chesstempo games sources will overwhelm the numbers in your own games, prioritising based on master games and CT games first.
|
|
To avoid excessive load on the server, only one opening explorer sync per game source type can be performed every few minutes. |
|
|
You will need to manually reload the opening trainer after the sync has completed in order to make use of the synced data. |
|
|
This is a desktop only feature until the next app update. |
17.6. Syncing engine evals
Using the sync evals feature you can fill in pre-processed engine evaluations for your repertoire moves. Having evals synced with your moves allows extra colouring options for opening tree colouring and opening sunburst visualisation colouring , as well as sorting options on the move list table and a bulk disable based on engine evals.
Chesstempo has a large cache of pre-cached engine evaluation for many opening positions of varying depths. We have been using a portion of our idle cloud engine servers to analyse the most common opening positions at high depth (depth 50 using Stockfish). We’ve been running this high depth analysis for over a year, but such depth takes around half a day for each position, so even with many engines processing these requests in parallel there is still a lot of work to be done to cover all common positions. We also have opening position evaluations cached from some of the cloud engine analysis done by users of our cloud engine features, that is often of lower depth (although occasionally higher depth analysis is also available). We have also recently released a feature for diamond members that allows them to request bulk analysis of their repertoires at depth 25, and once cached this analysis is also available to other members.
To start the engine eval sync, click on the blue circle menu launcher under the board, and select the sync evals option. Several options are available for the sync: Only add evals to moves without existing evaluations:: Use this option to preserve any existing evaluations. Because you can manually add engine evals or export them via PGN when importing a repertoire from PGN you may want to use this option to make sure pre-cached evaluations do not override your hand chosen evaluations. The option is on by default, if you want to overwrite existing evals during the sync, turn this option off. Minimum engine depth to use:: Only sync pre-cached engine evaluations that were analysed to at least this depth.
|
|
To avoid excessive load on the server, only one eval sync can be performed every few minutes. |
|
|
You will need to manually reload the opening trainer after the sync has completed in order to make use of the synced data. |
|
|
This is a desktop only feature until the next app update. |
17.7. Repertoire engine analysis
The sync evals feature provides repertoire engine data for positions that already have pre-existing engine analysis. Diamond members also have access to a feature that provides engine analysis for all moves in a repertoire, filling in the gaps for moves that don’t already have pre-cached analysis. To use the engine analysis feature right click on any move in the opening tree panel and choose the 'analyse line' option. If you want to analyse the entire repertoire, click on the top level move to analyse the entire tree. In order to manage load on our cloud engine servers, there is a 5000 daily quota on moves analysed. Analysis is done with the Stockfish engine to depth 25. Note that the quota only applies to moves that don’t already have at least depth 25 evaluations cached, and with average sized repertoires, 5000 moves may be enough to cover all moves without prior evaluation in one day. Over time, as more moves are cached, we expect the 5000 limit to be sufficient to analyse entire repertoires in the vast majority of cases, with only those with an unusually large number of novel positions needing to spread the analysis out over more than one day.
If you do need to analyse over several days, you can analyse again from the top level move in your repertoire, and the system knows which moves have already been analysed and will only look at the yet-to-analysed moves in subsequent analysis requests (i.e you don’t need to remember which part of the tree you have already asked for analysis on). If you want to monitor how the analysis is going, you can request another analysis, and you’ll get feedback on how many items are still in the queue waiting to be processed (as well as details on the remaining quota for the day).
Once all positions have been analysed (requesting a new analysis will tell you if that is the case), you need to use the sync evals feature to initiate the final sync of the processed moves with your repertoire, after a page reload you will then be able to visualise the opening tree and opening sunburst using the eval colouring method, and sort the move table based on evaluations.
|
|
This is a desktop only feature until the next app update. |
17.8. Opening sunburst repertoire visualisation
The opening sunburst provides a method of visualising your opening repertoire and various metrics such as engine evaluations , opening explorer stats and spaced repetition learning metrics. It lays out your repertoire in a radial tree layout which allows a more compact overview than can be provided by the opening tree. To launch the sunburst click on the eye icon in the header of the opening tree panel.
If your repertoire is of a reasonable size only a sample of the entire repertoire will be displayed, with priority given to moves whose sub-branch is a larger percentage of the total repertoire. You can click on any move in the sunburst to make that move the centre of the sunburst, thus drilling down into the move’s sub-lines. Clicking on any move will also jump to the position in the opening tree.
The board in the centre of the sunburst shows the position after the move currently hovered over with the mouse. The full line for the hovered move is shown below the board, along with the opening name, and opening explorer stats and engine eval if available. The spaced repetition based statistics for moves you’ve attempted at least once will be shown towards the top of the sunburst when hovering over the move.
If you’d like to return to the previous set of data after drilling into a move by clicking on it, then you can zoom back out by clicking on the board in the centre of the sunburst. Subsequent clicks on the board will continue to zoom back out until you reach the initial position again. If you’ve drilled several moves down and want to jump back to the start position quickly, use shift-click to achieve that. There is a resize handle in the bottom right of the sunburst if you need to resize, please note that you may have trouble making out the moves when a smaller size is used, if that’s the case you may want to change the "Maximum rings in sunburst" setting to limit the total rings displayed at a time.
You can click on the settings icon in the top left corner on the sunburst to configure the sunburst evaluation, available settings are:
- Colouring Method
-
The colouring method determines how the move segments in the sunburst are coloured, the options include:
- Engine evaluation
-
Colour the moves based on engine evaluation from the point of view of the repertoire colour, so if the repertoire is from black’s point of view for example, moves the engine think give the edge to black will be coloured green (or blue if the colour blind friendly option is used), and red if the position is considered good for white. the larger the advantage (or disadvantage) the darker the colour will become, and the smaller the advantage the lighter the colouring, with white showing even positions. Positions that currently lack engine evaluation are shown in grey. See syncing engine evals for instructions on syncing evaluations to the moves for use in colouring.
- Opening Explorer win rate
-
Colours the moves based on the win rate in the opening explorer data synced to the move from the point of view of the repertoire colour. The colouring method is similar to the eval colouring with win-rates favouring the repertoire colour shown in green (or blue) and moves not favouring the repertoire colour shown in red. moves with no opening explorer stats available are shown in grey. See the syncing opening explorer stats section for more details on connecting opening explorer stats data to the moves.
- Opening Explorer performance rating
-
Similar to the opening explorer win rate option, but using the performance rating for the move, colouring is based on the performance rating for each move compared to the average rating of the players that played it, so moves that perform above average will be coloured green/blue vs moves that perform below average being coloured red. Note the colouring for this option takes the 'first mover advantage' setting into consideration. This is to adjust for the natural advantage white has over black in the opening, and avoids having all black openings coloured as 'slightly bad'. The default value for this normalisation uses a 35 rating points adjustment bonus for black openings, if you’d prefer a raw performance rating without the adjustment, set it to 0 in your settings.
- Line separation
-
This simply attempts to colour different lines with different colours, providing some visual separation of different lines in your repertoire on the sunburst, but without using any performance metrics.
- Accuracy
-
This colours moves based on your accuracy during opening training. More accurate moves will be coloured green/blue, less accurate moves red. Moves you’ve never attempted will be coloured grey.
- Correct sequence
-
This colours moves based on the number of times you have got them correct in a row while training. The longer the correct sequence the greener/bluer the move will be, the shorter the sequence the more red the move will be. Moves you’ve never attempted will be coloured grey.
- Last seen
-
Colours moves based on how recently you’ve seen them. Recently seen moves will be green/blue and less recently seen will be red. Moves you’ve never attempted will be coloured grey.
- Next scheduled
-
Colours moves on when they are due for their next review. Moves due further into the future will be shown in green/blue, moves due soon will be red. Moves you’ve never attempted will be coloured grey.
- Attempt count
-
Colours moves based on the number of times you have seen them relative to other moves. The more times you have seen them, the greener/bluer the moves will be , the less often , the more red they will be. Moves you’ve never attempted will be coloured grey.
- First mover advantage in Elo
-
The estimated advantage to white in the opening in rating points. Used to normalise the performance rating colouring to factor out white’s inherent advantage in the opening. Set this to 0 if you’d prefer an unadjusted view.
- Maximum rings in sunburst
-
The maximum number of concentric circles shown in the sunburst. A smaller number may be useful on smaller screens. In general smaller numbers provide a less cluttered output, but provide a more high level overview, with less of the data visible at once.
- Bad→Good colour range
-
The default metric based colour range uses a Red to Green range (with white in the middle showing a neutral metric). If you have trouble differentiating colours in this range due to issues with colour blindness you can switch to the Red to Blue option which should provide more differentiation for those with Red/Green differentiation issues. Note we may be replace this option in the future with a system wide setting once we start offering other colour blind friendly options for other parts of the site.
There is also an opening trainer wide setting on the opening trainer advanced settings that controls the opening explorer based stats, and can be used to set a minimum number of games before a stat will be used, this can be useful for the win/rate, and opening performance rating colouring methods as smaller game numbers can produce misleading colouring due to small sample sizes, so considering using this setting (which is off by default) if you find low-sample size colours confusing.
|
|
This is a desktop only feature until the next app update. |
17.9. Move list table
The move list table provides a linear list of all the moves in your repertoire. Providing data on each move such as the engine evaluation and opening explorer stats (where available) and the spaced repetition learning metrics for each move. The move list table can be launched by first selecting the start of the branch you want to exam (use the top level move if you want to see all moves in your repertoire) and then click on the list icon in the header panel of the opening tree. Once launched click on the headers of the table to sort by those metrics, and click on the settings icon in the top left of the table to access settings and filters for the table. The forward/back arrows next to the settings button moves forward and backwards one move at a time in the table, selecting the move in the opening tree (or you can click directly on a move in the table to jump to that position in the tree).
By combining sorting (via clicking on column headers) and the available filters the move list can be used to identify important aspects of your repertoire. For example if you want to review all the bad moves (according to Stockfish) in your repertoire click on the eval header to toggle between sorting by increasing or decreasing eval. This allows you to have the worst moves shown first in the list. You may also want select the 'only show our moves' setting, to focus on moves of your colour that the engine thinks are poor. You can then tarverse through the list of bad moves and decide if you want to keep them in your repertoire, or replace them with better options. Similar filtering can be done with opening explorer based settings. You can also zero in on move you are performing poorly at in spaced repetition by sorting by those columns.
Another example of using the move list table is to find moves where you might get the most benefit from extending the line further. If you enable the "only show end-of-line" moves option, and then sort by the "opex #" column (i.e the number of times the move appeared in the opening explorer data that was synced with your repertoire) then you can see which lines ended in positions that were still very common according to the opening explorer data, and these positions may provide good extension points, as they are more likely to come up in actual play, so extending the line further is more likely to provide a return on your learning time investment than extending a line that rarely comes up. When using explorer based stats, you may also want to filter based on the minimum explorer games setting to completely avoid seeing moves with less than minimum number of moves.
By default the move list table will also show disabled moves, but you can hide those by enabling the 'hide disabled moves' option in the move list table settings.
|
|
This is a desktop only feature until the next app update. |
17.10. Bulk disable moves
If you have already synced engine evals and/or opening explorer stats with your repertoire (and subsequently reloaded the page) you will be able to disable moves in your repertoire that do not meet a minimum engine eval target or number of games played in the opening explorer stats.
To initiate the bulk disable first click on the first move in opening tree of the branch in your repertoire you want to disable (click on the first move if you want to consider the entire repertoire for disabling). Then click on the blue circle menu launcher under the board, and select the bulk disable option. Choose the pawn evaluation threshold and/or the minimum number of games the move has been played in for the disabling criteria (any move worse than the stated eval threshold or played less number of times in the opening explorer stats will be disabled). You can also choose to disable moves of either colour or just your own moves. Only moves from the currently selected repertoire will be considered for disabling.
This option can be useful for reducing a very large repertoire down to the essential lines for memorisation based on how likely you are to see them in your actual games. Disabled moves remain in the tree for instrucitonal purposes, but are not included in training.
17.11. Move details
When paused or not in training mode, details about the move just played are shown under the board, this includes: - Accuracy - Last time the move was seen - Number of times the move was wrong or correct in a row. - When it is next scheduled - The mistake history for the move, which shows all the incorrect moves that have been made in the current position and their frequency and most recent date played. Note: This only applies to moves made after the 25th of April 2020, and currently only collects mistakes made on the desktop version, the apps will also track mistakes after the next update. - Engine evaluation of the move if available (see the syncing engine evals section). - Opening explorer stats for the move if available (see the syncing opening explorer stats section).
17.12. Personal comments panel
Any comments you have made on a position or move in the comment panel, or comments imported automatically from a PGN import will be made visible in the personal comments panel. You can control when these items will be visible via the 'Show our move comments' setting in the opening trainer settings panel.
17.13. Board annotations
You can draw arrows and highlight squares on the main opening trainer board using right click (square highlight) or right click and drag (draw arrow), combined with Ctrl/Shift/Alt key combos for choosing the colour of the square or arrow.
These board annotations can be permanently saved on the move for this position by pressing the 's' key after you’ve finished making the required graphical annotations, and will be available when traversing the move list and included any PGN exports.
|
|
This is currently a desktop only feature, viewing board annotations (but not creating them) will be made available on the app in a future update. |
17.14. Play online integration
When you have one or more opening repertoires created, they will be used after each game you play on Chesstempo to provide feedback on where the game deviates from your repertoire. A deviation will be either where you play a move that was different than the one recommended in your repertoire, or your opponent plays a move that you don’t have in your repertoire yet. You can choose to add new moves via the opening explorer without leaving the playing page, or launch the opening training page with the relevant repertoire selected.
17.15. Opening training settings
To launch the settings panel, click on the blue circle menu launcher under the board, and select the settings option.
17.15.1. Basic settings
- Learning mode
-
Choose between the different methods of deciding which items to train, either Spaced repetition, Review in order or Least recent/unseen first. (Note: Desktop only until next app update)
- Pause at end of line
-
While training, don’t show the next move automatically after reaching the end of a line. You can also choose to pause after any move by using the pause button under the board, allowing you to review comments etc without automatically moving on to the next move.
- Preview moves in new lines
-
Show the correct move via an arrow in all new positions.
- Preview moves wrong on last attempt
-
Show the correct move via an arrow if it was wrong on the last attempt.
- Preview moves in all lines
-
Show the correct move via an arrow before all moves.
- Candidate moves as arrows when not training
-
When not in training mode, use arrows to show the current candidate moves in the position, the main line move will be shown as a purple arrow, other candidate moves as grey arrows. (Note: Desktop only until next app update)
- Top explorer move as arrow when not training
-
When not in training mode, use an orange arrow to show the most popular move in the position according to the opening explorer. If the top explorer move is also the main line move, and candidate move arrows is turned on then the orange arrow will be shown with a purple border, indicating the main line move is also the most popular move. If the top explorer move is an non-main line candidate move then it will be shown with a grey border. (Note: Desktop only until next app update)
- Show our move comments
-
Your own move comments (either made by you in the comment panel, or imported from PGN when creating your repertoire) are shown in the personal comments panel under conditions decided by this option. You can choose to have comments shown only when not training, always (so both training and non-training), never or in situations where the move is previewed. The latter includes several cases, such as when showing a previously wrong move, showing a new move you haven’t seen yet, or when training might be paused such as when a mistake was just made or a line has reached the end. When not training is the default. When your own comments are shown in training in a situation where the system is currently expecting you to play a move, then the comment will be shown for the move to play rather than move just played, which is different to the all comments list panel which always shows comments for the move just played. (Note: Desktop only until next app update)
- Learning priority
-
How new moves are moved from the as yet unseen moves into the learning set. 'Main lines first' takes moves from main lines first and sidelines later. 'Breadth over depth' mode takes all moves at depth 1 first then moves on to all moves at depth 2, continually increasing the depth until all moves have been added to the learning set. This setting is also used to decide the move order in Review in order mode and the order in which unseen items are selected in the Least recent/unseen first mode.
- Maximum learning depth
-
The maximum depth to train moves to. Default to unlimited, entering 0 for the depth will revert back to unlimited. Note that the global training graphs will always use unlimited depth for stats display, even if a depth limit has been requested.
17.15.2. Spaced repetition settings
- Sort due items by
-
When the spaced repetition system has several items that are due for presentation, this option decides what order they will be presented in. "Variation" means due items will be sorted by variation, "Due date" will sort the items by when they are due. Variation is the default option and will lead to less jumping around in your repertoire, especially if your repertoire is large. However if you are having trouble completing all items each day, you may want to switch to "Due date" which will prioitise the items that are most overdue first. Note that using "Variation" mode means wrong moves will not be scheduled until you either finish the due items that were scheduled at the start of the session or you reinitialise the repertoire by reloading the page or clicking between different repertoires. (Note: Desktop only until next app update)
- Sort undue items by variation window
-
When using the sort due items by variation option, this value dictates how many hours into the future any undue items will be included in the sorting. For example if the value is set to 24 hours then you can continue solving against problems due up to 24 hours into the future, and still have them sorted by variation. Once the window has been passed, if you continue to train when there are 0 due items then they will be selected purely on the order they are due, which may mean you jump between variations. The default value is 0 hours, which disables including undue problems in the variation-based sorting, but if you often solve when due = 0 and would like to keep variation based sorting, at least for the items due soon, then change this setting so the window is large enough to reflect what you consider to be 'soon'.
- Gap growth factor
-
The gap growth factor dictates how quickly moves you get correct are pushed into the future. If the gap growth is 2 for example and you get the item correct after having previously got it correct 4 days ago, then the next presentation will be scheduled in 2*4 days = 8 days. If you choose 1.5 as the gap factor then it would have been scheduled in 1.5*4 days = 6 days. If you feel you are forgetting moves before the next review (and you are solving all due problems each day), you may want to decrease the growth factor. If you are remembering items ok, but feeling overwhelmed by the total number of problems due each day, try increasing the gap factor beyond the default 2.0 value in order to more quickly push correct items into the future.
- Max Days into the future
-
The maximum number of days the spaced repetition system will allow an item to be scheduled into the future. The bigger this number is , the easier it becomes to manage the learning load in a very large repertoire. However if it is too large you may find yourself forgetting items. The current default is 1095 days (3 years).
- Mistake Reschedule time
-
The number of minutes into the future to schedule a mistake move. Defaults to 0.5 minutes (30 seconds). Note this doesn’t mean it will be automatically shown in 30 seconds, as there may be other items already scheduled before it, it simply means its due date will be 30 seconds from now.
- Initial Correct Scheduled time
-
The first time you get an item correct it will be scheduled this number of minutes into the future. The default value is 1440 minutes (1 day) into the future.
- Preview reschedule time
-
If a move triggered preview treatment (for example , you had got it wrong previously and had the preview wrong moves option on), then it will be scheduled more quickly into the future using the default setting of 1 minute. The reason being that a move shown in preview mode has basically given you the correct solution, so we don’t have any extra information on how well you know the move, placing it beyond the end of the already scheduled items gives the system a chance to check your memory further towards the end of the current session.
17.15.3. Advanced settings
- Consider leadup moves when training branch
-
If turned on, then when training a branch, context moves leading directly from the branch point up to the start position will be considered as training targets if they meet reinforcement or scheduling criteria. Currently off by default.
- Reinforce minimum correct
-
If we choose a move for training that has earlier context moves in the move list with less than the "Reinforce minimum correct" number of correct attempts in a row, then that move will be tested before testing the target move, even if it is not scheduled yet.
- Reinforce minimum days
-
This is similar to the 'Reinforce minimum correct' setting, in that if a move leading up to the target move is scheduled within 'Reinforce minimum days' number of days then the move will be tested before moving on to the target move. If you’d like the spaced repetition system to force you to play all context moves, then you can set either this number or the reinforce minimum correct number to a very large number which will trigger reinforcement on all leadup items. We don’t recommend this choice, as it will take much longer to learn your repertoire if you are forced to continually play moves you know well, but some users prefer this style of training, and it can be useful in smaller repertoires. Setting both the the values to 0 with disable reinforcement and only context moves that are due or about to be due will be used as training targets.
- Don’t show start moves threshold
-
When deciding how many context moves to show before the current target move, skip displaying any previous moves that have already been solved at least this number of times correct in a row.
- Move speed adjustment
-
Controls the speed at which context moves are played. 1.0 uses the default speed. Values under 1 speed up the piece movement, values over 1 slow it down. So for example 0.5 would make the speed twice as fast as the default value of 1.0, and 5.0 would make the speed 5 times as slow. Note that the base speed is also controlled by how well learnt a particular move may be, so very well learnt context moves will be played faster than less well learnt moves.
- Use fixed piece movement speed
-
By default, leadup context moves are played at a speed determined by how well you know the move, combined with the move speed adjustment setting. If you’d like a fixed amount of time for each move animation where the base speed is determined by the board settings piece movement speed instead of learning data, then turn this item on. The speed adjustment factor setting will still be used, but it will applied to the board settings for piece speed instead of the speed chosen by your learning history. NOTE: This does not change the speed of moves that match the "don’t show start move threshold" criteria, if you’d like all moves from the start position played at your preferred speed, you will also need to change that setting to a very large number in order to turn off start move skipping.
- Engine eval output style
-
By default engine evaluations for repertoire moves are output from the point of view of white, that is a positive evaluation is good for white (and bad for black), and a negative evaluation is bad for white (and good for black). It may be clearer in some contexts to view evaluations from the point of view of the repertoire colour, so for example in a black repertoire, positive evaluations are good for black, and negative evaluations are bad for black. If you’d prefer a repertoire colour based view, you can change the setting here from white based to repertoire colour based.
- Opening tree colouring method
-
The moves in the opening tree can be coloured using several metrics. The colouring methods are the same as those used in the opening sunburst visualisation, please see the sunburst colouring settings section for a more detailed description of the colouring options available.
- Explorer game threshold
-
When move colouring methods are used (for either the opening tree moves or the opening sunburst visualisation) that rely on opening explorer stats you can choose to set the minimum number of explorer games for a move to use the explorer colouring, if the threshold is not met then grey colouring will be used to indicate 'no explorer data available'. This option is useful in avoiding the use of colouring for moves that may have misleading colours applied due to their stats being sourced from a small sample of games.
17.16. Opening tree
The opening tree shows all the moves for the currently selected repertoire (or repertoires when a global repertoire like all white repertoires is selected). Clicking on any move will jump to that move on the board, with the moves required to lead to that position shown in the move list. You can start training moves below any position in the tree by clicking on a move and then clicking on the Train branch button.
Moves can be deleted by right clicking on any move in the tree and selecting the delete option. That move and all moves under it will be deleted. On mobile devices right click can be simulated by pressing and holding on the relevant move in the tree.
|
|
Note if you are deleting a line that other moves could have transposed into you will also be truncating those transposition lines as you will be removing the moves from the line they transposed into. If you want to delete a line holding transposed moves that you would like to preserve, then promote the truncated tranposing line first, and this will move the following moves into the promoted transposing line and out of the line you plan to delete. You can then delete the moves left in the demoted line (which will now be marked as the truncated transposing line) without losing the moves that are now attached to the newly promoted transposition destination line. |
Parts of the opening tree can also be disabled or enabled by right clicking on the move, and selecting the enable or disable line option. Disabling allows you to keep lines in your repertoire that will not be trained, and can be useful for example when you may want to list moves for your own colour that are poor, with comments explaining why the move should be avoided. You may also want to temporarily disable lines during training if you are not currently planning to play them, but may want to do so in the future.
Lines can be copied from one repertoire to another by again right clicking on the move to start the copy from, and then choosing the Copy line option. The destination repertoire will be prompted for after the option is selected, after the copy the line will exist in both the original and destination repertoires. When copying, it is the sub-tree under the selected move that will be copied. In addition, the moves from the selected move up to the root of the opening tree will also be copied to ensure the destination repertoire has a branch on which to attach the copied sub-tree.
17.17. Repertoire tree
The repertoire tree holds all your white and black repertoires, as well as the global repertoires such as the resistant repertoires. Clicking on the white or black repertoires folder will fill the opening tree with all moves from all repertoires of that colour, and allow you to train across all the repertoires.
If you’ve created any shortcuts, they will be displayed under their parent repertoires. Clicking on a shortcut will load the parent repertoire into the opening tree (if not already loaded) and jump to the shortcut position.
Each repertoire with positions currently in learning state will have either a number or time shown to the right of the repertoire name. A number indicates the current number of positions due for presentation via the spaced repetition algorithm. If none are due it will be a time until the earliest item is scheduled due.
Note that these scheduling stats are not updated dynamically so unless you visit the repertoire, the number may say Caro-Kann (7) for example, but 7 is the number scheduled when the page loads, so you may find when you click on the repertoire the number scheduled has grown if positions have moved into being scheduled since you loaded the page. Similarly, if it says Caro-Kann (20 minutes) to indicate the next item is due in 20 minutes , while the 20 minutes will dynamically update, when it gets to 'now' it will not change to 1 but rather start to show how long ago the most recent position was scheduled, e.g Caro-Kann (5 minutes ago).
Repertoires are currently sorted alphabetically, and we don’t have way of controlling the order, until we implement explicit ordering control, you can force an ordering by utilising the alphabetical ordering. For example by using numbers in repertoire names. "1. Repertoire 1" will sort before "2. Repertoire 2" or "AA Repertoire name" will appear before "BB Repertoire name". You can right click on a repertoire name in the repertoire tree to access rename and delete commands.
17.18. Repertoire shortcuts
With a large repertoire you may want to bookmark parts of the repertoire to allow you to quickly jump to sub sections with a single click rather than having to move through the tree or hunt for the move in the tree. Shortcuts allow you to create bookmarks for any position in the repertoire. To create a shortcut, use the add shortcut button in the action menu under the board. In the repertoire tree the shortcut will be added under the folder holding the currently selected repertoire. Clicking on the shortcut name will jump to the repertoire and position. To delete a shortcut right click on the shortcut name, and select the delete shortcut option.
If you’d like to organise a repertoire’s shortcuts into sub-folders, choose the name of the sub-folder to place the shortcut in when creating the shortcut. If a sub-folder name is not selected, the shortcut will be added directly under the repertoire in the repertoire tree. Currently you can’t reorganise shortcuts once created, so the only way to move a shortcut into a sub-folder is to delete the old shortcut and create it again using a sub-folder name. Shortcuts are currently sorted alphabetically, so if you want to control the order you need to do so via naming, for example 'A) Variation' will appear before 'B) Variation'. We hope to improve shortcut organisation capabilities in a future update.
17.19. Opening explorer
The opening explorer provides a view of the popularity and performance of moves in the current position. If you are considering adding a new move to the repertoire, it can be used as a guide to see what master level players are choosing to play in the position, and their success when playing each move. You can also turn on the option to show the most popular move in the explorer as an arrow on the main opening trainer board.
17.20. Candidate moves
The candidate moves list tells you which moves are available in the current position. Usually this panel is hidden during training, however you can choose to unhide it if you feel you need the hints. When outside training mode, you can use the candidate moves to traverse your repertoire. Clicking on a move will play that move. The up and down arrow keys will change the currently selected move, and the forward arrow will play the currently selected move. The currently selected move will default to the next move in the move list if you are currently traversing a move list. Moves in the candidate move list are labeled with the repertoire they come from. If you play a move that appears in a different repertoire from the one you have currently selected, that repertoire will become the current repertoire, and the opening tree view will be updated to reflect the change of repertoire.
17.21. Engine panel
For premium members, the engine panel provides a way of asking for an opinion from the engine on the current position. If you’d like to add the start move of a line shown by the engine to your current repertoire, click on the move and it will be added to the currently selected repertoire. The engine evaluation will be stored with the move, and will be available in any exported PGN. If you’d like to add an engine evaluation to moves not added from the engine analysis, you can do that via the 'E' key when the move to be assigned an evaluation is selected.
17.22. Annotations
If you press the 'a' key or launch the annotation window from the move list blue action menu , the annotation panel will load , allowing you to add annotation symbols to moves such as '!', '?', '+=' etc. Like engine move evaluations , these are permanently stored and available in any PGN exports.
17.23. Comments
Comments can be made on either the move or position level. A move comment should be specific to the move just made, whereas a position comment applies to the current position, and is not necessarily tied to a particular move (although it may mention one or more moves in the position).
You can choose to have your comment public or private. If you are making comments from a book you own, and are copying the analysis thoughts of the book author in a way which would be considered plagiarism, please keep the comment private.
The comments for the opening trainer are displayed in a slightly different way to the comments on other parts of the site. Instead of always ordering the comments in chronological order, the system chooses what it believes to be the best comment, and then displays the other comments in chronological order after that. Any comment you’ve made yourself will be considered to be the 'best' comment when you are reading comments, if you have not commented on a position then the system chooses the comment with the highest vote sum. If a tie break is required, then the comment makers with the highest problem rating (in any problem solving mode) is chosen.
Due to the above ranking method, comment voting in opening training should be approached in a slightly different manner to problem comments. Because we want the most useful comment to be at the top, if you see a comment that you believe is better than the best comment , even if you think the best comment is ok, then you should down vote the current best comment, and up vote the comment that you believe to be better.
If you’d like to see the current 'best' comment quickly without opening the comments panel, you can do so by pressing the 'c' key which will show a pop-up panel with the best comment. Press 'c' again to quickly hide the panel.
There is also an option to show your own comments in a separate panel below the move list which you can turn on in your settings (by default your own comments will be shown while viewing moves in non-training mode).
17.23.1. Comment boards
To embed a board into a comment , first launch the analysis board (magnifying glass icon under the move list). You can then enter moves, and add any analysis you’d like. Once done , click on the menu expander in the top left of the analysis board panel and choose one of the copy to comment options. 'Copy to comment' copies the entire analysis board analysis to a comment, 'Copy move to comment' copies only the current position, and 'Copy selection to comment' copies the moves from the analysis that you’ve highlighted for selection with the mouse.
You can add arrow and square highlight annotations by right clicking on the board squares (square highlighting) or right clicking and dragging. Combinations of Ctrl and Shift keys change the colour of the highlighting, so right click without keys draws Green, Ctrl-Right-Click = Yellow, Shift-Right-Click = Red and Ctrl-Shift-Right-Click gives Blue. If you move away from the current position (or click on the board with anything but a right click), any annotations will be reset. If you’ve made annotations you want to save before moving to the next move, press the 's' key before moving on. NOTE: If you want arrows to appear on the main board instead of a comment board, then you can perform the above procedure on the main opening trainer board instead of in the analysis board comment editor.
Once you’ve copied your analysis to the comment, you can add further text to the comment and then submit the comment once finished.
17.24. Other actions
17.24.1. Import PGN
This option allows to add moves from a PGN file into an existing repertoire. Select the repertoire to import the PGN into before selecting this action.
17.24.2. Export repertoire
Repertoires can be exported as PGN via the export option from the actions menu (the blue menu under the board).
You can choose to export the current repertoire, all white repertoires, all black repertoires, or all repertoires of both colours. When outputting more than one repertoire, each repertoire is output as a separate game in the PGN file.
By default any comments you have made yourself (or were imported when importing a repertoire from PGN) will be exported to the PGN file. You can disable comment export in the export panel.
We strongly encourage regularly backup[s of your repertoire via PGN export if you are using Chesstempo as the main method of editing the repertoire, as this will provide a backup you can use if you accidentally delete you repertoire.
17.24.3. Reset training
The reset option of the actions menu resets all the learning data from the current repertoire. This will reset both the stats and the spaced repetition back to a default state, and all items will be listed as 'unseen' once a reset has occurred. If you’d like to only reset the review order in the review in order training mode then use the Reset Review Order button which will leave spaced repetition learning data in tact, and only reset the review to the beginning.
|
|
Resetting training in a repertoire that shares positions with other repertoires will also reset the training data for the shared positions as all learning data for a position is shared across all repertoires the position may appear in. |
17.25. Graphs and Statistics
To access the graphs click on the blue action menu under the board and select either the global stats or repertoire stats option.
17.25.1. Global stats
Global stats shows statistics across all repertoires, either single values aggregated across all the repertoires or a list of all repertoires comparing performance on each repertoire.
Available graphs:
- History
-
Shows how the total number of moves in Learning, Learnt and Uncertain status change over time. Learning is the state moves are in that have been scheduled via spaced repetition at least once, but are not yet known well enough to be deemed Learnt. Once a move has been correct several times in a row, it moves to Learnt status. If an incorrect attempt is made, it will revert back to "Learning" status. Uncertain status is for moves that were Learnt , and have been scheduled some time ago for review, but are not yet reviewed. Their status is uncertain until the review occurs, at which point a correct answer will place them back in "Learnt", and an incorrect answer move them back into "Learning".
17.25.2. Repertoire stats
The repertoire stats drill down into the currently selected repertoire to show repertoire specific stats.
Available graphs:
- Scheduled
-
Shows how many items are already due, and how many are scheduled Today, in the next week, month, year and beyond a year.
- Sequences
-
Two graphs that shows how many moves have been correct or incorrect in a row 1 time, 2 times, 3 times etc. A third graph shows a histogram of the number of moves have been played 1 time, 2 times, 3 times etc.
18. Guess The Move
Guess The Move is a training feature which allows you to play through master games, and get a rating based on how well you go. You are assessed based on how often you match the master move, and engine evaluations are used to assess moves that differ from the master’s choice.
18.1. Move Score Display
The move score is shown after each move you make, and is displayed above the move list. Moves are scored from 0-12, with 10 being a move that matches the master move, and 0 being a potentially game losing blunder. A bonus score of up to 2 is given when you play a move that is considerably better than the move played by the master. If you played a move that matched a relatively main line opening move, you are also given the same score that you would have been, had you played the master move, irrespective of whether the master played the same opening move. See the Score Calculation section for more details on how the score is calculated.
In addition to the score, you are told the engine evaluation for your move, the master move, and the move the engine considered the best move if it is different to the master move or the move you played. The best engine move itself is not shown if it is different from the played or master moves , as often the best move can remain the best move for several moves in a row, and providing the actual engine move would provide unwarranted hints, hence only the evaluation is shown.
The score from 0-12 is fed into a rating calculation (using the glicko rating system) which takes into account the rating of the current position, and your current rating to calculate a rating adjustment. If you are playing a game in unrated mode, the rating adjustments will be zero, however the rating adjustment that would have been made in rated mode is shown in square brackets e.g. User: 1830.2 (0 [+4.1]) indicates your rating adjustment was 0, but if solving in rated mode it would have gone up 4.1 points.
Rating each position in a game provides the advantage of being able to produce a user rating based not only on the matchup rate of your moves, but also factors in how easy it was to find those moves. A system which only scores based on comparison to the master or best engine move ends up giving the same result for playing the master move in a simple obvious retake as it would in a move requiring long calculation, or subtle positional evaluation.
A consequence of the rating system is that easy positions (compared to your current rating) will require a better move to gain rating points compared to a harder position. For example, playing a move that scores 5 on a very easy position that is well below your rating may lead to a rating point loss, but may be enough to gain rating points on a much harder problem. One way of interpreting the score and the impact on the rating outcome is that a 0 score is equivalent to a rating outcome that would arise if you lost a game, 10 leads to a rating adjustment equivalent to winning a game, and 5 is equivalent to drawing a game. A score of 10 will always gain at least some points, no matter how easy the position is. However, as mentioned in the previous example, whether you gain or lose points with scores below 10 will depend on how the position rating compares to your own rating.
18.2. Score Calculation
The score given for a particular move depends on a number of factors:
-
Matching the master move will score 10 points as long as the master move was not deemed a blunder. What is considered a blunder will depend on the specifics of the situation, for example missing a mate in 10, and playing a mate in 5 would not be considered a blunder. Similarly, being up considerable material and playing a move that is only a pawn worse than the best move would not be considered a blunder, whereas playing a move that is a pawn worse than the best move in an even position could be considered a blunder.
-
When in the opening, a move which did not match the master move , but matched a relatively main line opening move (as decided by opening explorer statistics) would also receive a score of 10 (the same as playing the master move).
-
Moves which the engine thinks are significantly better than the master move receive up to a two point bonus, giving a maximum score of up to 12 points.
-
Moves which match neither a common opening move or the master move (or the master move was a blunder), are scored based on exmaning engine evaluations of the move you played , the best move available, and the move the master played. For example missing the master move in a position where your move is only deemed half a pawn worse than the master move in a position where you are still clearly winning would be given a higher score than playing the same move in an even position where a half pawn positional advantage might be an important factor.
18.3. Progressive Scoring
The progressive scoring display to the left of the board shows a list of statisticss showing your progress on the current game, the following stats are followed:
- Rating Change
-
The total rating change so far during the game.
- Engine Matches
-
The number of moves which matched the best engine move.
- Master Matches
-
The number of moves which matched the master move.
- Moves Played
-
The total number of moves played so far.
- Turned Win To Loss
-
The number and percentage of moves which turned a winning position into a losing position, and the total number of moves that the position in the game was considered winning.
- Turned Win To Even
-
The number and percentage of moves which turned a winning position into an even position, and the total number of moves that the position in the game was considered winning.
- Turned Even To Loss
-
The number and percentage of moves which turned an even position into a losing position, and the total number of moves that the position in the game was considered even.
- Total Time
-
The total amount of time used in all moves up to the current move.
- Average Score
-
The average of per move scores for the game so far.
18.4. Commenting and Tagging
Guess the move supports per move comments and tags. As you move around in the game, the current move and move number is shown in the position comment/tag section title, and any comment or tag made or viewed will be relevant to the current move. You can also make general comments/tags that are relevant to the entire game by jumping to the start of the game, before the first move is played, and the comment/tag title bar changes to "Entire Game", at which point comments/tags made or viewed are referring to the entire game rather than a particular move.
In addition to the per move position comment view, there is also an "All Comments" view which is a covenient way of reading over all comments made on a game. You can jump to any position in the "All Comments" view by clicking on the move header for the relevant move. The "All Comments" view also allows adding an additional comment to already commented moves.
18.5. Game Selector
The game selector is shown when the GTM page is loaded. It allows you to choose to start playing a new game, resume a game in progress, or replay an already played game. The replay button is shown next to games you’ve played before, and allows you to choose between replaying the game in unrated mode, or reviewing your most recent attempt on the game. Once you’ve selected a game for play or review, the game selector is hidden, and can only be accessed again by either reloading the page , or reaching the end of the game, and clicking on the 'Select Game' button shown under the board.
The game selector also shows some statistics related to the problem, such as the average move score you achieved last time you played the game (in brackets next to the ast date played column), and the current rating of the problem (which is an average of the rating of all of the positions in the game).
18.6. Review Mode
Review Mode allows you to look through the game, viewing the engine lines for your move, the master move and - where it differs from the master and played moves - the best engine move. As you move through the move list, you are also shown the scoring details for each move. Review mode is automatically entered after you reach the end of a game, or you can enter review mode by clicking 'replay' next to a previously played game, and choosing 'review' when asked to choose being replaying unrated, or reviewing the previous game.
In the review mode move list , a move you played is marked as "PLAYED", a move the master played is marked with "MASTER" and the best engine move is marked as "ENGINE". So for example a move that you played, that was also the master move AND the best engine move will be labeled "MASTER/PLAYED/ENGINE". For the moves that you played, they will also be coloured based on the score, good moves are green, bad moves red, and moves in between the two as khaki.
18.7. Variation Hiding/Folding
The variation folding and hiding buttons below the move list allows for some of the detail to be hidden in order to provide a more compact move list. The plus or minus expanders can be used to manually open and close the variation lines when folding is turned on. Please see the PGN Viewer Key Bindings section for more details on controlling the folding and traversing the move list via the keyboard.
18.8. Skipping The Opening
When a game is first loaded, you can choose to skip playing the opening part of the game by clicking the 'Skip Opening' button shown under the board. This is only an option before you have played a move, and the button is hidden once the first move is played. The opening skip is based on the opening explorer stats, and jumps to a point where the total number of games in the position is relatively low.
18.9. Engine Analysis
When in review mode, the UCI engine can be started by clicking on the 'Start Engine' button shown under the move list. This allows you to use your own engine running on your local machine to further analyse any position in the game.
19. PGN Viewer
The PGN viewer can be accessed on the PGN viewer page.
19.1. Feature Summary
- Figurine Notation
-
By default, the PGN Viewer will show the pieces as graphical figures instead of piece letters.
- Resizable board
-
The board can be resized by dragging on the resize handles to the right of the board.
- Board Preferences
-
The Viewer has a settings button in the top left which allows board preferences to be set, these will be remembered in a browser cookie for when you next return to using the viewer.
- Move entry
-
The viewer can be used to enter your own list of moves by moving the pieces, or to add or investigate side variations to an existing game.
- View the game in the Chesstempo Opening Explorer
-
The PGN Viewer includes a button which loads the current game into the Chesstempo database page where you can explore the opening, or find other games which match positions in the current game.
- Show/Download PGN
-
The Show PGN button allows you to see the source PGN of the game, and to download the PGN to your machine, this is especially useful if you have been annotating a game, and wish to save the results.
- Arrows and Square highlighting
-
Using arrows or square colouring to highlight particular aspects of a game is supported with special PGN comments. These are covered in more detail below.
- Mini-board comment Support
-
Move comments can include a '#' symbol which will embed a board showing the current state of the board into the move comment.
- Variation folding
-
Variations can be hidden and expanded by the user, this often helps makes complicated games with lots of variations much more readable.
- Annotation Window
-
The annotation window allows you to add or edit comments on the game you are viewing. It can also be used to add Annotation Symbols such as !, ? etc to moves or positions. The annotation window is also used to turn folding on and off, and to perform variation manipulations such as promoting or deleting variations.
- Keyboard bindings
-
The viewer supports a large range of keyboard bindings, that allow for rapid annotation of games using only the keyboard, without the need for mouse interactions for most operations.
19.2. Keyboard Bindings
- ESC key
-
Escape from a text entry field, useful in annotation window when wanting to complete editing and move around the move list with the arrow keys.
- Left/Right arrow
-
Move back and forward in the move list.
- Home/End keys
-
Jump to start/end of the move list
- Up/Down keys
-
Move through variations on a move. If you are in a variation, or have the parent move of a variation selected, you can cycle through the variations by using the up/down arrow keys.
- a
-
Bring up the annotation window, with the current move selected for annotation.
- A
-
Same as the 'a' key, brings up the annotation window, but with the comment entry set to add a comment BEFORE the current move.
- c
-
Focus on comment entry area. When the annotation window is open, the 'c' key focuses on the comment text entry, if you are moving through the move list with the arrow keys, commenting on a lot of moves, you can use the 'c' key in combination with the ESC key and arrow keys to avoid having to use the mouse during game annotation.
- s
-
Saves and closes the annotation window (in reality this is mostly just a close, as annotation window changes are automatically saved almost immediately after any edits).
- ! and ?
-
These toggle the good move and bad move glyphs on a move, for example if you start with 1.e4 and press '!' once, it changes to '1.e4!', if you press it again it changes to '1.e4!!', and one more press resets it back to '1.e4'.
- f
-
Toggles folding on the current variation, if folding was previously not turned off, it will be turned on.
- F
-
toggles 'fold all/unfold all' variations.
- t
-
Traverse all moves in the move list from the current move onwards. This will allow you to visit every move in every variation in the game from the current position. In other words it will visit all moves in all variations by traversing the entire game tree, it will visit all variations and sub-variations of the current move before moving on to the next one. The traversal is relative to the starting move, so if you start within a variation it will only traverse the following moves in that variation. To traverse every move in the game, start traversing from the first move. Each time you press the 't' key, you traverse to the next move in the traverse. This can also be used as a primitive temporary bookmarking system, as once you have first pressed 't' , you can click around the move list (or move around using the arrow keys), and pressing 't' again will jump you back to the next move after the last one you visited with the last 't' press.
- T
-
Start new traversal. If you’ve already used the 't' key, and want to start traversing from a new location, use the 'T' key.
- p
-
Promote the current variation one level, this will make the current variation the parent variation, and the previous parent, the child variation. If you are promoting a variation directly off the main line, the promoted variation will become the main line, and the old main line will become a variation of the new main line.
- d
-
Delete line to end. Deletes all moves from the current move onwards. Choosing the first move in the main line will delete all moves in the game, choosing the first move in a variation will delete that variation (and any sub-variation).
19.3. Comment Markup Annotations
The PGN viewer supports some special markup that allows arrows, square highlighting , mini-board insertion and figurine notation to be rendered on the board or move list.
19.3.1. Arrows
` [%cal Gc2c3,Rc3d4] `
This comment draws a Green arrow from c2 to c3 and a Red arrow from c3 to d4.
19.3.2. Square Colouring
` [%csl Ra3,Ga4] `
This comment highlights the a3 square in red and the a4 square in green.
19.3.3. Mini Boards
` [%cal Gc2c3] # `
The '#' places a mini board in the move list for the current position.
19.3.4. Figurines in comment text
You can embed figurine notation into PGN comments by using the capitalised piece letters with a leading blackslash, so: \K, \Q, \R , \B, \N, \P will output figurine notation in a comment for King, Queen, Rook, Bishop, Knight and Pawn.
19.4. Variation Folding
Variation folding allows side variations to be expanded and collapsed. Folding can make it easier to concentrate on the main line or important side lines when a game is annotated with many side variations. Folding is turned on in the annotation window, or can be turned on by using the 'f' or 'F' key (fold/unfold current variation or fold all/unfold all variation keys). Once on, you can click on the variation toggle button in front of each variation to open and close any particular variation (or use the 'f' key to toggle the variation fold when inside a variation).
19.5. Annotation Window
The viewer annotation window allows the manipulation of comments, annotation symbols and side variations. It can be opened by using the 'a' or 'A' keys, or by clicking the annotation button beneath the board.
19.6. Using the PGN Viewer on your own site
If you’d like to display games on your own website, you can include a few HTML snippets in your page to allow you to load the viewer on external web sites.
|
|
The Chess Tempo PGN Viewer is licensed under a Creative Commons License. You are able to use the viewer for free on your non-commercial web site(s) on the condition that you place a visible link to https://chesstempo.com on the page(s) where you are using the viewer. If you’d like permission to use the viewer on your commercial website, please contact Chesstempo admin. |
19.6.1. Basic Usage
To use the PGN Viewer on your own site add the following HTML tags to the <head> section of your HTML page:
<link href="https://c2a.chesstempo.com/pgnviewer/v2.5/pgnviewerext.vers1.css" media="all" rel="stylesheet" crossorigin>
<script defer language="javascript" src="https://c1a.chesstempo.com/pgnviewer/v2.5/pgnviewerext.bundle.vers1.js" crossorigin></script>

<link
href="https://c1a.chesstempo.com/fonts/MaterialIcons-Regular.woff2"
rel="stylesheet" crossorigin>
If you would also like figurine notation please add:
<link href="https://c1a.chesstempo.com/fonts/chessalphanew-webfont.woff" media="all" rel="stylesheet" crossorigin>To create an instance of the viewer add the following tag inside your HTML body to create a viewer from PGN:
<ct-pgn-viewer>
PGN HERE
</ct-pgn-viewer>
To load the PGN from a URL instead of inside the ct-pgn-viewer tag use:
<ct-pgn-viewer has-url="true">
URL TO PGN HERE
</ct-pgn-viewer>
Layout can be tweaked in various ways by overriding the CSS used by the viewer. For example:
-
Set move list height
ct-pgn-viewer.ct-pgn-viewer move-list .ct-move-list-container {
  height:350px;
}
19.6.2. PGN Viewer configuration options
The PGN viewer has a wide range of configuration options that are controlled via attributes on the ct-pgn-viewer tag.
For example to set the piece style to merida use the following form:
<ct-pgn-viewer board-pieceStyle="merida">
1. d4
</ct-pgn-viewer>
For configuration options with boolean types, and default values of false, you can change the value to true by using option_name="true".
|
|
option_name="false" should not be used for Boolean options with default values of false. If you want to use the default value of false, don’t list the option as one of the ct-pgn-viewer tag attributes. |
|
|
The option names themselves are case insensitive, but it is important for options with String values that the case is used exactly as described in the table below, as "Merida" will not be the same as "merida", if in doubt, use lower case, as currently all string option values have lower case values only. |
| Name | Type | Default | Description |
|---|---|---|---|
move-list-folding |
Boolean |
false |
Sets whether variation folding (collapsible/expandable variations) is turned on in the move list. |
move-list-resizable |
Boolean |
false |
Sets whether the move list has a vertical height resize handle. |
move-list-useFigurineNotation |
Boolean |
false |
Enables figurine notation for moves in the move list (i.e. piece images used for King,Queen,Rook,Bishop,Knight). |
move-list-moveListStyle |
String |
indented |
Set the move list layout style, either 'indented' or 'twocolumn'. |
move-list-fontSize |
Number |
Defined in CSS |
Explicitly set the move list font size. This number is in pixels and does not include the unit type, so 20px font size would be set with 20 as the attribute value. |
move-list-autoplaySpeed |
Number |
1000 |
The delay between moves when using auto play. The delay is in milliseconds. |
move-list-ignore-comments |
Boolean |
false |
If enabled, do not display any comments that are available in the PGN. |
board-enable-markers |
Boolean |
false |
If visual markers such as arrows, square highlights etc are defined in the PGN, then display them. |
board-marks |
String |
Unset |
Allows you to set arrows, and square highlights for the board without needing a PGN string with marker comments. See the PGN viewer comment annotations section for more details on the format of the marker string. You can have more than one annotation in the board-marks value, separated by spaces. |
board-allowdrawing |
Boolean |
false |
Allow right click to draw arrows and highlight squares. |
board-coords-style |
String |
four-sides |
Set the style of the board coordinates. Options are four-sides, left-bottom, internal and none. |
board-resizable |
Boolean |
false |
Enables board resizing |
board-disablePieceMovement |
Boolean |
false |
Do not allow users to move the pieces on the board. |
board-fen |
String |
Unset |
Set the board into the position defined in the provided FEN string. |
board-never-active |
Boolean |
false |
Board never takes active keyboard focus, so will not respond to the usual key combination such as arrow keys etc. |
board-dont-start-active |
Boolean |
false |
By default each pgn viewer starts in active keyboard focus mode, this setting disables that, requiring the user to move over the viewer with the mouse before the viewer will respond to key presses. |
board-highlight-move-arrow |
Boolean |
false |
Highlight the last move made using an arrow. |
board-highlight-move-square-colour |
Boolean |
false |
Highlight the last move made by highlighting the source and destination squares with colour. |
board-pieceStyle |
String |
merida-gradient |
Piece style to use. Available piece styles are:merida-gradient, merida, goodcomp-gradient, goodcomp, alpha, blindfold1, blindfold2, blindfold3, blindfold4, case, eyes, fantasy, kingdom, kosal, leipzig, maya, skulls, spatial and wiki. |
board-boardStyle |
String |
blue-gradient |
Board style to use. Available board styles are:blue-gradient, blue, brown-cream, brown,cadet-grey-gradient,camouflage,cracked-stone,fabric, gold-silver,granite,grass,green-plasma,green-white,green,grey-diagonals, grey-gradient,grey,leather,light-grey,marble-brown,marble-green,metal, sand-snow,stucco,teal-gradient,white-grey,wood-dark,wood-dark2,wood-light,wood-medium and wood-pine. |
board-pieceMovementSpeed |
Number |
150 |
The speed of the piece movement animation in milliseconds. |
board-disable-sound |
Boolean |
false |
Disable piece movement sounds. |
board-coordsSize |
String |
medium |
Size of the board coordinate lettering. Options are tiny, small, medium, large, very-large |
board-confirmMoves |
Boolean |
false |
Turns on move confirmation for moves made on the board by the user. |
board-dragAndDrop |
Boolean |
true |
Enable (or disable) drag and drop piece movement. |
board-clickAndClick |
Boolean |
true |
Enable (or disable) click-click piece movement. |
board-actions-menu-direction |
String |
rotary |
The direction in which the board action options expand, options are right,left,up,down,under,grid-above,brid-below and rotary |
board-size |
String |
auto |
Set board size, can be either auto or a CSS size such as "400px" |
board-auto-height |
Boolean |
false |
Set the viewer board height to auto and the width to the value in board-size (when board-size is set to anything but auto) |
gameSelectFormatString |
String |
{White} vs {Black} {Result} |
Set the format of game labels used in the game selector when multiple games are available. Any of the PGN tags can be used in the string by enclosing them in {}. |
has-url |
Boolean |
false |
If set to true assumes the body of the ct-pgn-viewer tag is a URL to load a PGN file from rather than the PGN text itself. |
flip |
Boolean |
false |
If true, the board will be shown with black pieces on the bottom. |
color-to-bottom |
Boolean |
white |
Sets default orientation of board so that the specified colour is on the bottom, options are white or black |
use-game-header |
Boolean |
false |
Enables showing the game details header above the move list. |
buttons-above-moves |
Boolean |
false |
By default the move list buttons are shown below the move list, this changes the position to above the move list. |
move-list-position |
String |
right |
Location of the move list relative to the board. Options are right or under. |
19.6.3. Theming
In addition to the board and piece styles that can be configured using the options mentioned in the previous section (or by users via the board settings menu), there are also colour themes that can be set for the viewer UI elements. These are configured by adding a CSS class to to the ct-pgn-viewer tag , for example <ct-pgn-viewer class="ct-theme-light"></ct-pgn-viewer>
Currently ct-theme-light and ct-theme-dark are the only supported themes, but any of the UI styles can be overidden via CSS styling if required.
19.6.4. PGN Viewer translations
By default the PGN viewer interface is provided in English, if you’d like to use one of the translated languages we support add the following to your html page:
<script src="https://c1a.chesstempo.com/translations/fr_FR-pgnviewer.vers1259.json"></script>and replace fr_FR with the country code for the language you want to use. Please make sure this script loads before the PGN viewer javascript.
| Language | Language code |
|---|---|
Italian |
it_IT |
French |
fr_FR |
Portuguese |
pt_BR |
Spanish |
es_ES |
German |
de_DE |
Polish |
pl_PL |
Russian |
ru_RU |
Dutch |
nl_NL |
Greek |
el_GR |
Swedish |
sv_SE |
Turkish |
tr_TR |
The latter 4 are not completely up to date, and may have some translations missing, if you’d like to help out with updating any translation please contact Chesstempo admin.
19.6.5. Per user persistent board and move list settings
By default the PGN viewer setting changes made by users via the board settings panel (such as piece and board styles) will not be saved. if you wish to have people browsing your site control board settings, you need to add the following attributes to the ct-pgn-viewer tag to set the name used to save and restore these settings: - move-list-persistId board-persistId e.g <ct-pgn-viewer move-list-persistId="pgnCookie" board-persistId="pgnCookie">
If you’d like all viewers on your site to share settings then use the same persistIds across all boards, but if you’d like users to be able to have different settings on different boards, then you can use a different persistId for each board.
Appendix A: Problem Comment Guidelines
Chesstempo’s problem comments are a strength of the site and there is a large range of very interesting and helpful comments. To ensure the problem comments are as useful as possible I’m providing the following guidelines for writing comments, comments not meeting these guidelines (especially those deemed to be offensive or insulting) may be deleted.
Before adding a comment consider if other users will be interested in reading that comment. For example, while hearing about your thought processes during the problem is an interesting and useful comment, simply stating how long you took to solve the problem without any other details is not particularly interesting. Similarly "I got this one right." is not that useful by itself and neither is a comment consisting of single words such as "easy" or "hard". Marking personal milestones is ok, for example, "I got this one right and it was one of the hardest problems I’ve solved." is acceptable. "I got this one right, but struggled for a while on move 3 due to not noticing move X" is also fine.
Be polite at all times. Don’t insult other users when writing comments. There are various forms of this, "You’d have to be a fool to get this one wrong." is one example. A more direct example is, "I read your analysis in the previous comment, and you are a fool!". People make mistakes in their analysis , it is why they are training, it is ok (and highly encouraged) to point out the mistakes, but please do so politely. Remember other users of the site cover a wide range of abilities, insulting someone because they didn’t understand something is not only rude, but will likely discourage them from further training. Users insulting others or being generally rude may have their commenting rights removed.
Don’t use language that could be seen as offensive in the comments. Different people have different levels of tolerance of "bad" language, what one person might find acceptable, another may not, please keep that in mind. Furthermore there are children using the system, and parents should be able to feel comfortable that their children can use the site without being exposed to inappropriate language. If you see a comment you find offensive please contact me immediately. Users using offensive language may have their commenting rights removed.
Remember that the problems are computer checked. If you think you’ve found a refutation for the "best move" then you almost certainly haven’t. If you think you’ve found a move that takes a lot more material or wins more quickly than the best move it is possible , but unlikely. If you’ve think you’ve found a move that might win that was marked wrong and you think it should be an alternative then this is more possible, but is still often the result of an analysis error. In the above situations (especially the first two) it is strongly recommended that you check your idea with a chess engine before posting in the comments. Human analysis is still very welcome (and sometimes very necessary for situations the engine doesn’t deal with well), but a quick check with an engine can avoid embarrassing comments like, "1.f6 is mate, but I lost points!" when in fact 1.f6 was mate for your opponent :-) Comments containing accurate and detailed analysis are amongst the most useful in the system.
If you do find a problem you believe is "wrong" (the best move is not best or a winning line leads to a failure instead of a "try again") AND you have performed an engine analysis which supports you, then you might want to report this in the Forum "Chess Problems" area where it’s more likely to receive timely action. (Put the problem number in the Subject line. In the body of your post, explain the situation and include concrete variations.)
Following on from the last guideline, it is ok to say "I don’t see why 1.f6 doesn’t/does work, can someone explain." as sometimes the point of a problem can be unclear. However it would be ideal if you checked the position yourself before posting, that way you can help others out with a "I tried 1.f6 , but it didn’t work due to 2..Be4+" comment. You can be certain that if you have a question about the position others also do, for that reason if you don’t have time to do the engine analysis yourself, I’d still prefer if you posted the "Why doesn’t 1.f6 work" question as someone else can answer it, helping not just you but others who have the same question.
When posting analysis or move descriptions, please include move numbers to avoid confusion, this makes it much easier for people who want to reply to your comment. Where possible it is probably best if you can use algebraic notation with English piece designations as it will be understood by the widest number of people. For further details see the Wikipedia Algebraic Chess Notation article.
If all you want to point out is that the problem employs a fork, discovery, back rank mate, etc. then use the "Vote For Tag" button to the left of the board.
Read all previous comments before starting work on yours, sometimes the point you want to make may have already been made by a previous comment.
Criticism of the problems is encouraged, but if you want to post "this problem is terrible", then please say what you thought was wrong with it , e.g. "this problem is terrible, there was only one legal move!" or "this problem is terrible, I played 1.f6 and was marked wrong but it looks like it wins due to the following line 1..x etc" are both ok. A constant stream of "this problem sucks" with no other details provided will likely get your commenting privileges removed (especially if you’re almost always wrong - bad problems exist, but bad analysis is much more common).
If you see comments that don’t meet the above guidelines they should be voted down. If you see a question being asked that was already answered in a previous comment, then these should also be voted down. Problem comments which ask for clarification on a move/line are fine, but mistaken claims like '1.Nf7 is mate in 2, but I was marked wrong' when in fact 1.Nf7 is not mate and lead to a losing position should also be voted down. However when voting down these types of comments, it would be useful if you added a new comment explaining why 1.Nf7 did not mate (without referring directly to the original voted down comment), for example 'Some people are playing 1.Nf7 here, assuming it mates, however it does not mate due to 1…Bxf2+ etc'. Sometimes you will see existing comments of this type that have already had replies, in that case if the reply makes reference to the original mistaken comment, the original comment should not be voted down if it makes the reply difficult to understand without the context of the original comment.
If you find a comment particularly useful or interesting, you can vote the comment up. This will help protect good comments (and commentors) from inappropriate down votes, but it will also make it possible to eventually provide a view of comments which sorts comments by quality.
The last guideline is not to let yourself feel too hemmed in by the rules! Don’t be afraid to write a long comment, contradict a previous comment, or simply express a contrasting point of view. Whatever you’ve wondered, someone else has probably wondered too and you’re performing a public service. Your voice deserves to be heard and your opinion matters as much as anyone else’s.